bootmod3 Map Editor has been entirely overhauled during the past few months along with many changes both server side and inside the OBD Agent to support the advanced editing features now available.
We have extensively used it on and off dyno and and a number of really great tuners have provided input throughout our recent tuner beta to make things as efficient as possible for them and their customers when tuning remote and in-person on-dyno vehicles.
Map Editor is an advanced tool for custom tuners looking to review/build custom calibrations for end users. In order to use the editor, user needs to use to Tuners screen and fill out their Tuning Profile details including Name, Contact Email for Tune Requests (defaults to login username email if not filled out). There is no additional cost in using the bootmod3 Map Editor to build any custom tune. Becoming an Authorized Tuner or Tuner Shop requires an email to be sent to bootmod3 Tech Support (support@protuningfreaks.com) where one of our calibration staff review current/past tuning skills and software used after which tuner account authorization is performed. Tuning support with the bootmod3 Map Editor is provided to all Authorized Tuners actively using the editor in their day to day tasks. Our staff is there to assist with any questions on DME logic that may not be clear, to add any additional RAM channels not currently available for datalogging, any new tuning tables, ROM versions, features, etc.
As part of our CustomROM release you’ll see we’ve moved tuning for all S55 vehicles towards CustomROM enabling all the features in them for all S55 vehicles in the system minimizing software variance when tuning, while leaving the option to users to flash back to their actual stock software at any time.
Table counts have grown from a few hundred to thousands of tables in all ROMs (software versions) for any car supported by bootmod3. CustomROM on the S55 for instance has just ~4800 tables, renamed according to their functional purpose with descriptions and functionally related tables linked in for editing.
For Tuning Tables available and general approach to custom tuning these features refer to this document:
4800+ tuning tables available on S55, 4300+ tables on N55-EWG and 4800+ tables on N55-M2 CustomROM (1000s for other vehicle models) for tuning between CORE and RELATED tables on each ROM version
Thousands of tables available for any existing non-CustomROM maps
Table categorization done by splitting tables into two main categories: CORE and RELATED
CORE tables represent tables most frequently used throughout tuning lifecycle
RELATED tables represent functionally related tables as per research on DME logic and A2L functions
Tables Tree showing all Core tables with Related tables underneath for ease of research/browsing
Integrated Table Descriptions for all Core tables
Descriptions are interactive. When other tables are referenced in the description text they can be clicked on and tables opened for review/edit/compare/import from version history
Related Tables tab on any open Core table shows all functionally related tables
Related tables tab is interactive. Any related tables shown can be clicked through and opened for review/edit/compare/import from version history
Integrated Version History at Map and Table levels - Compare or restore with any prior saved map version by importing a complete map or checking version history at the individual table level
Integrated Datalogs for Tune Requests and Self-Tuning
Integrated Live Dash for monitoring and logging
Dash remains hidden on the right of the screen until opened for use
Datalogs accessible through Datalogs Tab after logging with the integrated dash without leaving the editor
Without leaving editor and while dash is running, easily toggle between Metric, Imperial units and relative/absolute pressure unit representation
In cases vehicle connection changes from one vehicle to another, the available channels listing updates with new channels appropriate for the connected vehicle
Logs captured are automatically uploaded to the end-users account and made available on the Tune Request’s Datalogs tab for review
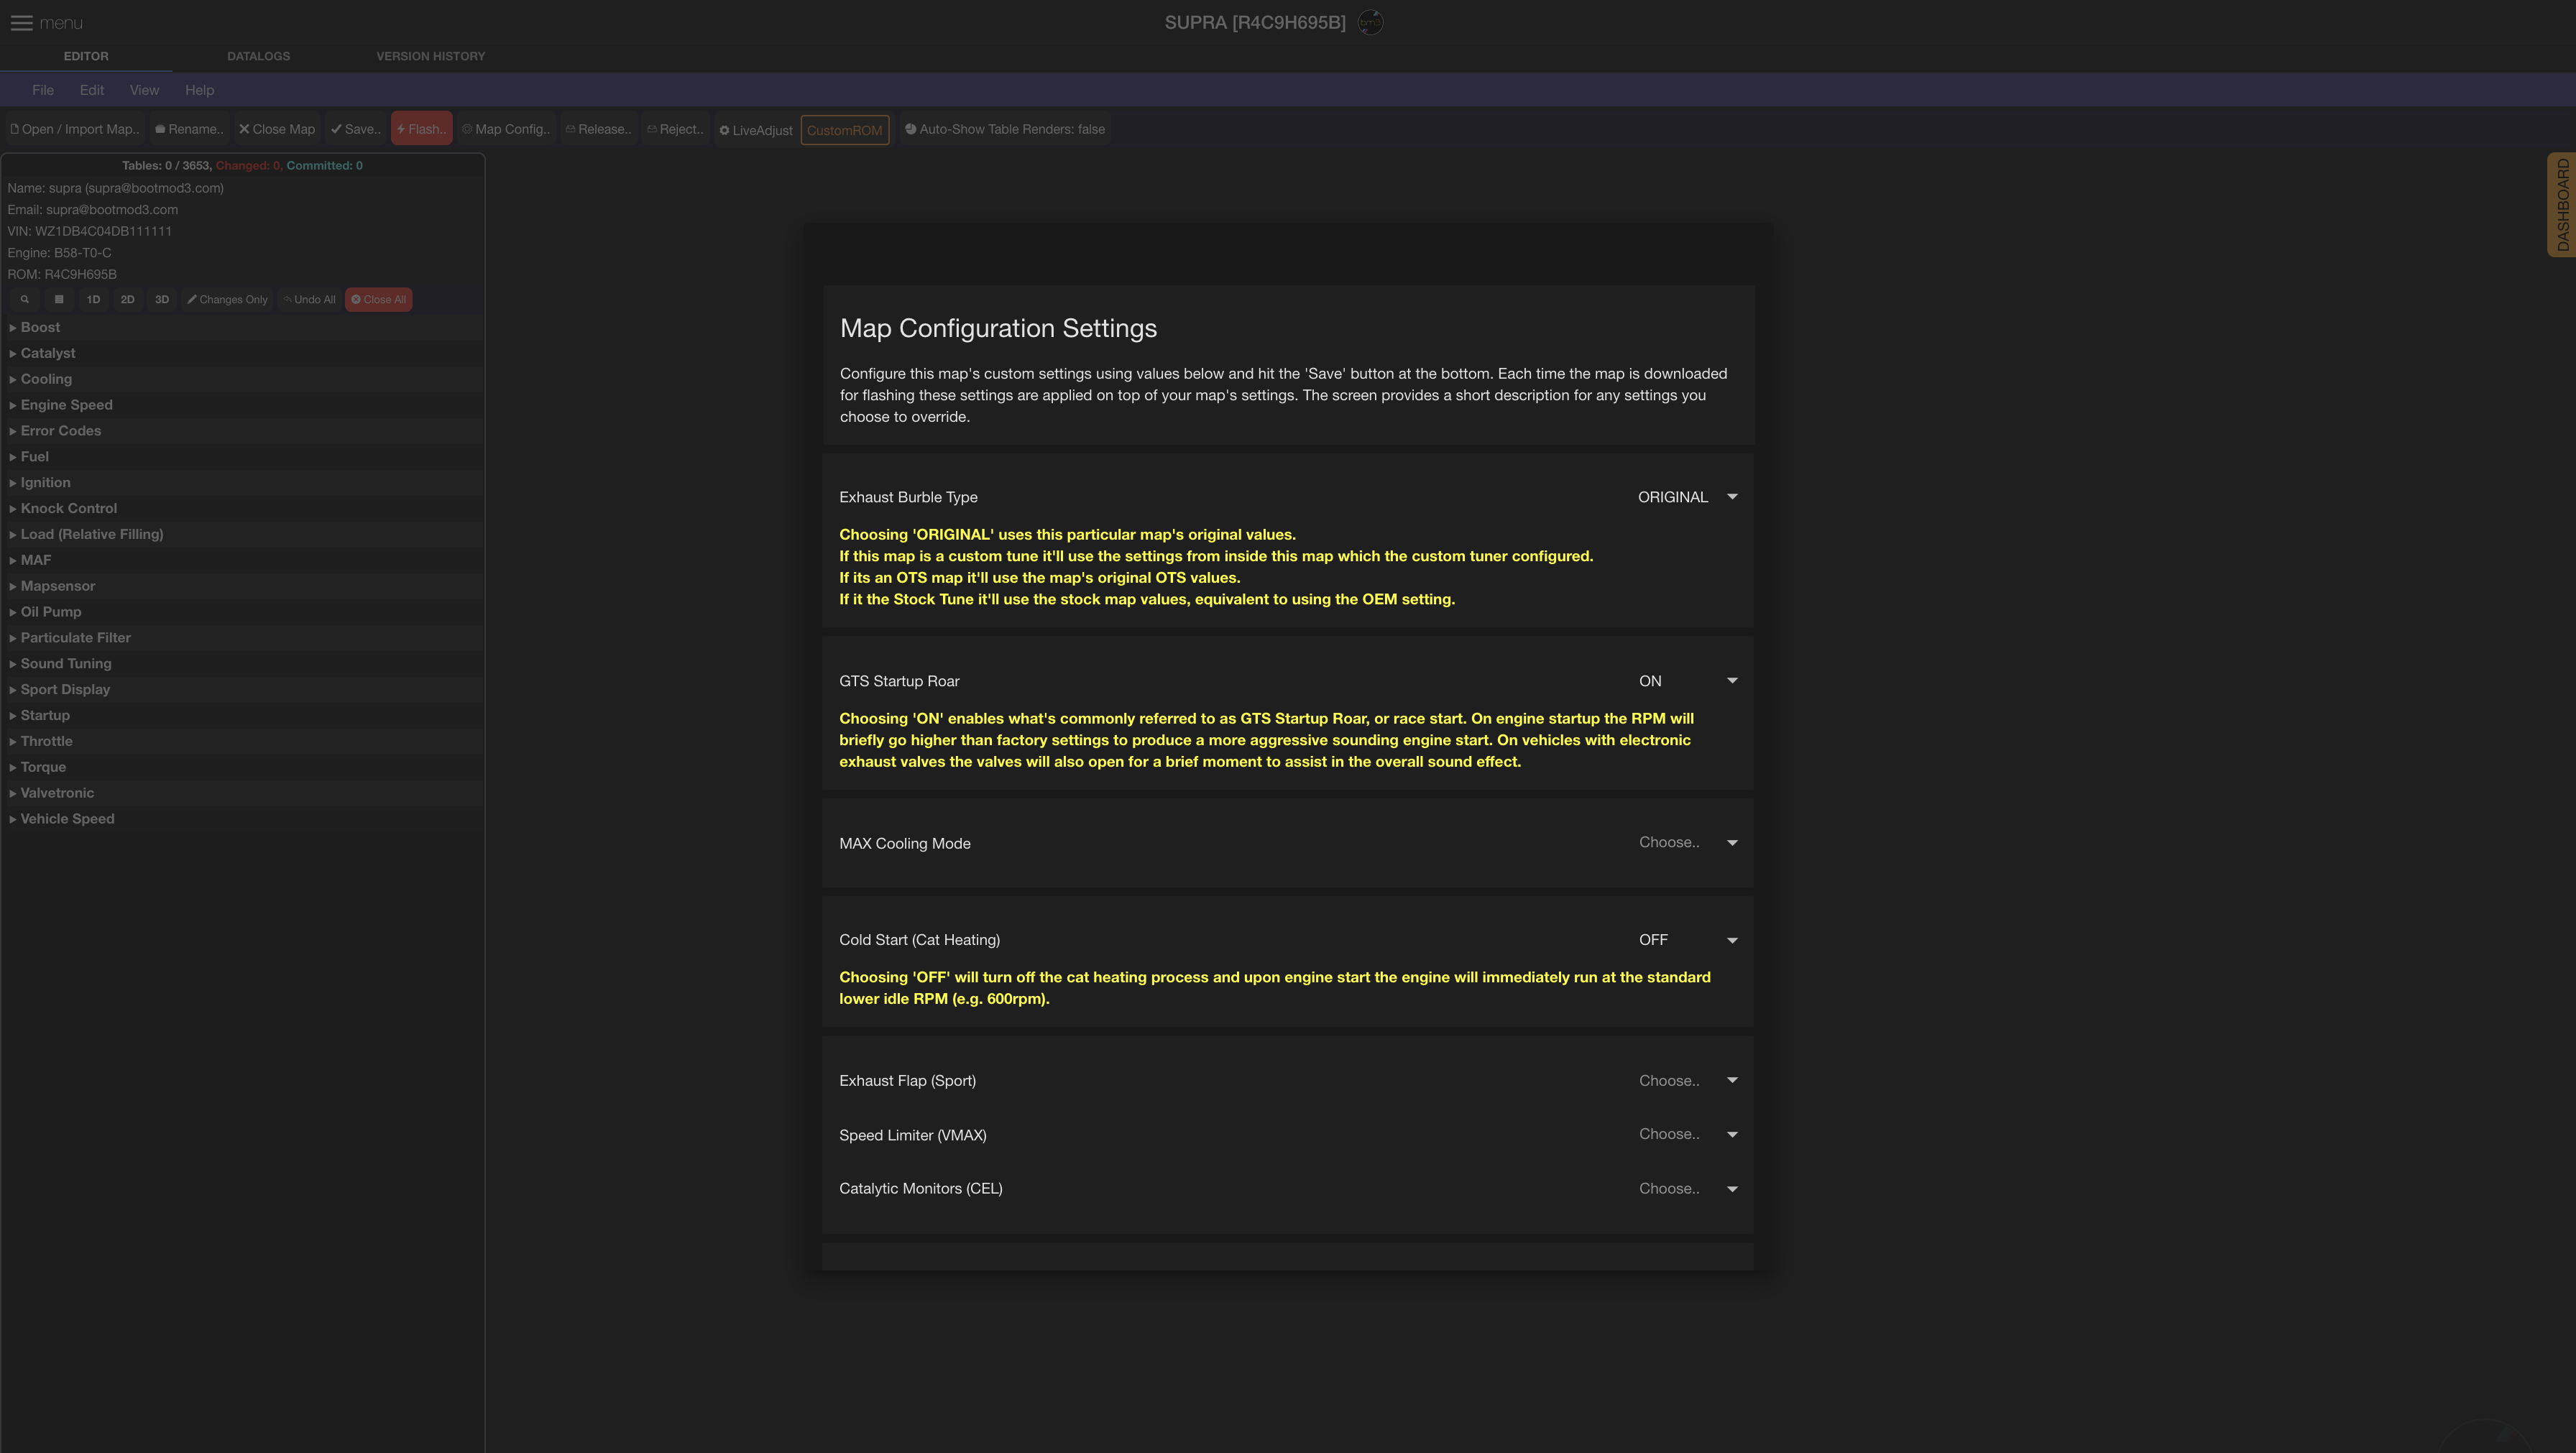
Integrated Map Configuration screen for Tune Requests - tuners can update Map Configuration on any custom tune request on behalf of end users
Open/Import screen across My Maps, Tune Requests and Free Reference Maps.
Maps shown with advanced filtering per column for all table listings making it easy to find what you’re looking to import/compare against
Filter search and Multi-select-to-delete any existing unwanted maps under My Maps
All Tune Requests are shown in the Tune Request tab regardless of their current status allowing for filtering on any in progress and previously closed Tune Requests
Free Reference Maps Tab - shows various maps made available for import into your existing maps for learning/comparison
New Ability to import across different engine types along with previous cross ROM import support
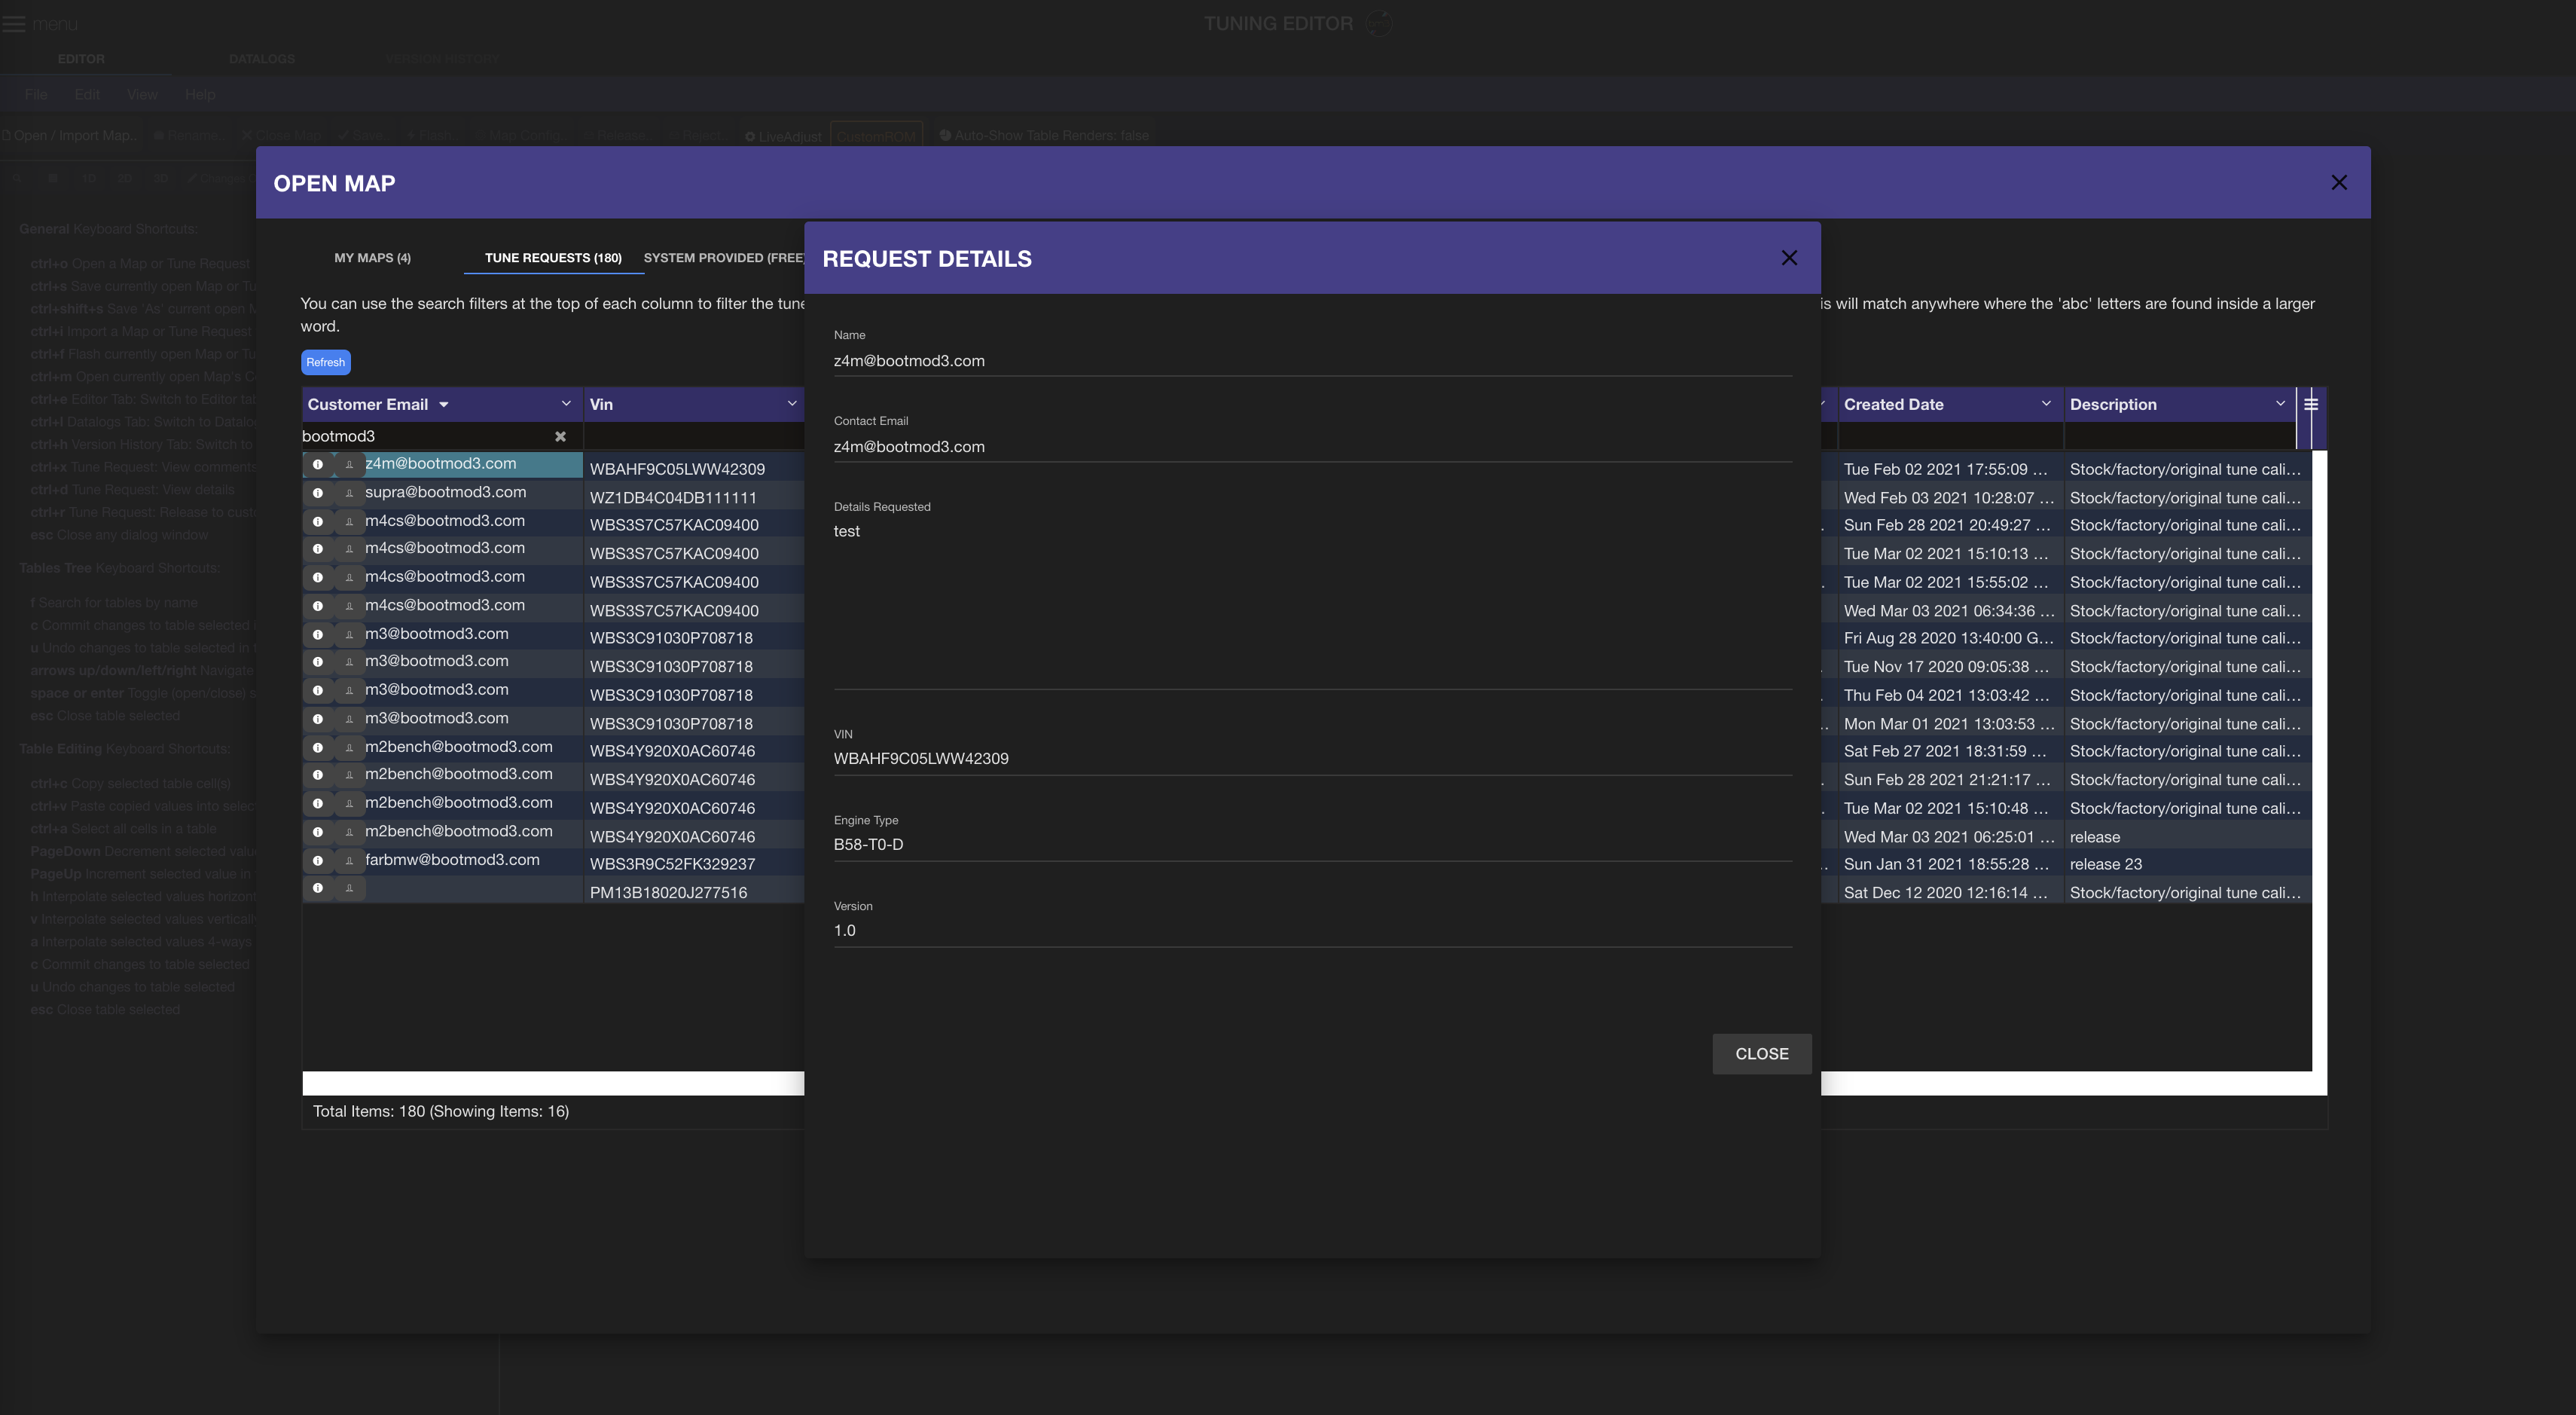
View Tune Request comments before opening the map for the tune request and respond when no map changes are required
Filter-select tables at Import by Name, Table/Map ID and Size
Search Table Tree by Table/Map ID
Flash open Tune Requests to connected vehicles directly from the Authorized Tuner account
Run LiveDash and datalog any connected vehicle by Authorized Tuners
Save Tune Requests under My Maps in the Tuner account when looking to save a reference map for later use
30+ keyboard shortcuts to speed up everything from map opening, table commit/undo changes, math functions, viewing tune request comments, switching between Editor, Datalogs, Version History tabs, and many others..
New Table Editing Math Functions:
Horizontal, vertical and 4-way interpolation smoothing functions added based on WinOLS interpolation behaviour
Increment/Decrement by smallest factorable unit
Increment/Decrement/Multiply/Divide by value entered in cell
Increment/Decrement by % value
View % differences before committing changes
Hover over Undo button to view current/previous data in a table before commit
Various ‘under the hood’ performance enhancements to editor functionality
Warning on close browser or back button when inside editor
Maps, tune requests, datalogs listings all show current user’s timezone date format (e.g. Tuner will see end user’s logs in their current local time zone, while end user sees the listing in their local timezone).
Old Tune Requests screen removed
Map Editor with sample map open and some tables open for editing, dashboard open on the right side running against the connected vehicle, searchable table tree on the left, button bar across the top for quick access to open, flash, other actions.
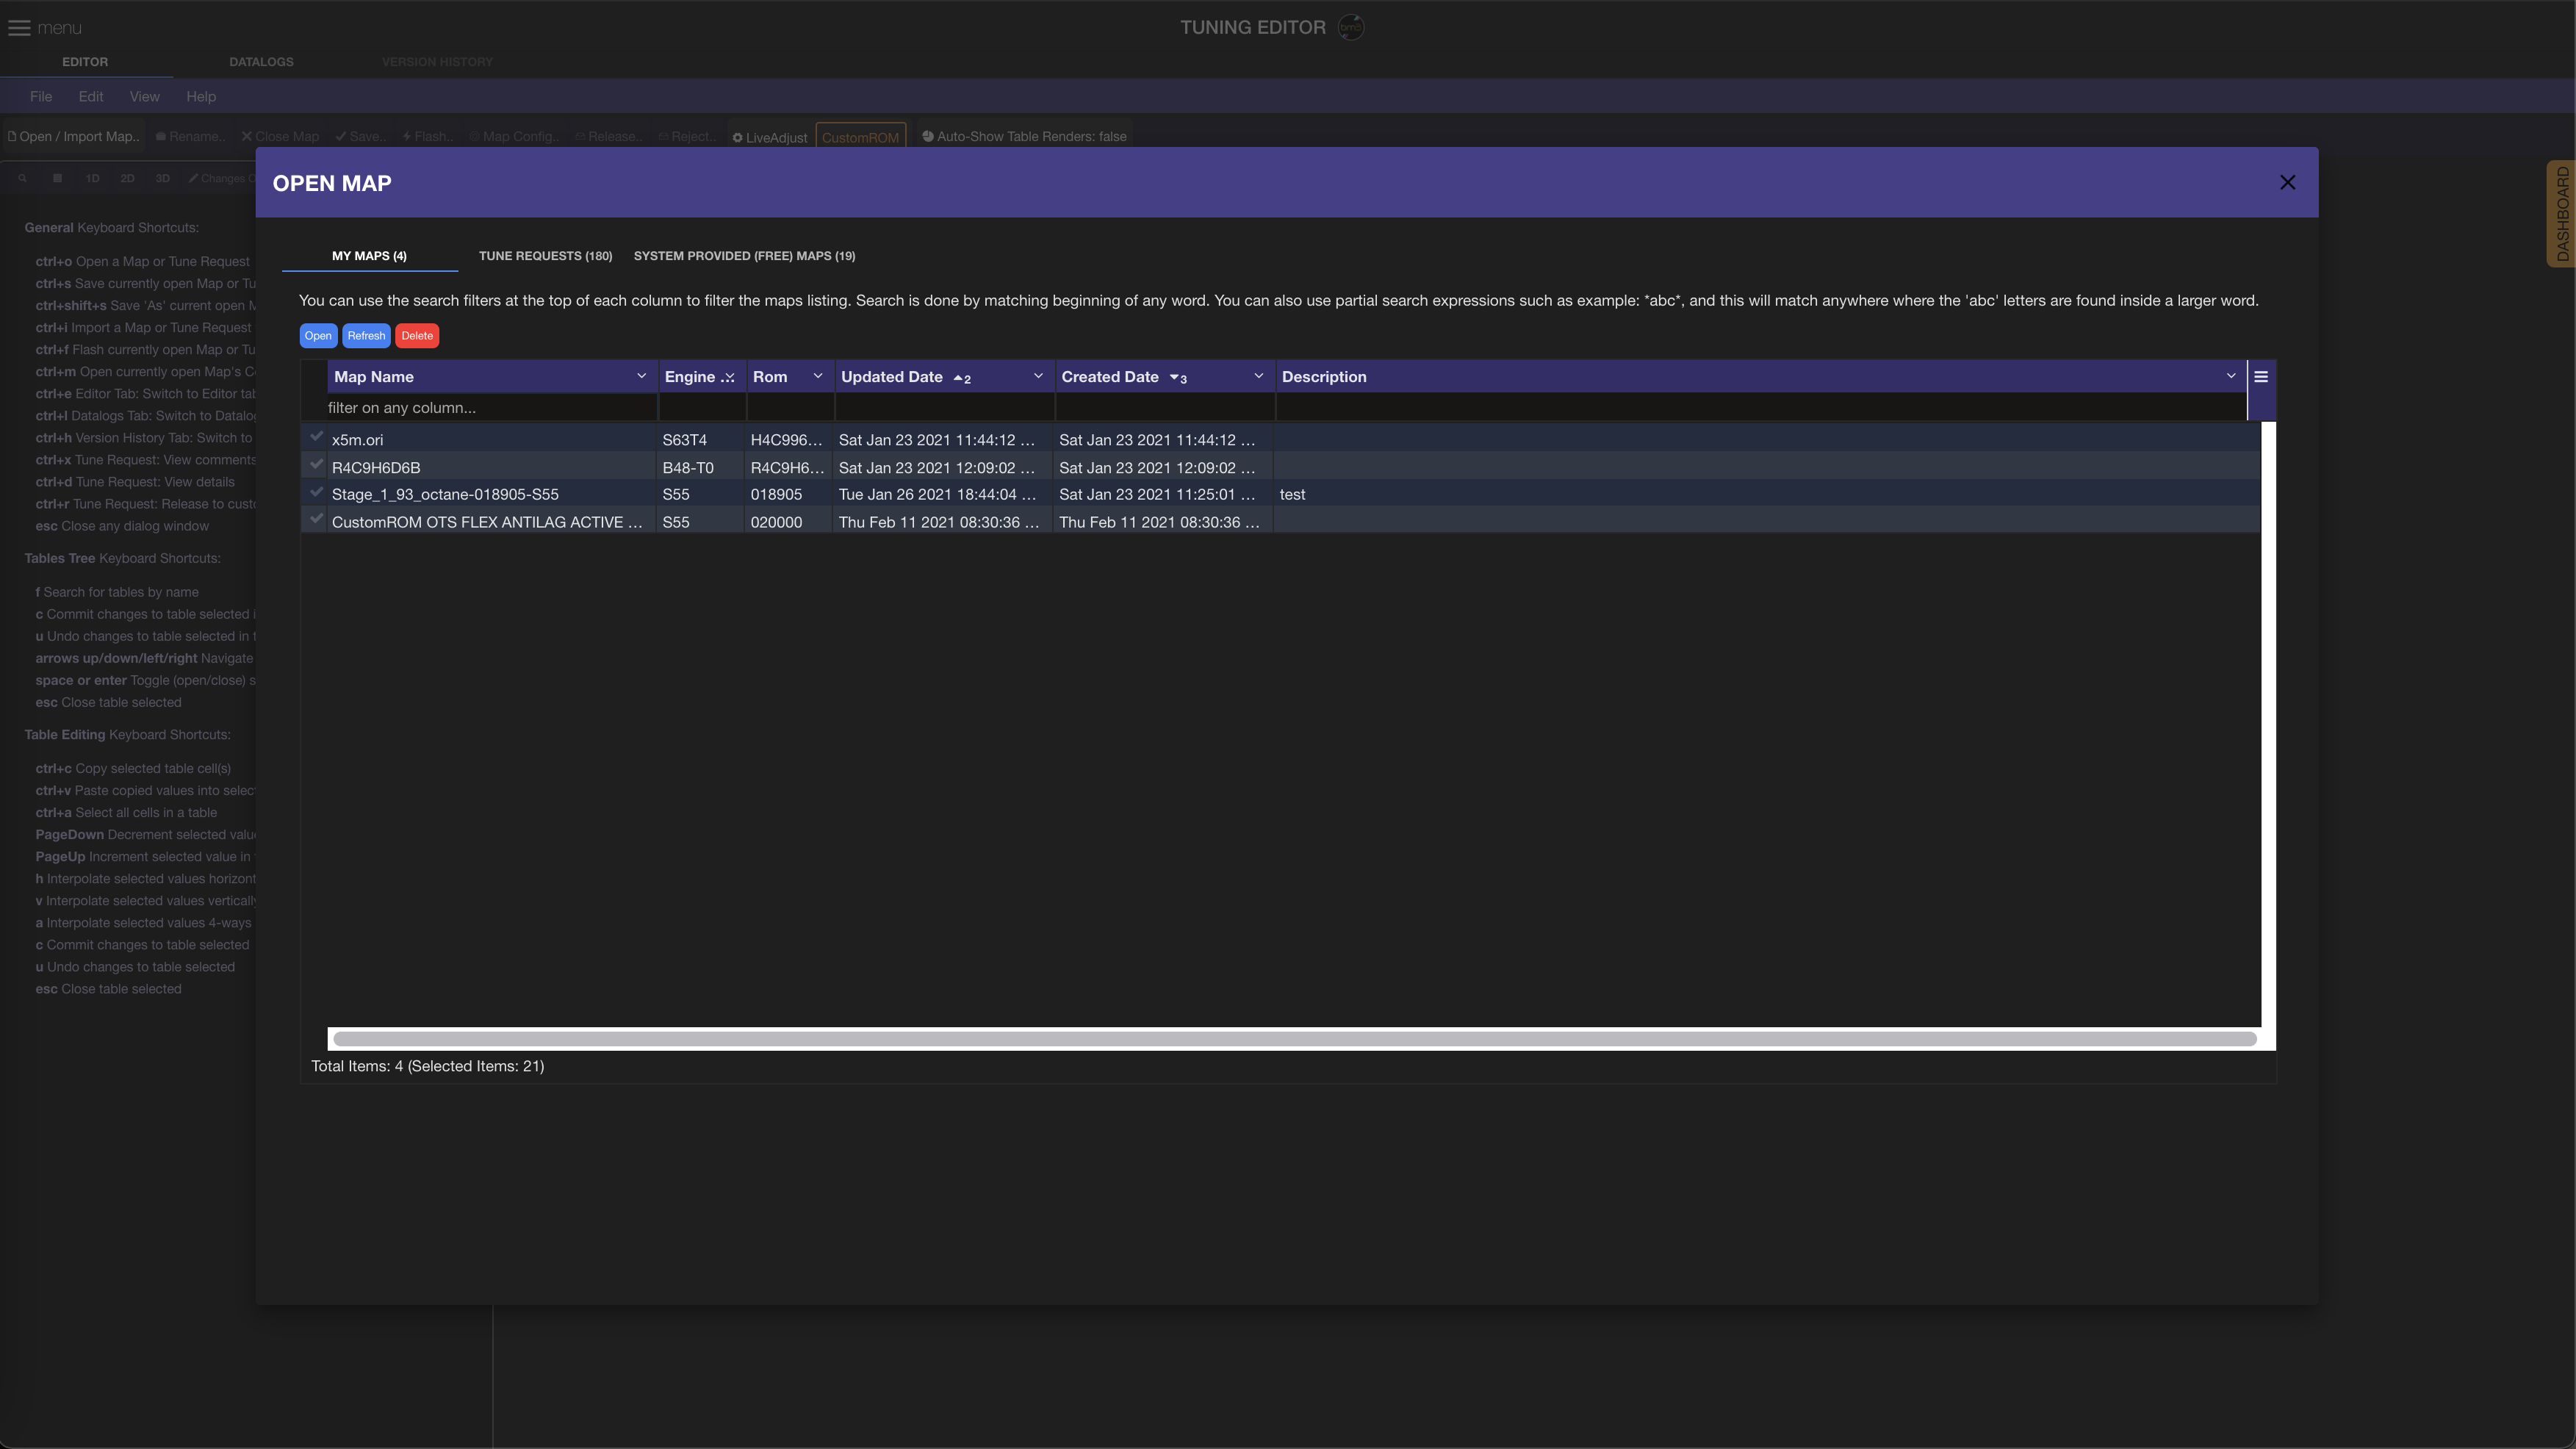
Clicking on Open/Import Map button a new dialog box shows up showing 3 tabs:
My Maps - all private maps in your own account, typically base maps used for custom tuning
Authorized users can upload raw BIN files to their account under My Maps and open them in editor
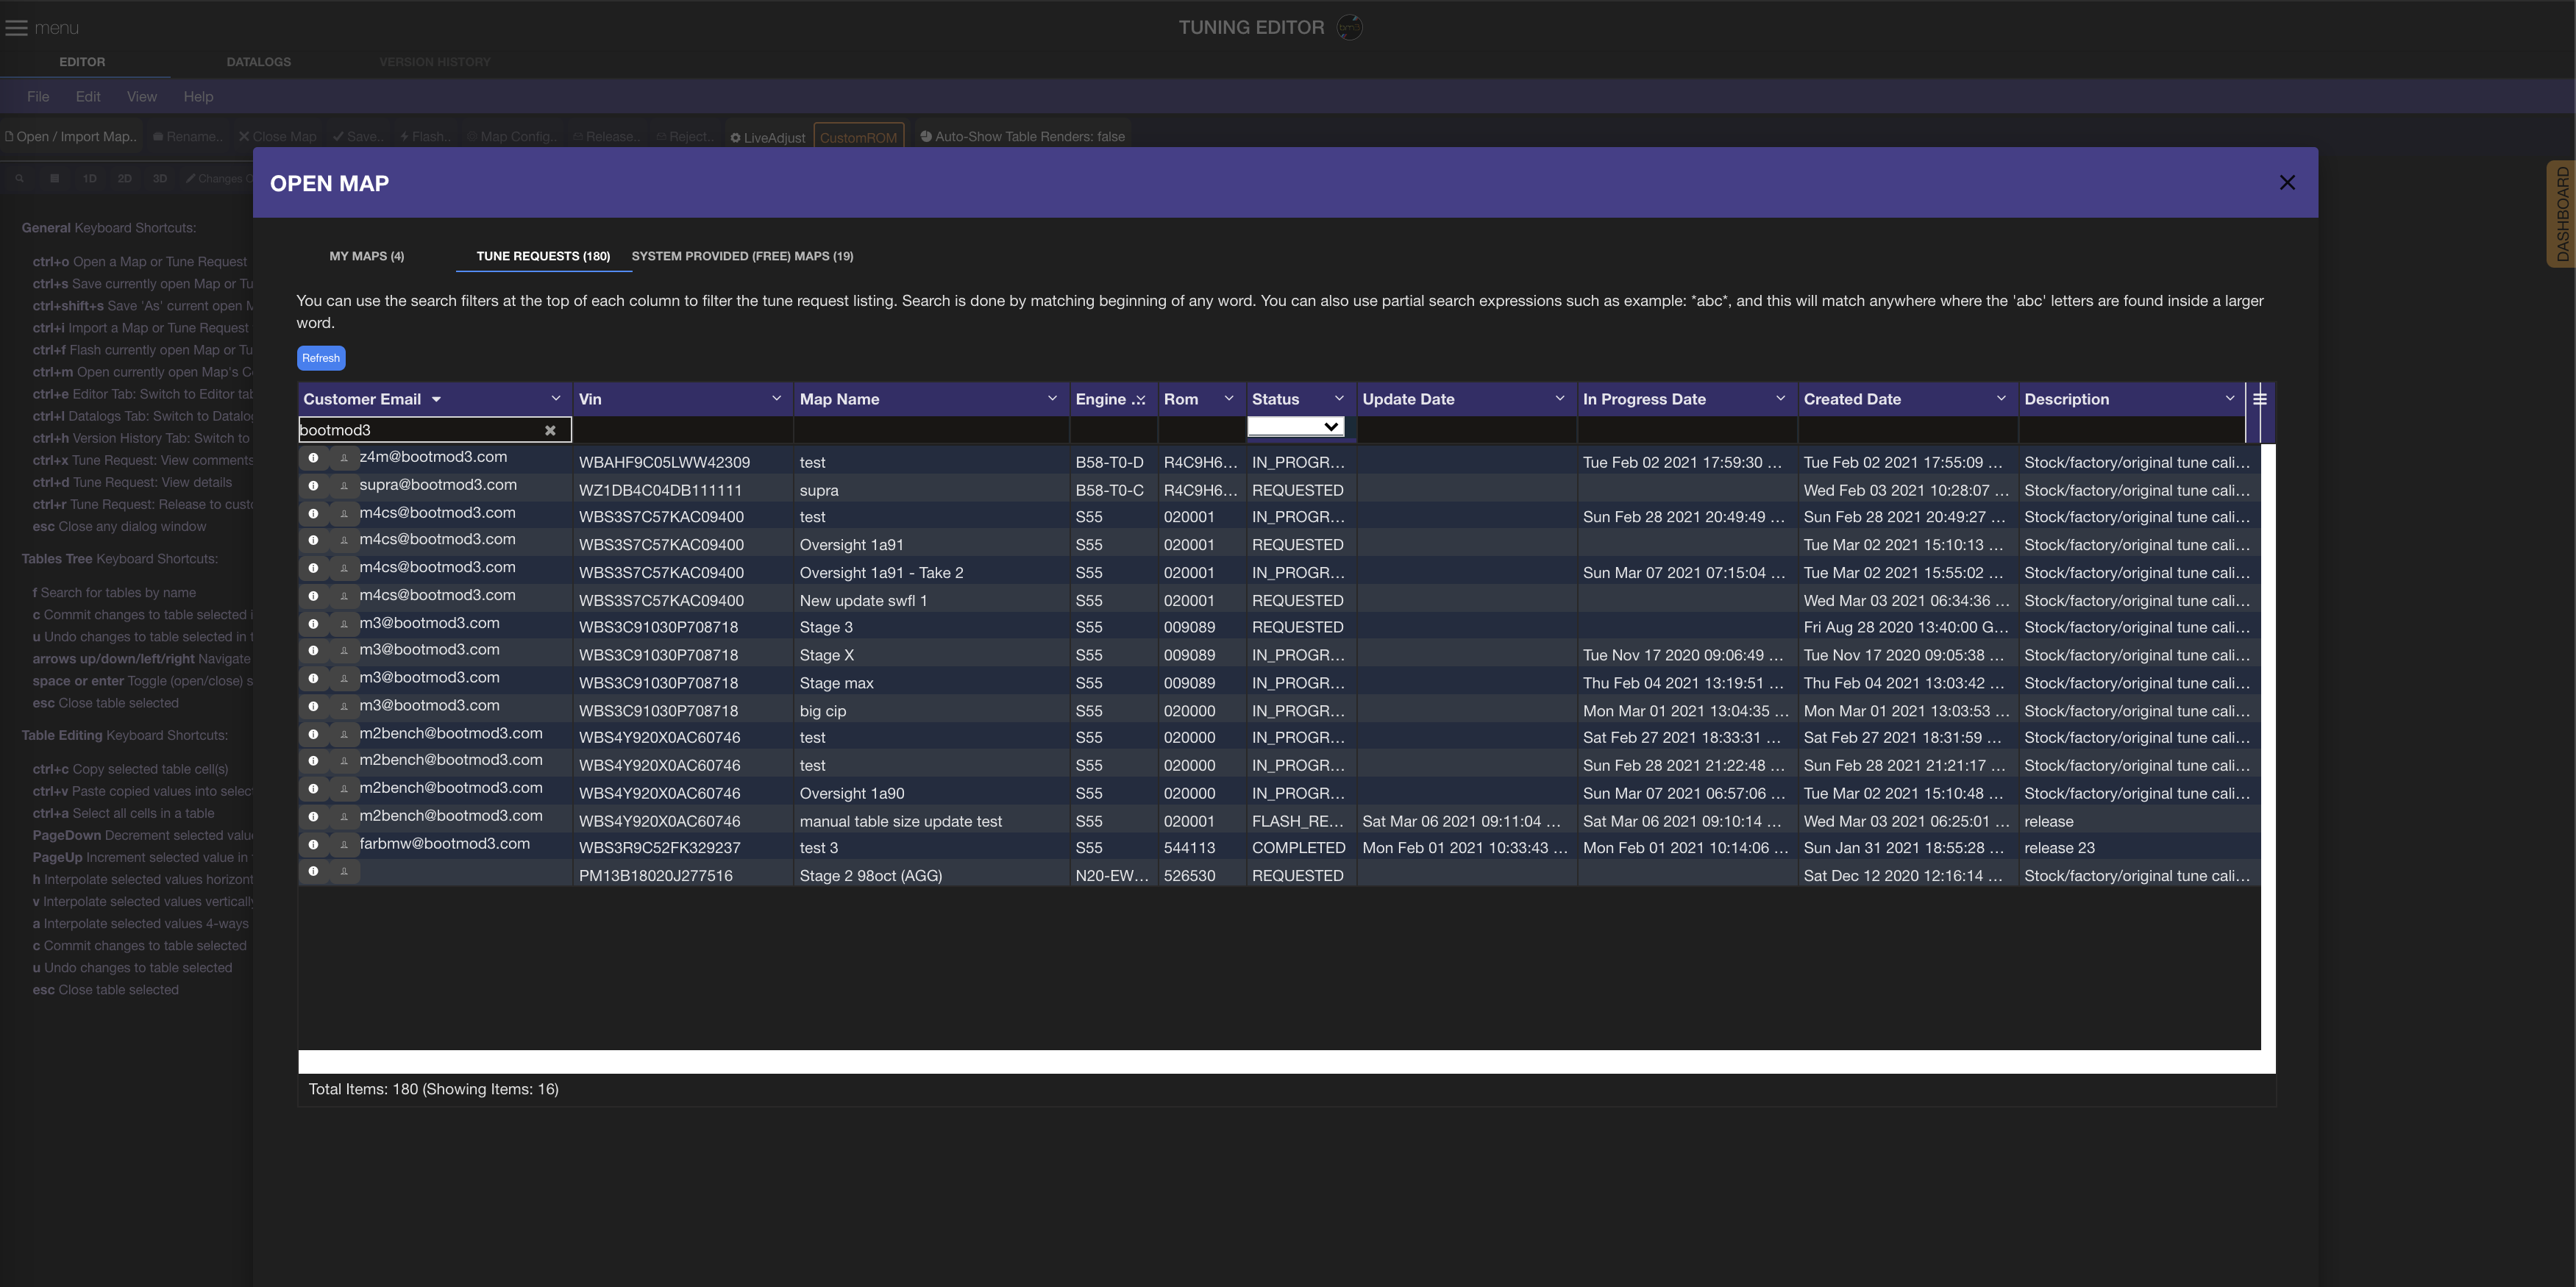
Tune Requests - all pending and completed tune requests from remote customers available to open, review, filter
System Provided (FREE) Maps - reference maps listing with a number of maps provided by the bootmod3 team for compare/learning
Tune Requests Tab - test account data, demonstrating filter by customer email at top which shows 16 of the available 180 tune requests. Filtering and sorting each column is possible along with viewing request details and responding to customer comments.
Tune Request Details screen:
Double-clicking on any map under My Maps or Tune Requests opens the map and shows the editor as below.
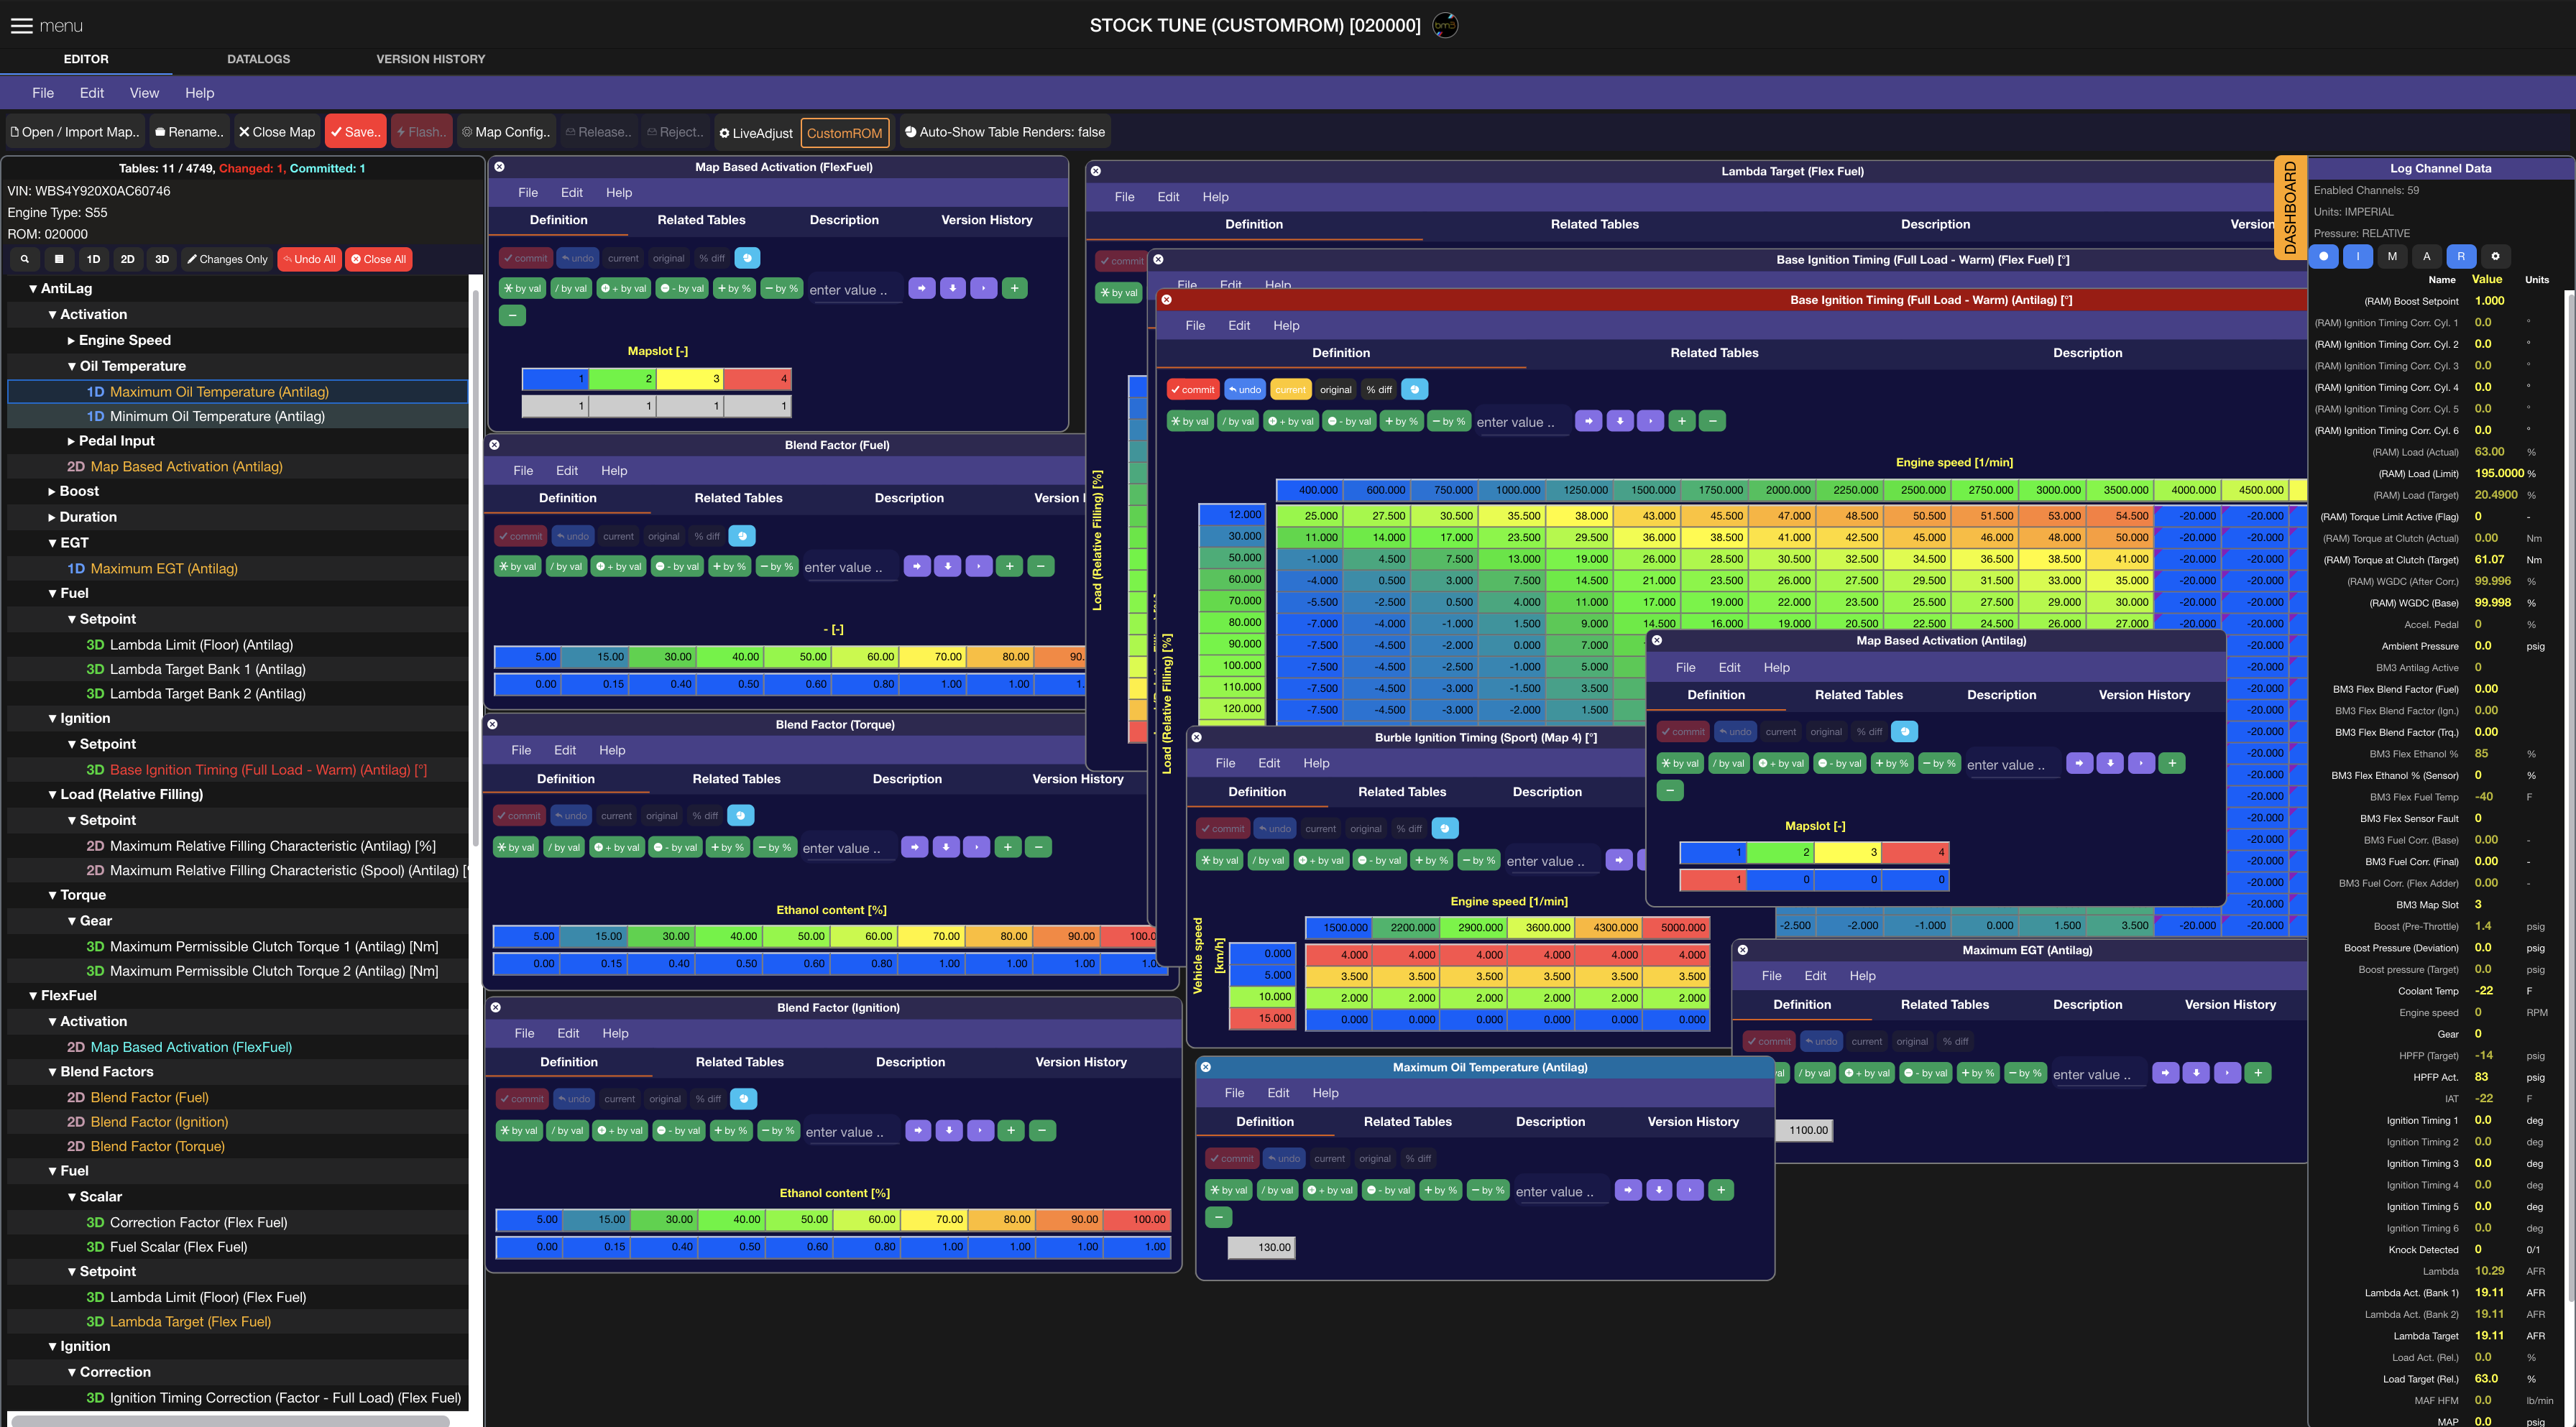
In case a map or tune request is already open, double-clicking to open another map from My Maps or Tune Request will allow the user to Import data from that map or tune request allowing for cross-porting of changes between various base maps under My Maps as well as custom Tune Request maps.
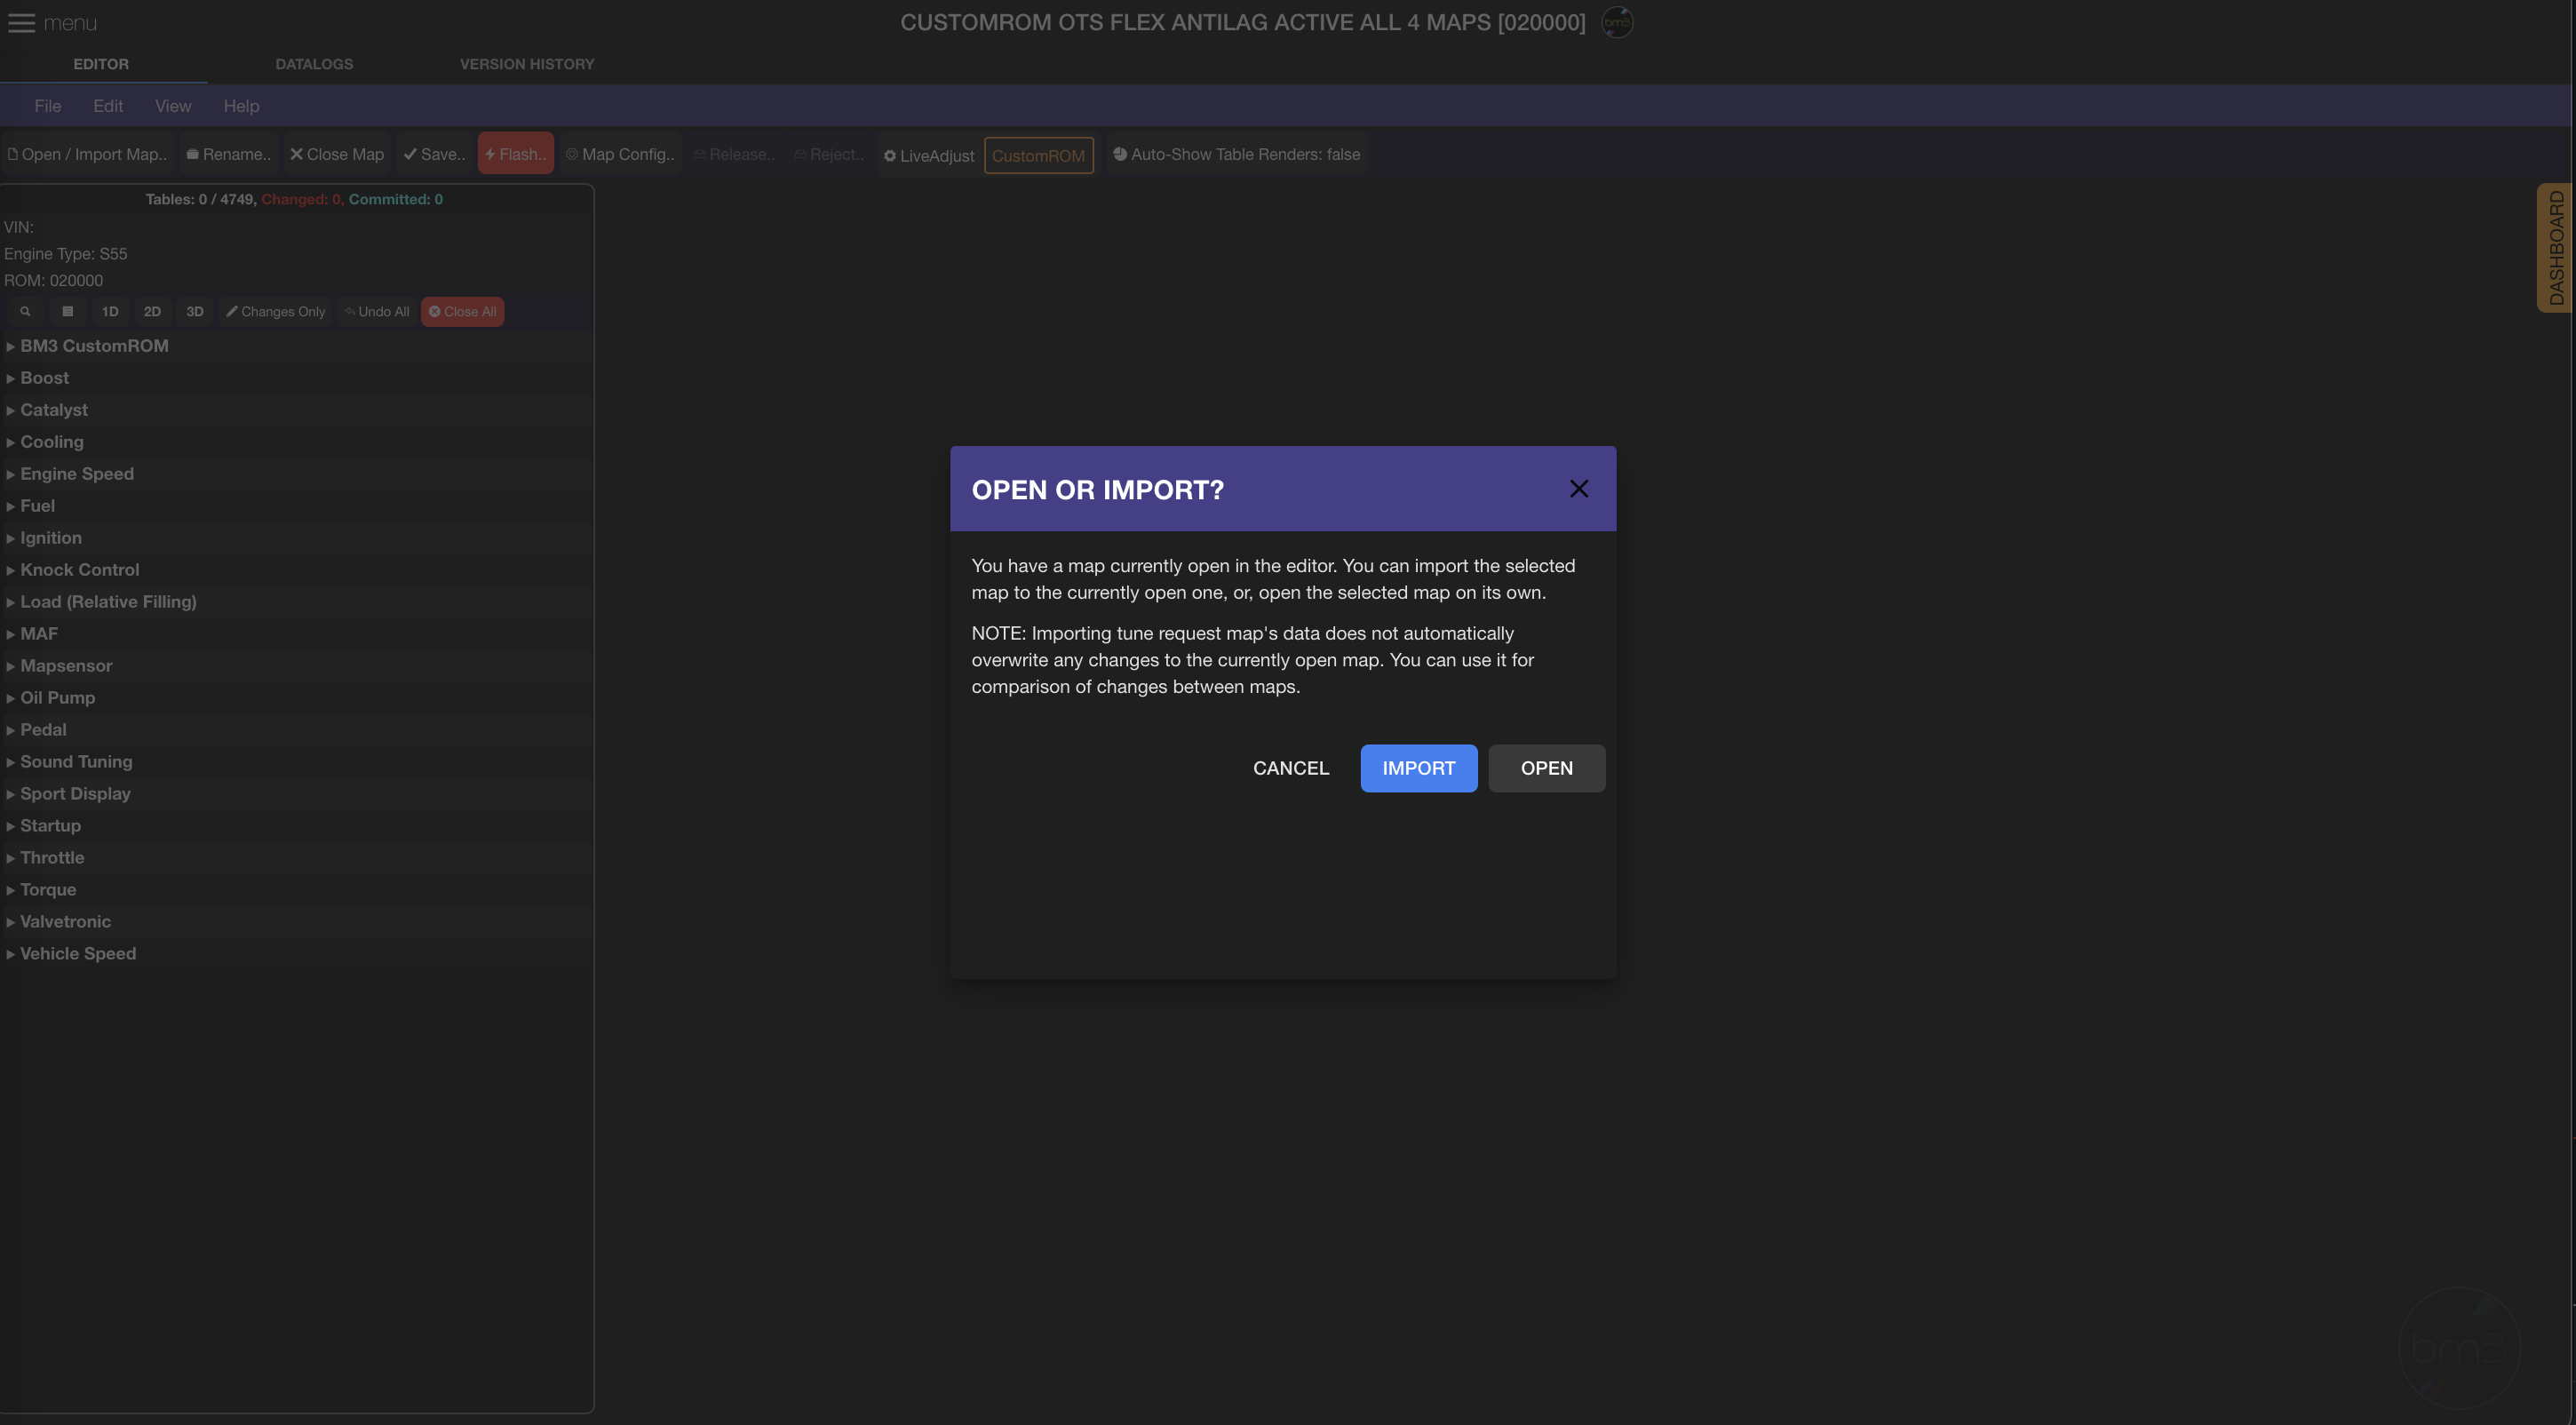
Choosing ‘Import’ on the selected map shows differences between the map currently open and the one selected and allows the user to select tables they’d like to import instead of importing all changes. By default all Core tables are preselected but the user can deselect all by clicking on the checkbox in the top left corner of the listing and filter by entering the table name or size or table type first and then check off the tables targeted for import.
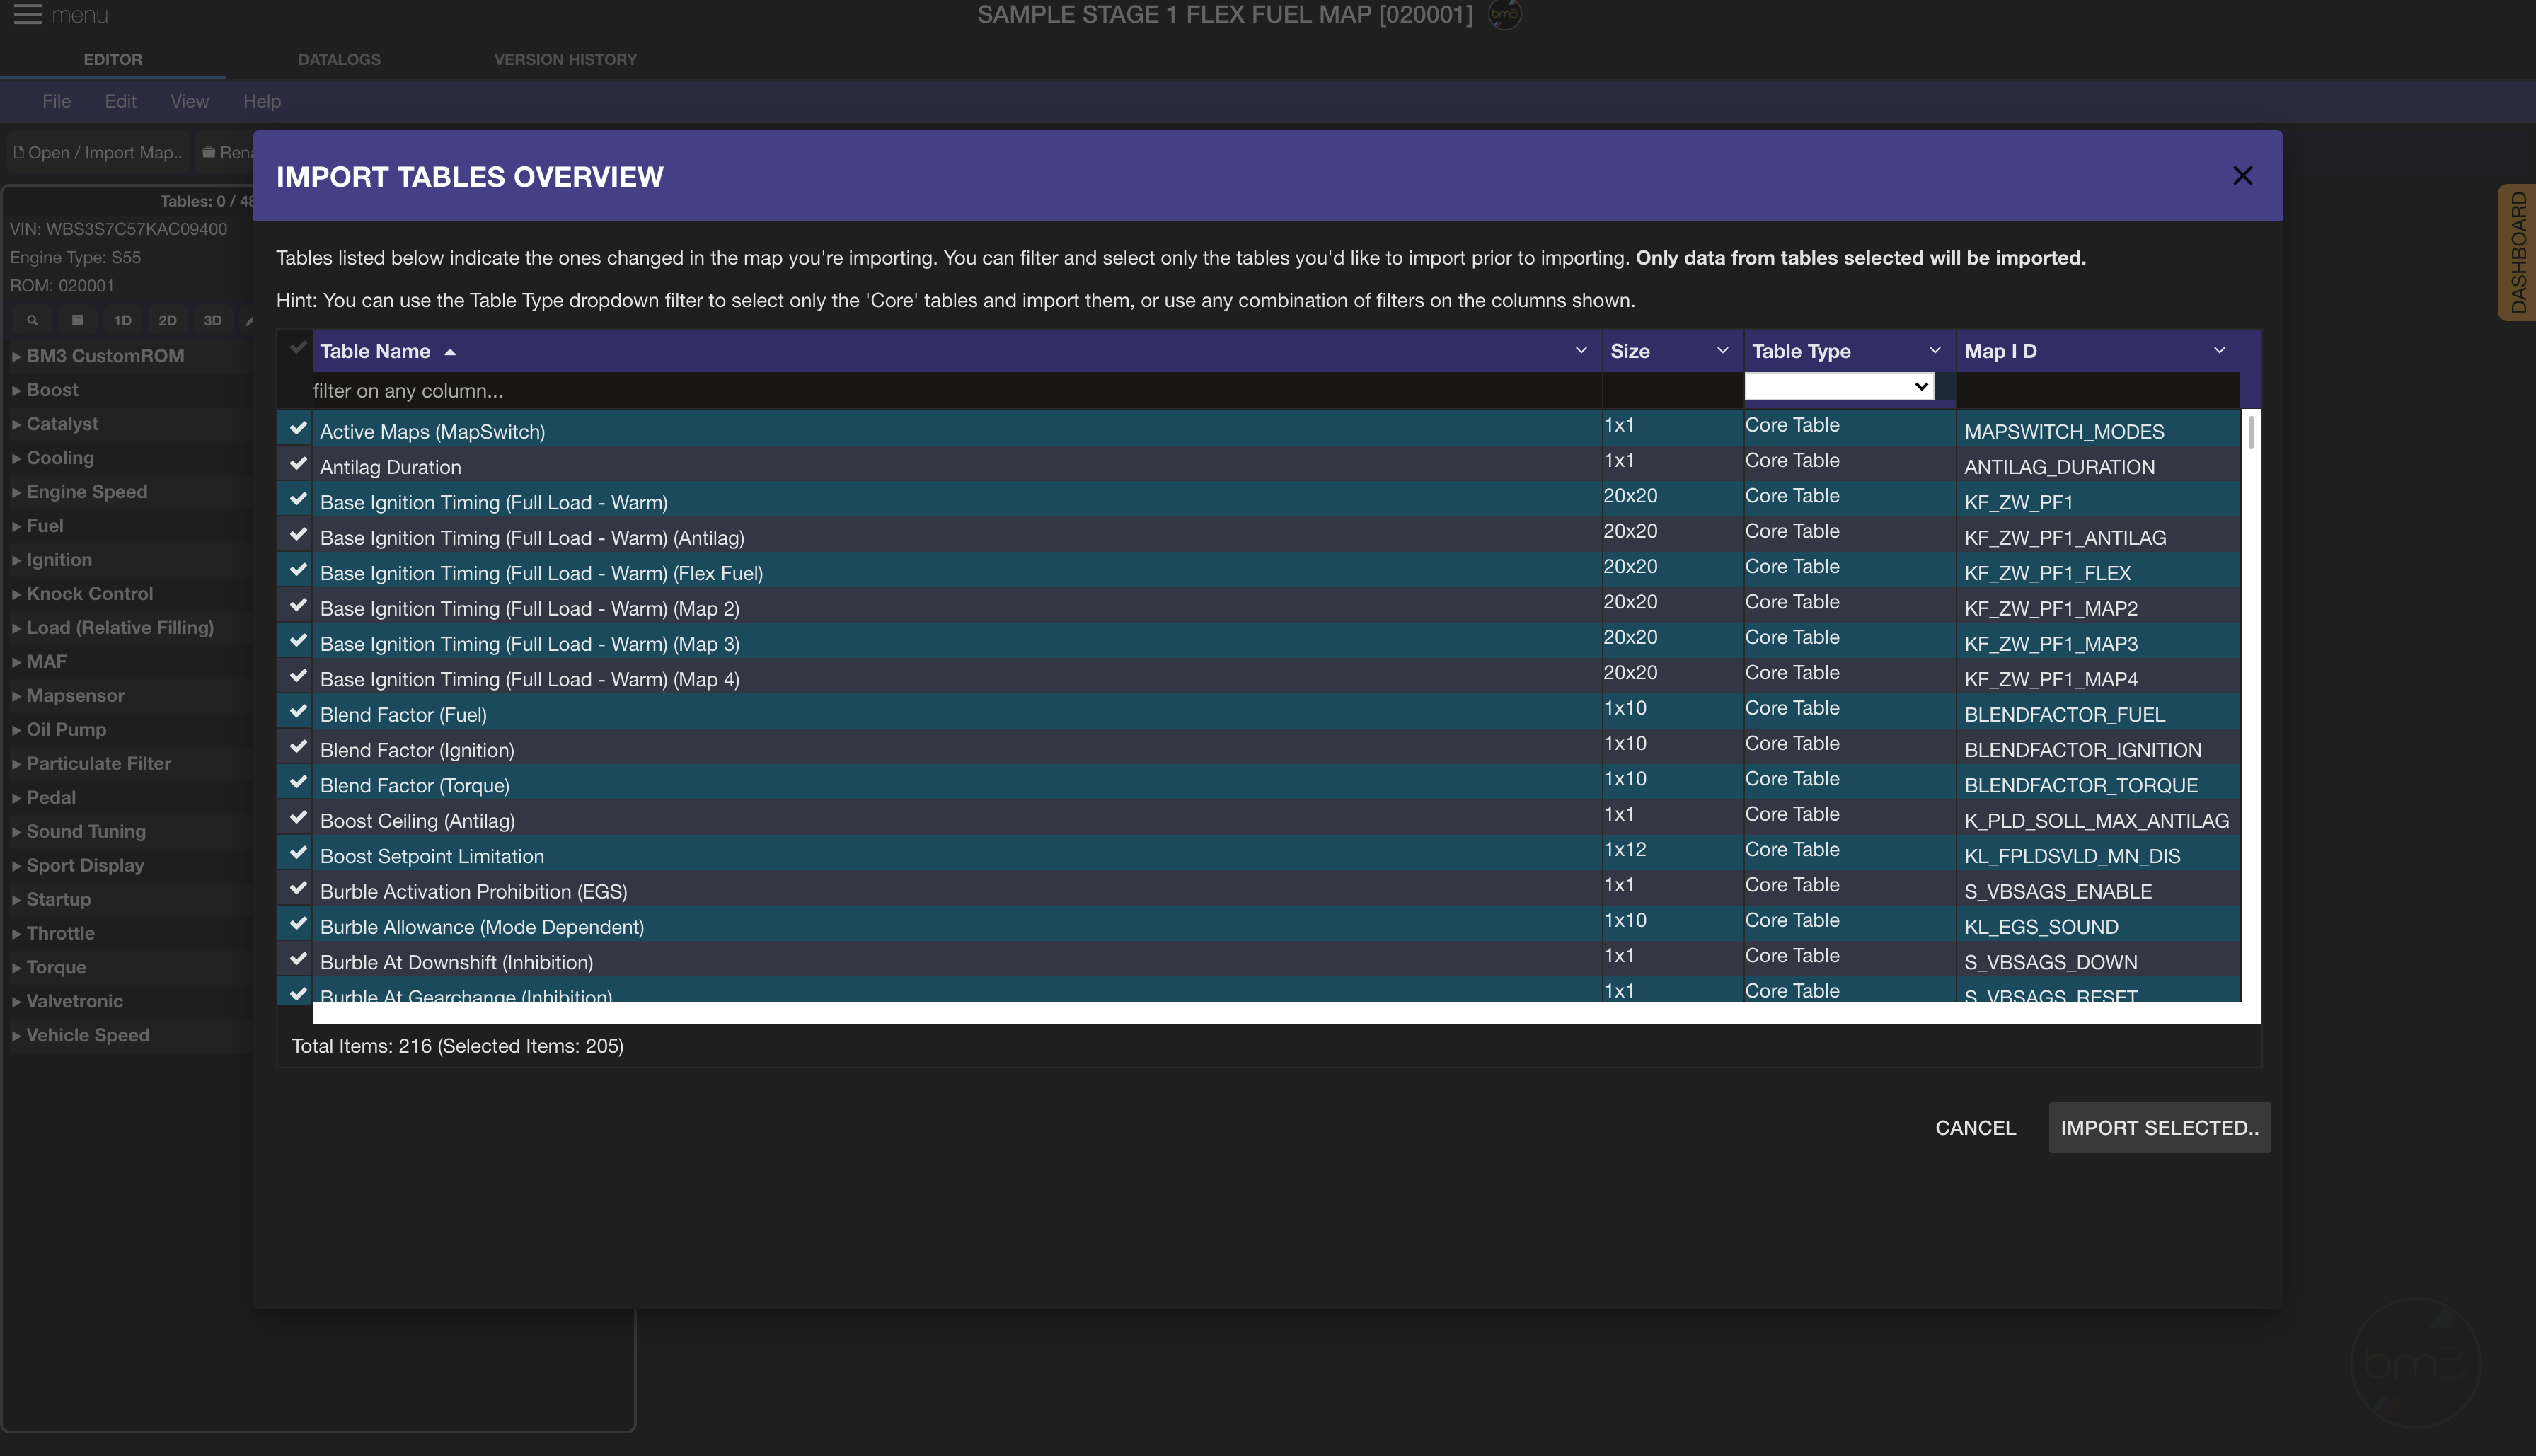
You can see that you can search/filter the import tables listing by a number of parameters including Name, Size, Table Type and Map ID.
Here we have deselected all and filtered for “Lambda” in the Table Name filter and then selected Lambda Target Bank 1, Lambda Target Bank 2 and Lambda Limit (Floor) tables for import:
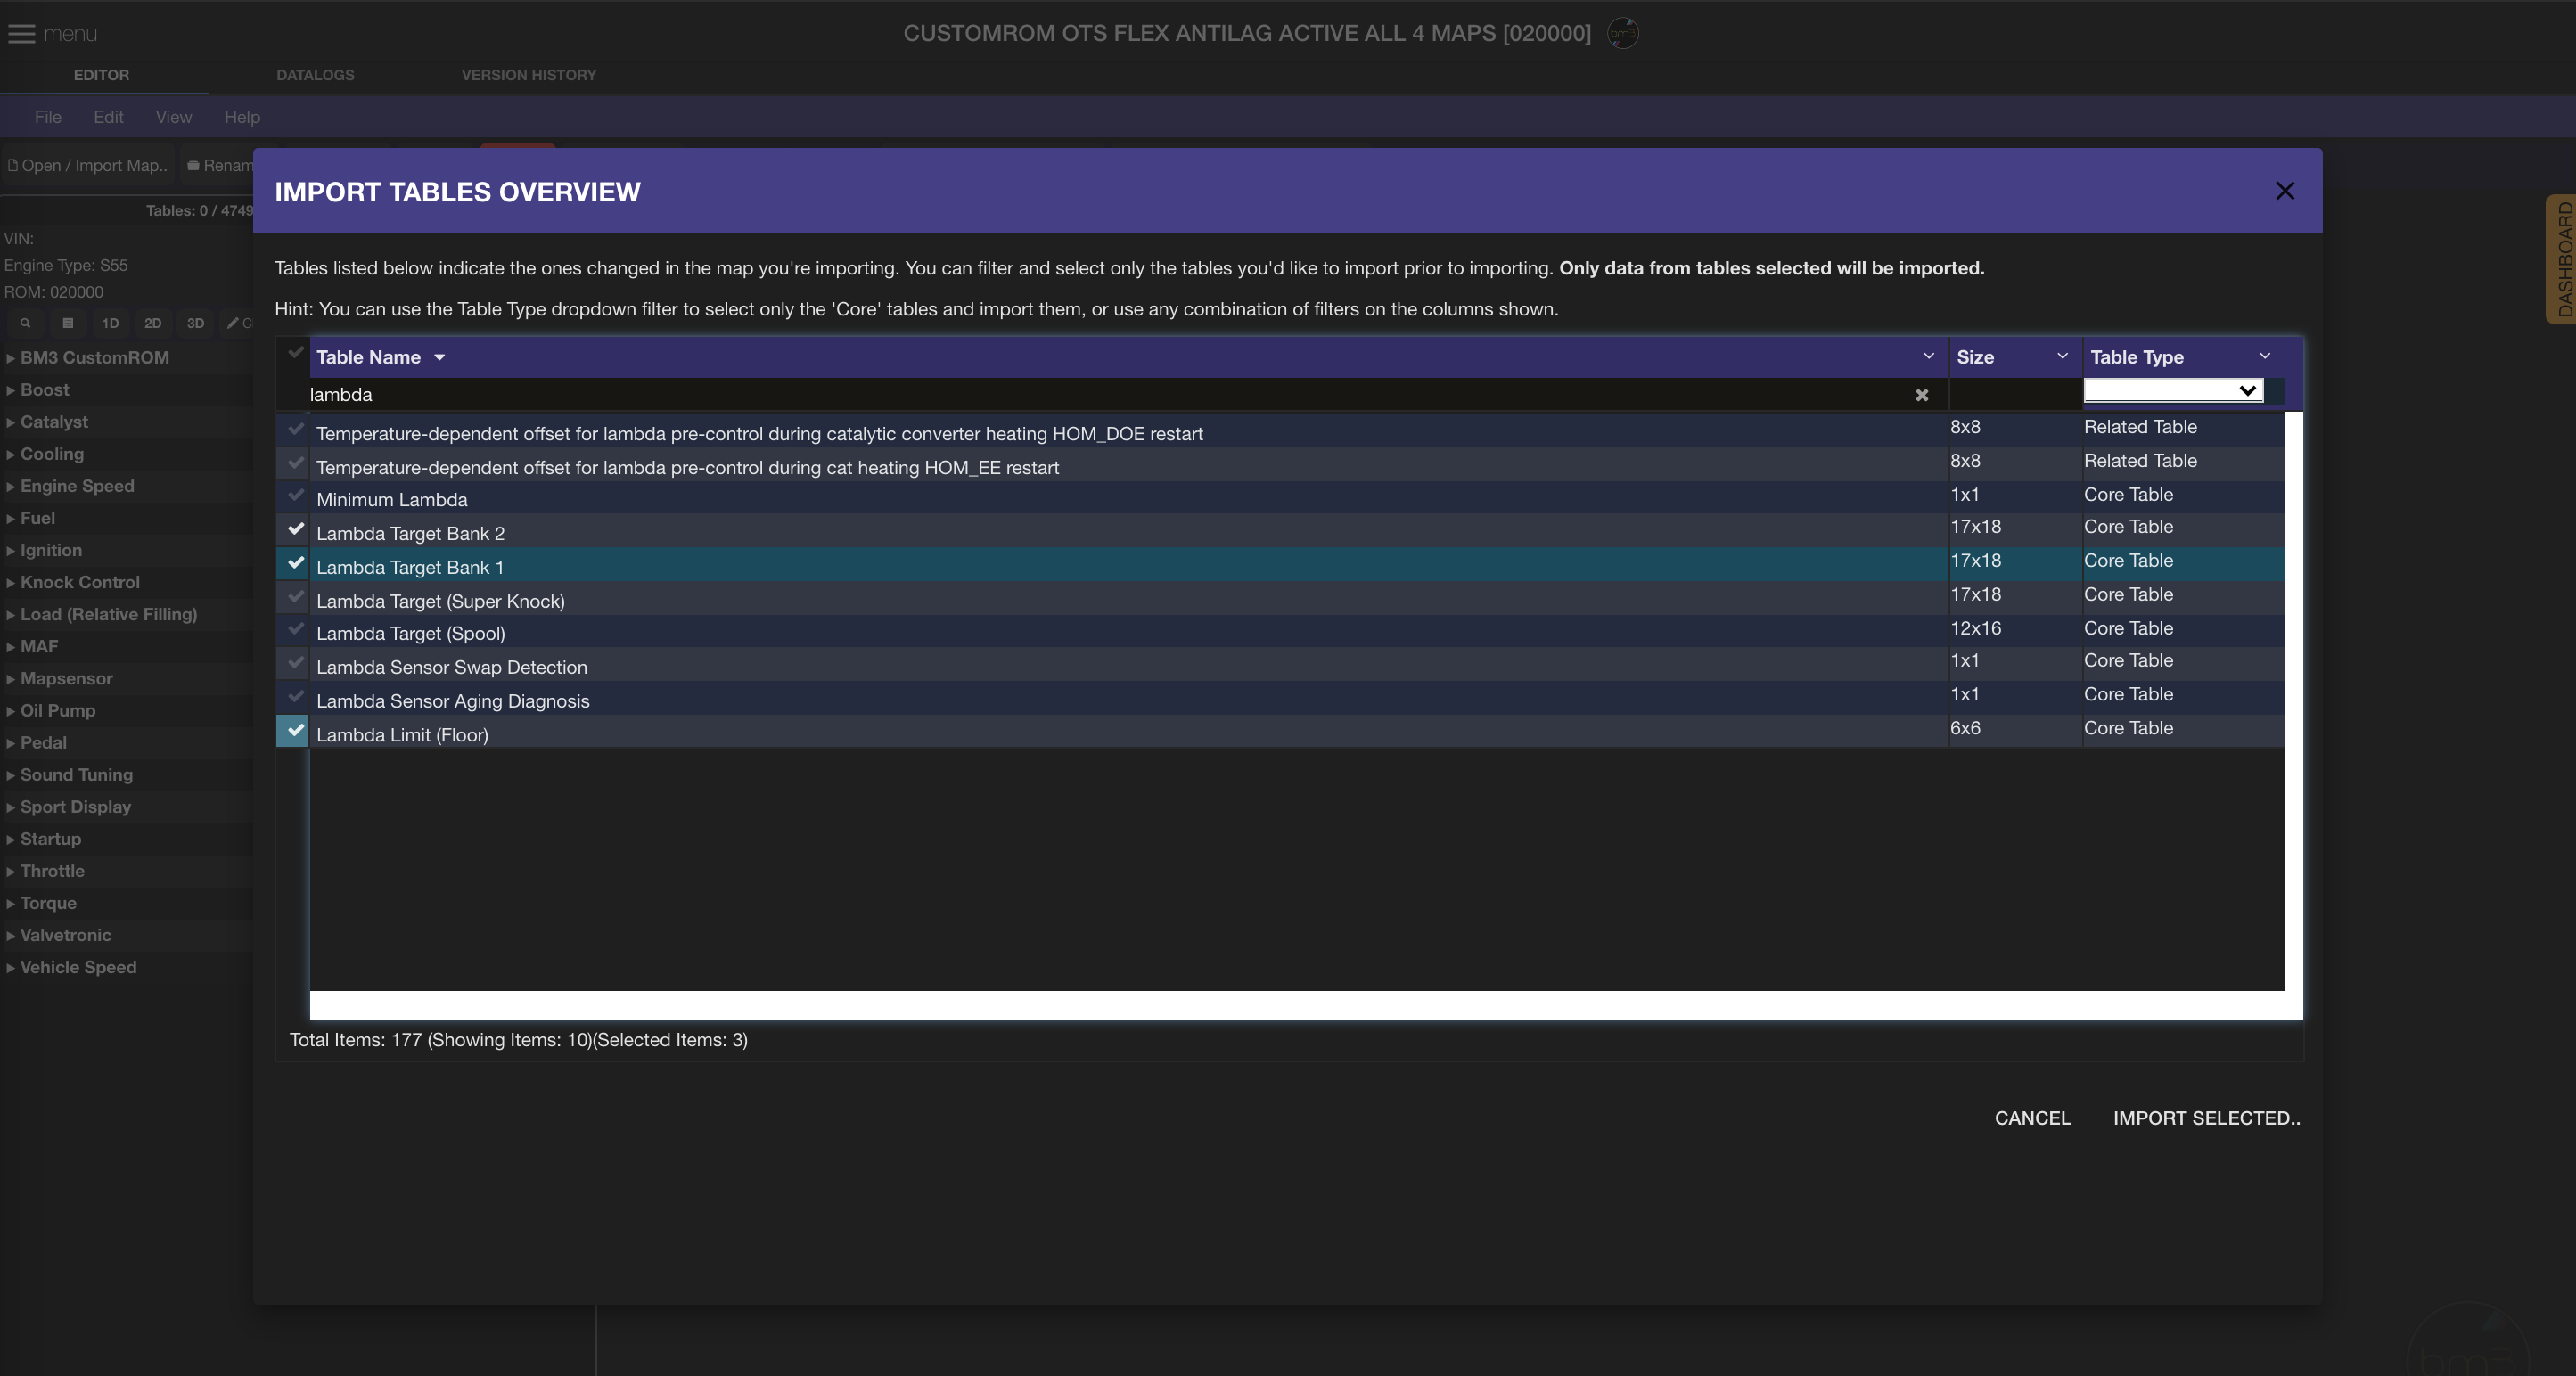
After import the Table Tree shows dirty tables only (can be toggled off with the ‘Changes Only’ button above the Table Tree). Once tables are clicked on you can see the data in the table with indicators on all the cells changed after import. You can also see the title bar for each changed table is changed from blue to red indicating changes pending commit and save.
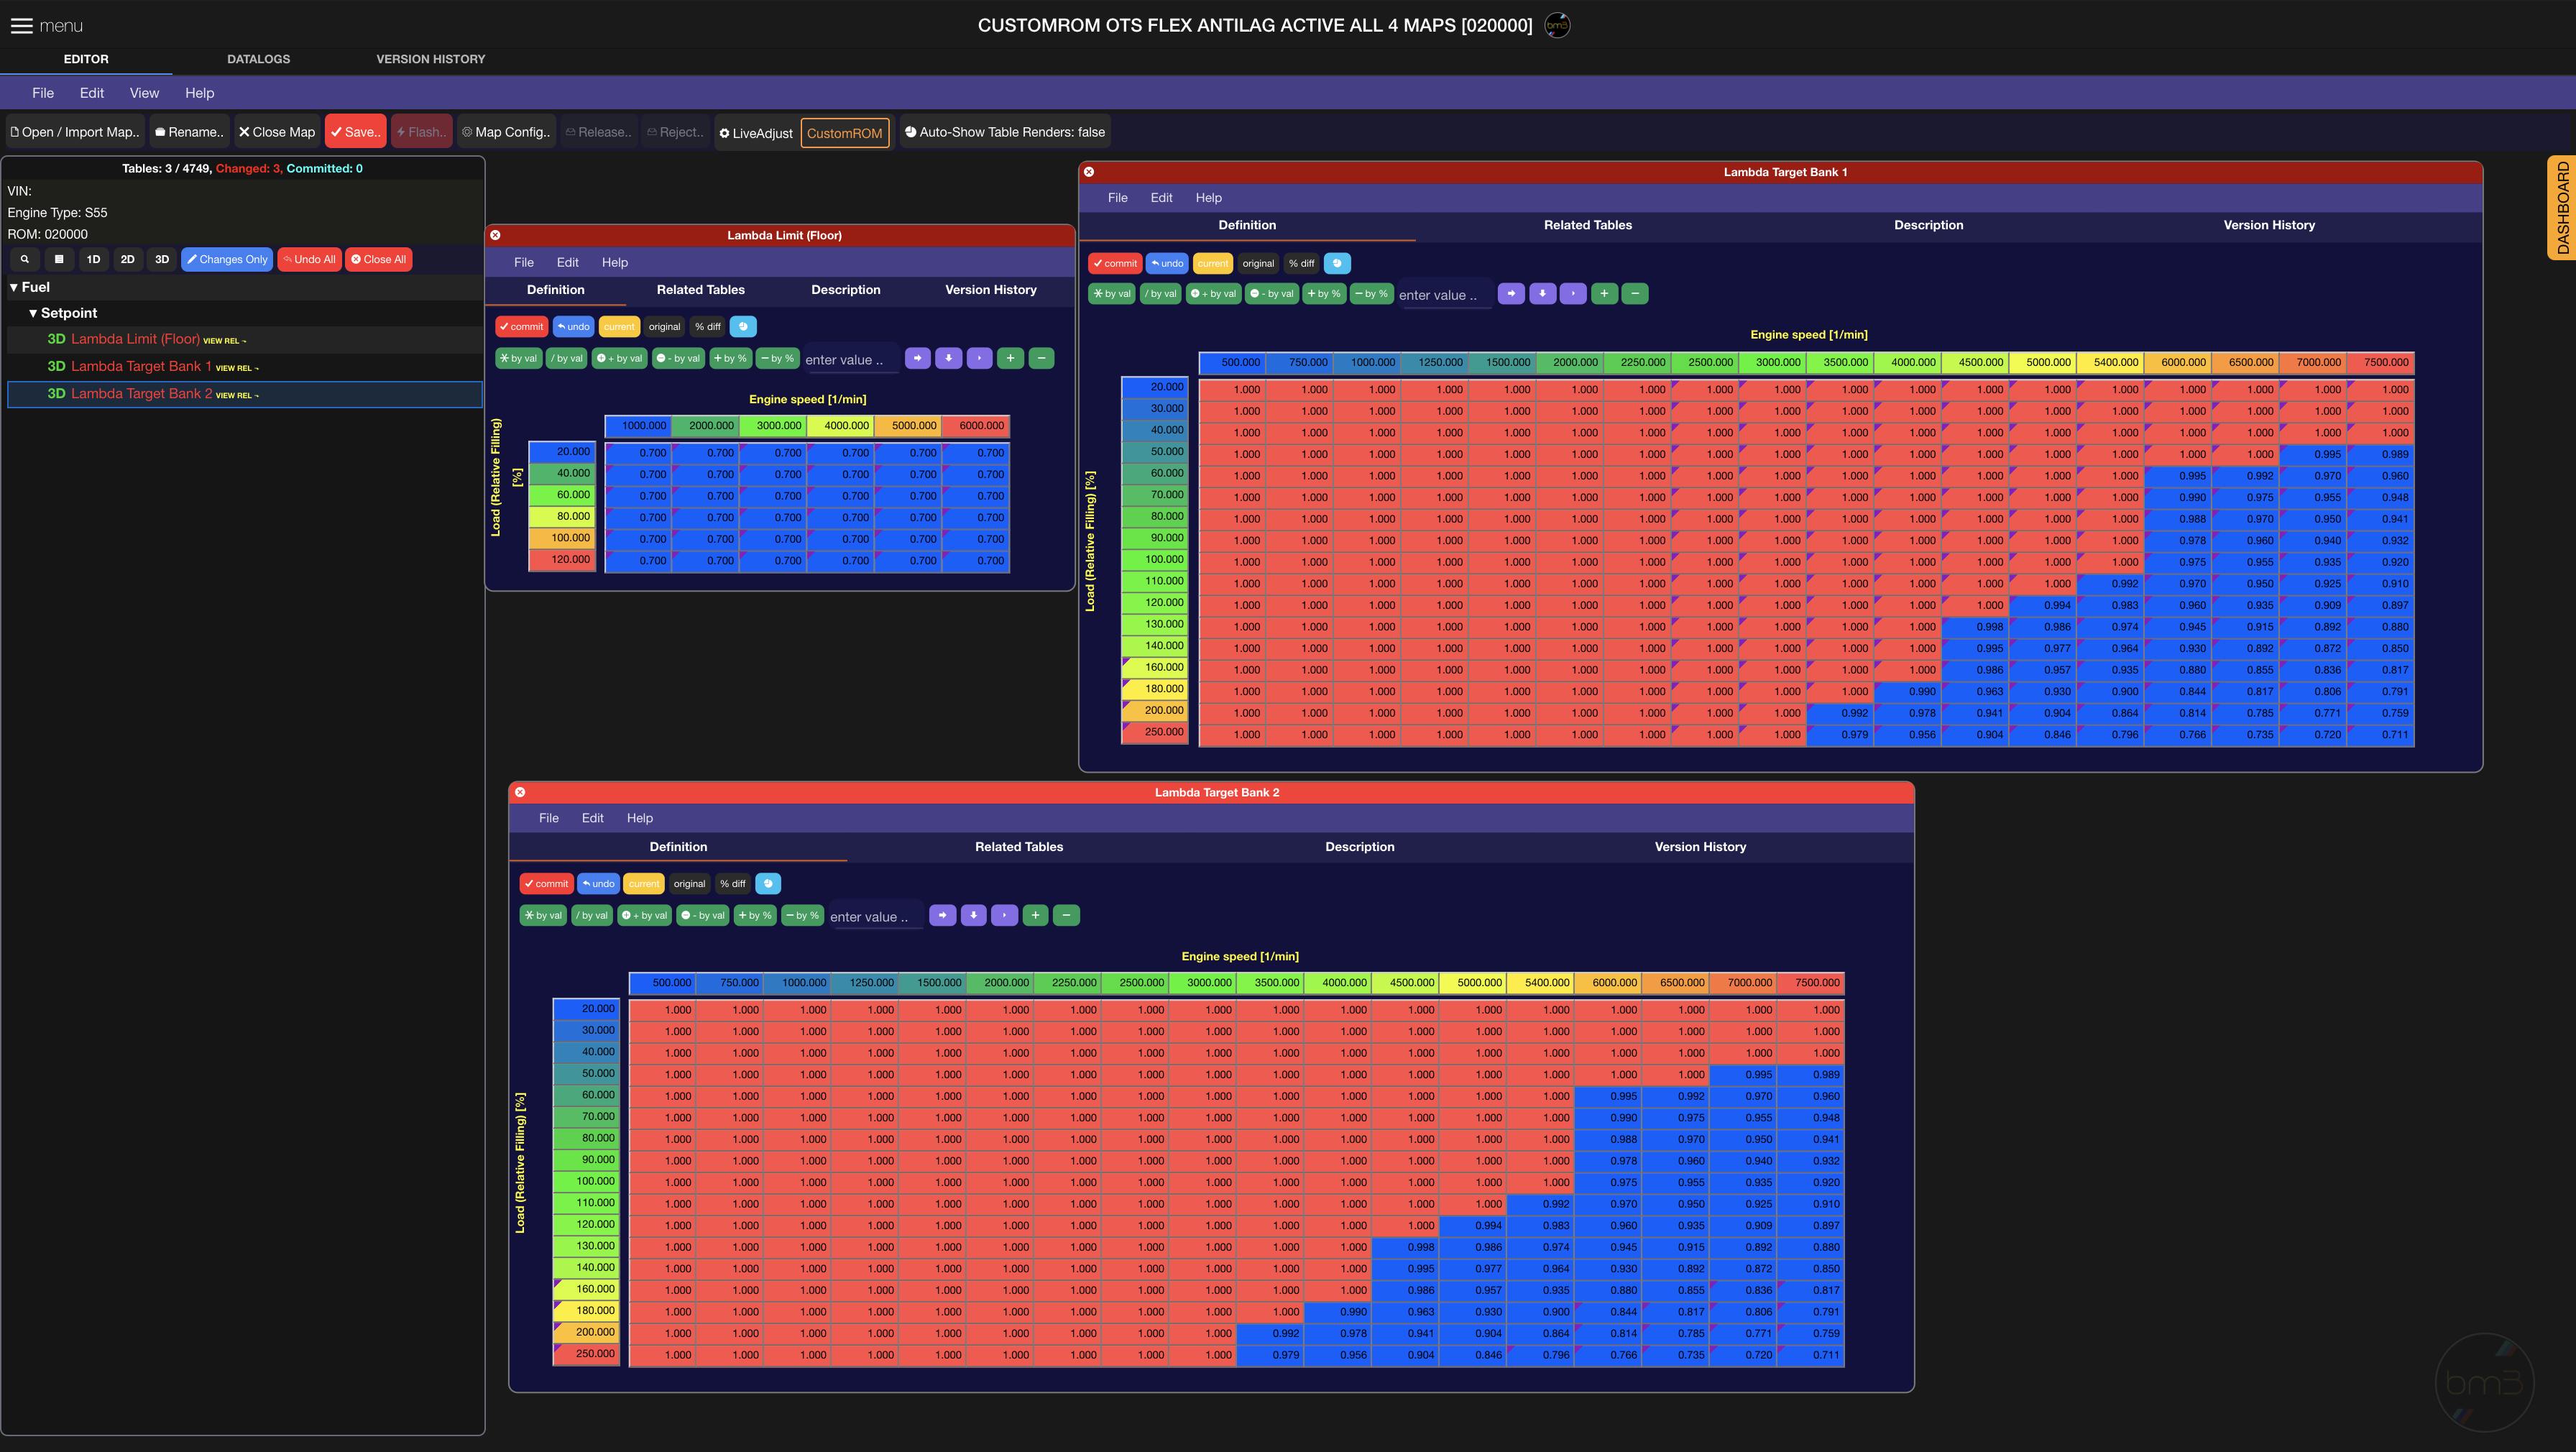
Hovering over the ‘undo’ button on each table will show original values that were in the table before editing/importing. This is only available before the ‘Commit’ button is clicked on.
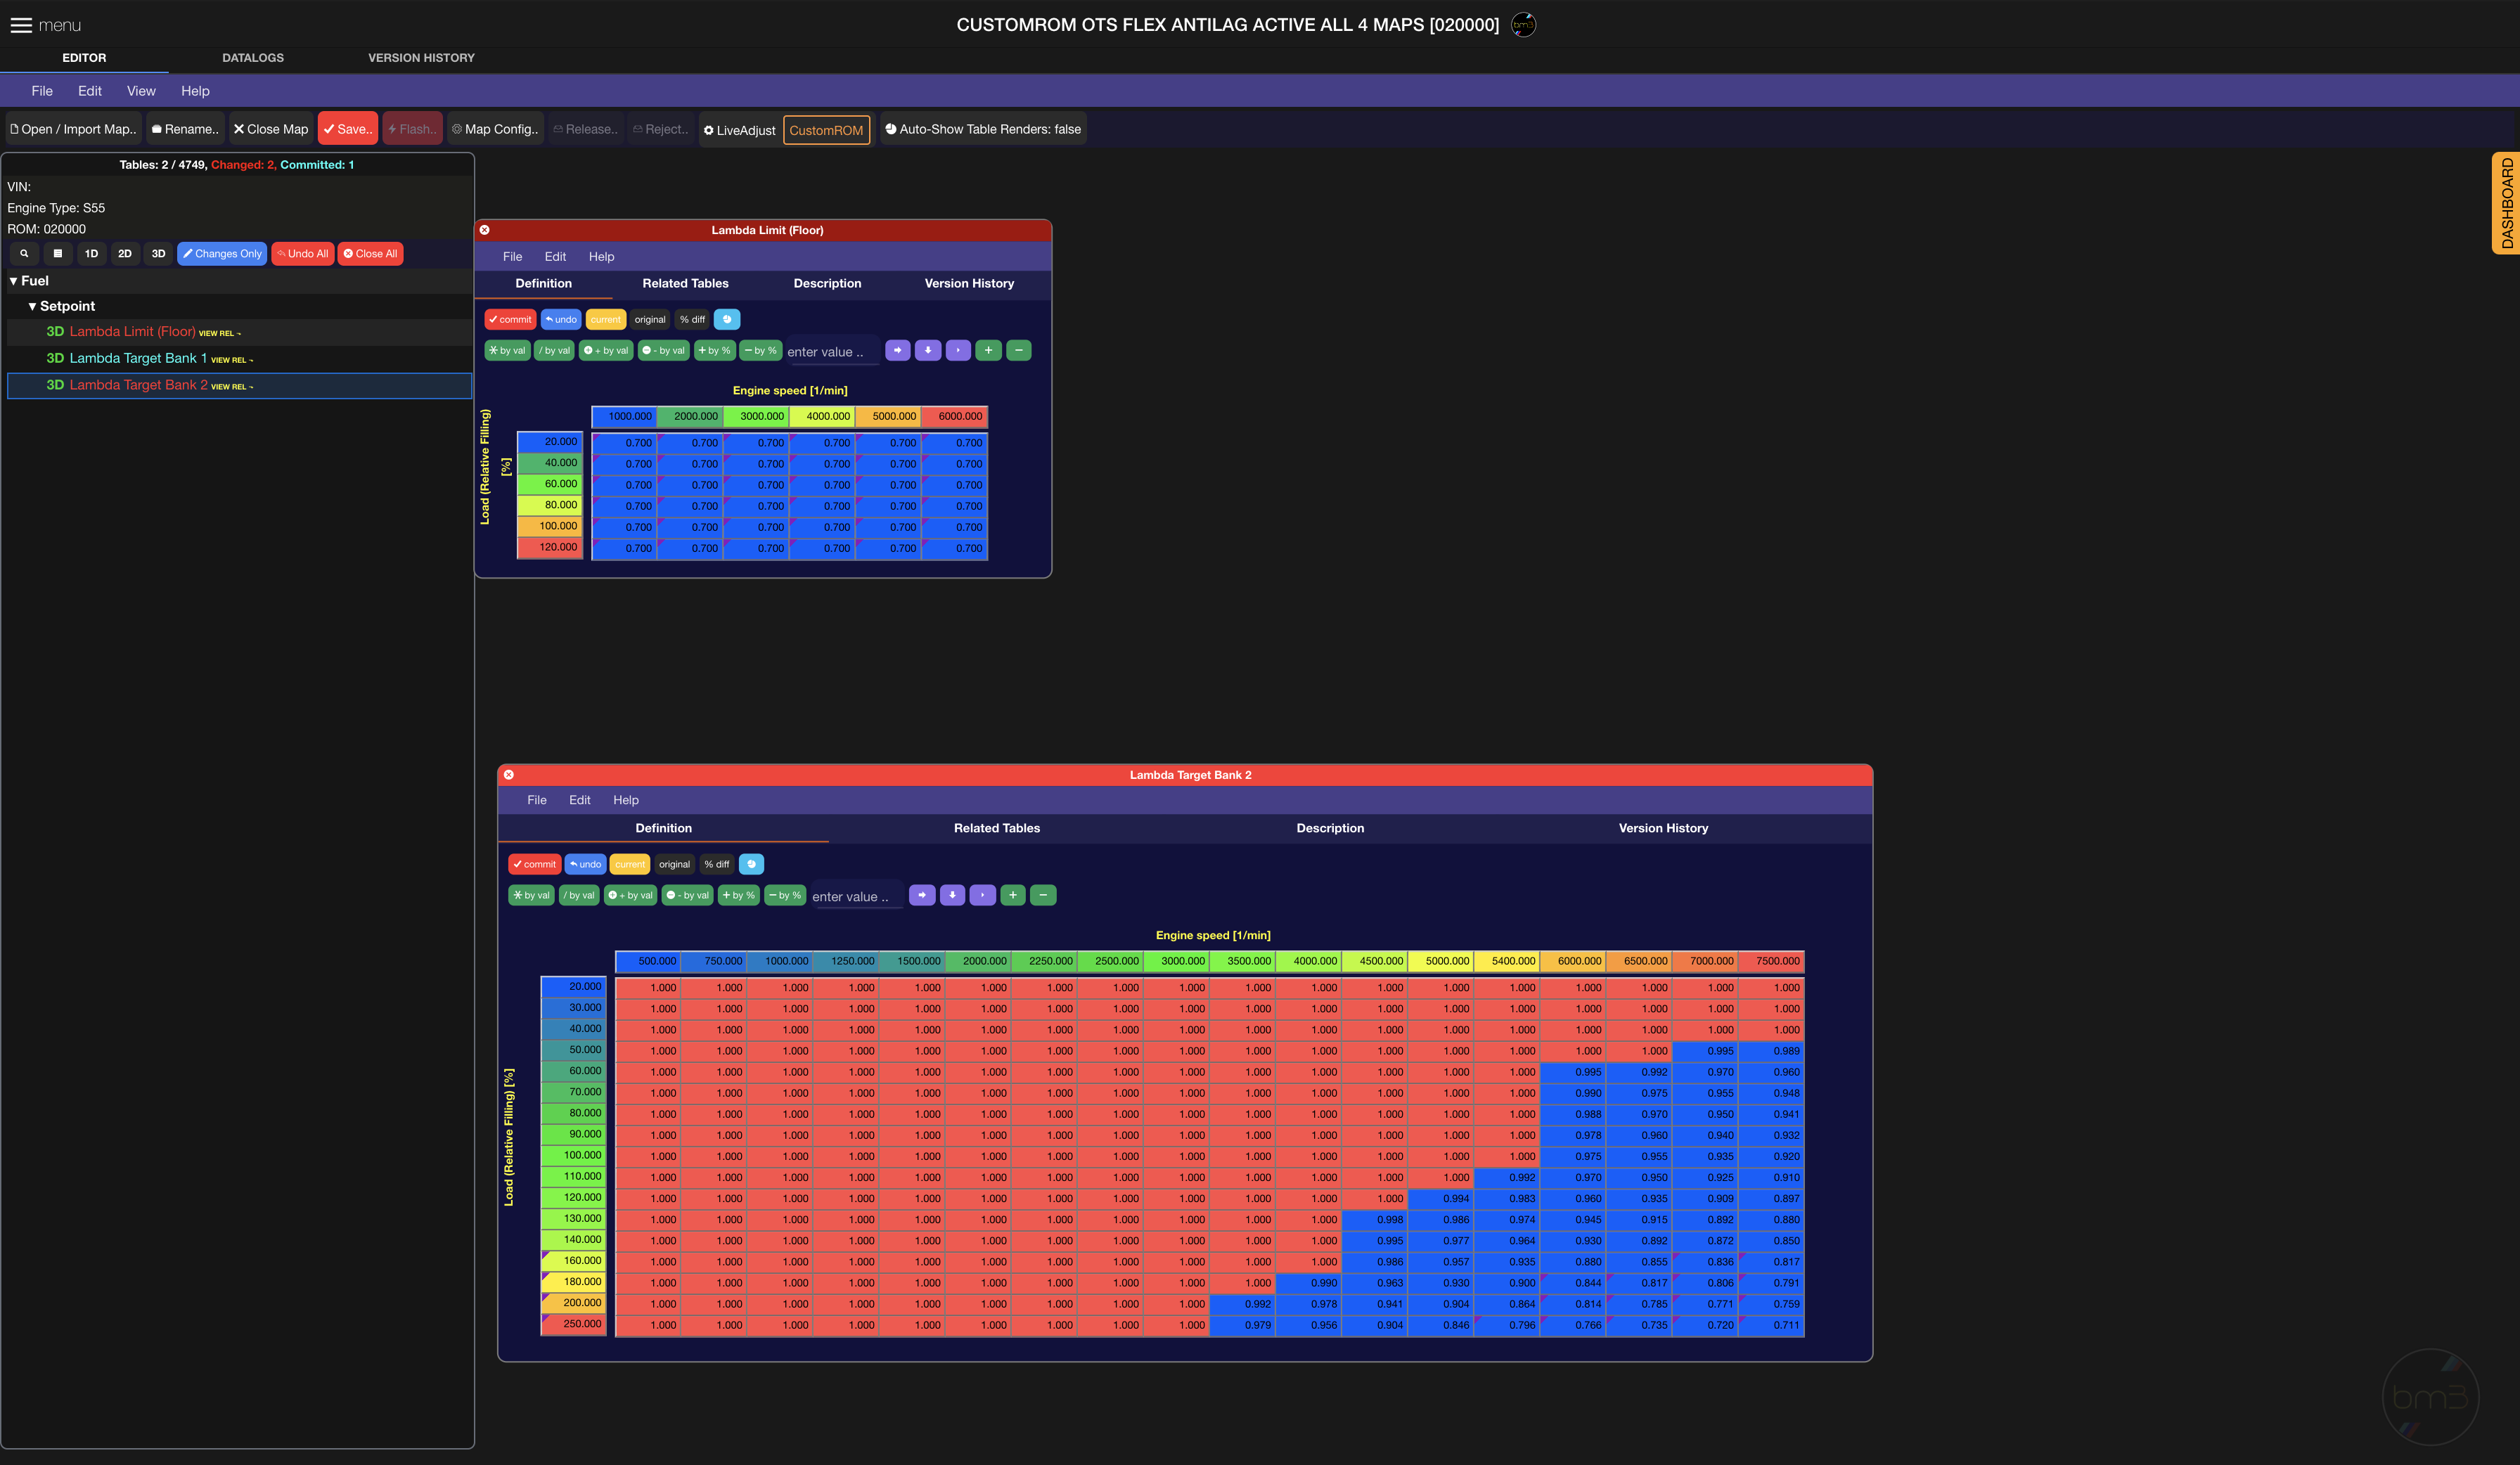
Clicking on the ‘commit’ button prepares that table for ‘save’ and removes original tables from it. Not all tables changed need to be committed before Saving. Saving, much like importing, is selective.
For example, we’ve clicked on ‘Commit’ on one of the 3 tables above, Lambda Target (Bank 1), and table name changes color in the tree from red to light blue, and auto-closes the table, ending up with this in the editor:
Lets assume only we are done with editing, we didn’t commit the other 2 tables but we’d like to Save and finish editing the map. Clicking on Save with 1 table committed and 2 tables still with changes pending (dirty) shows this:
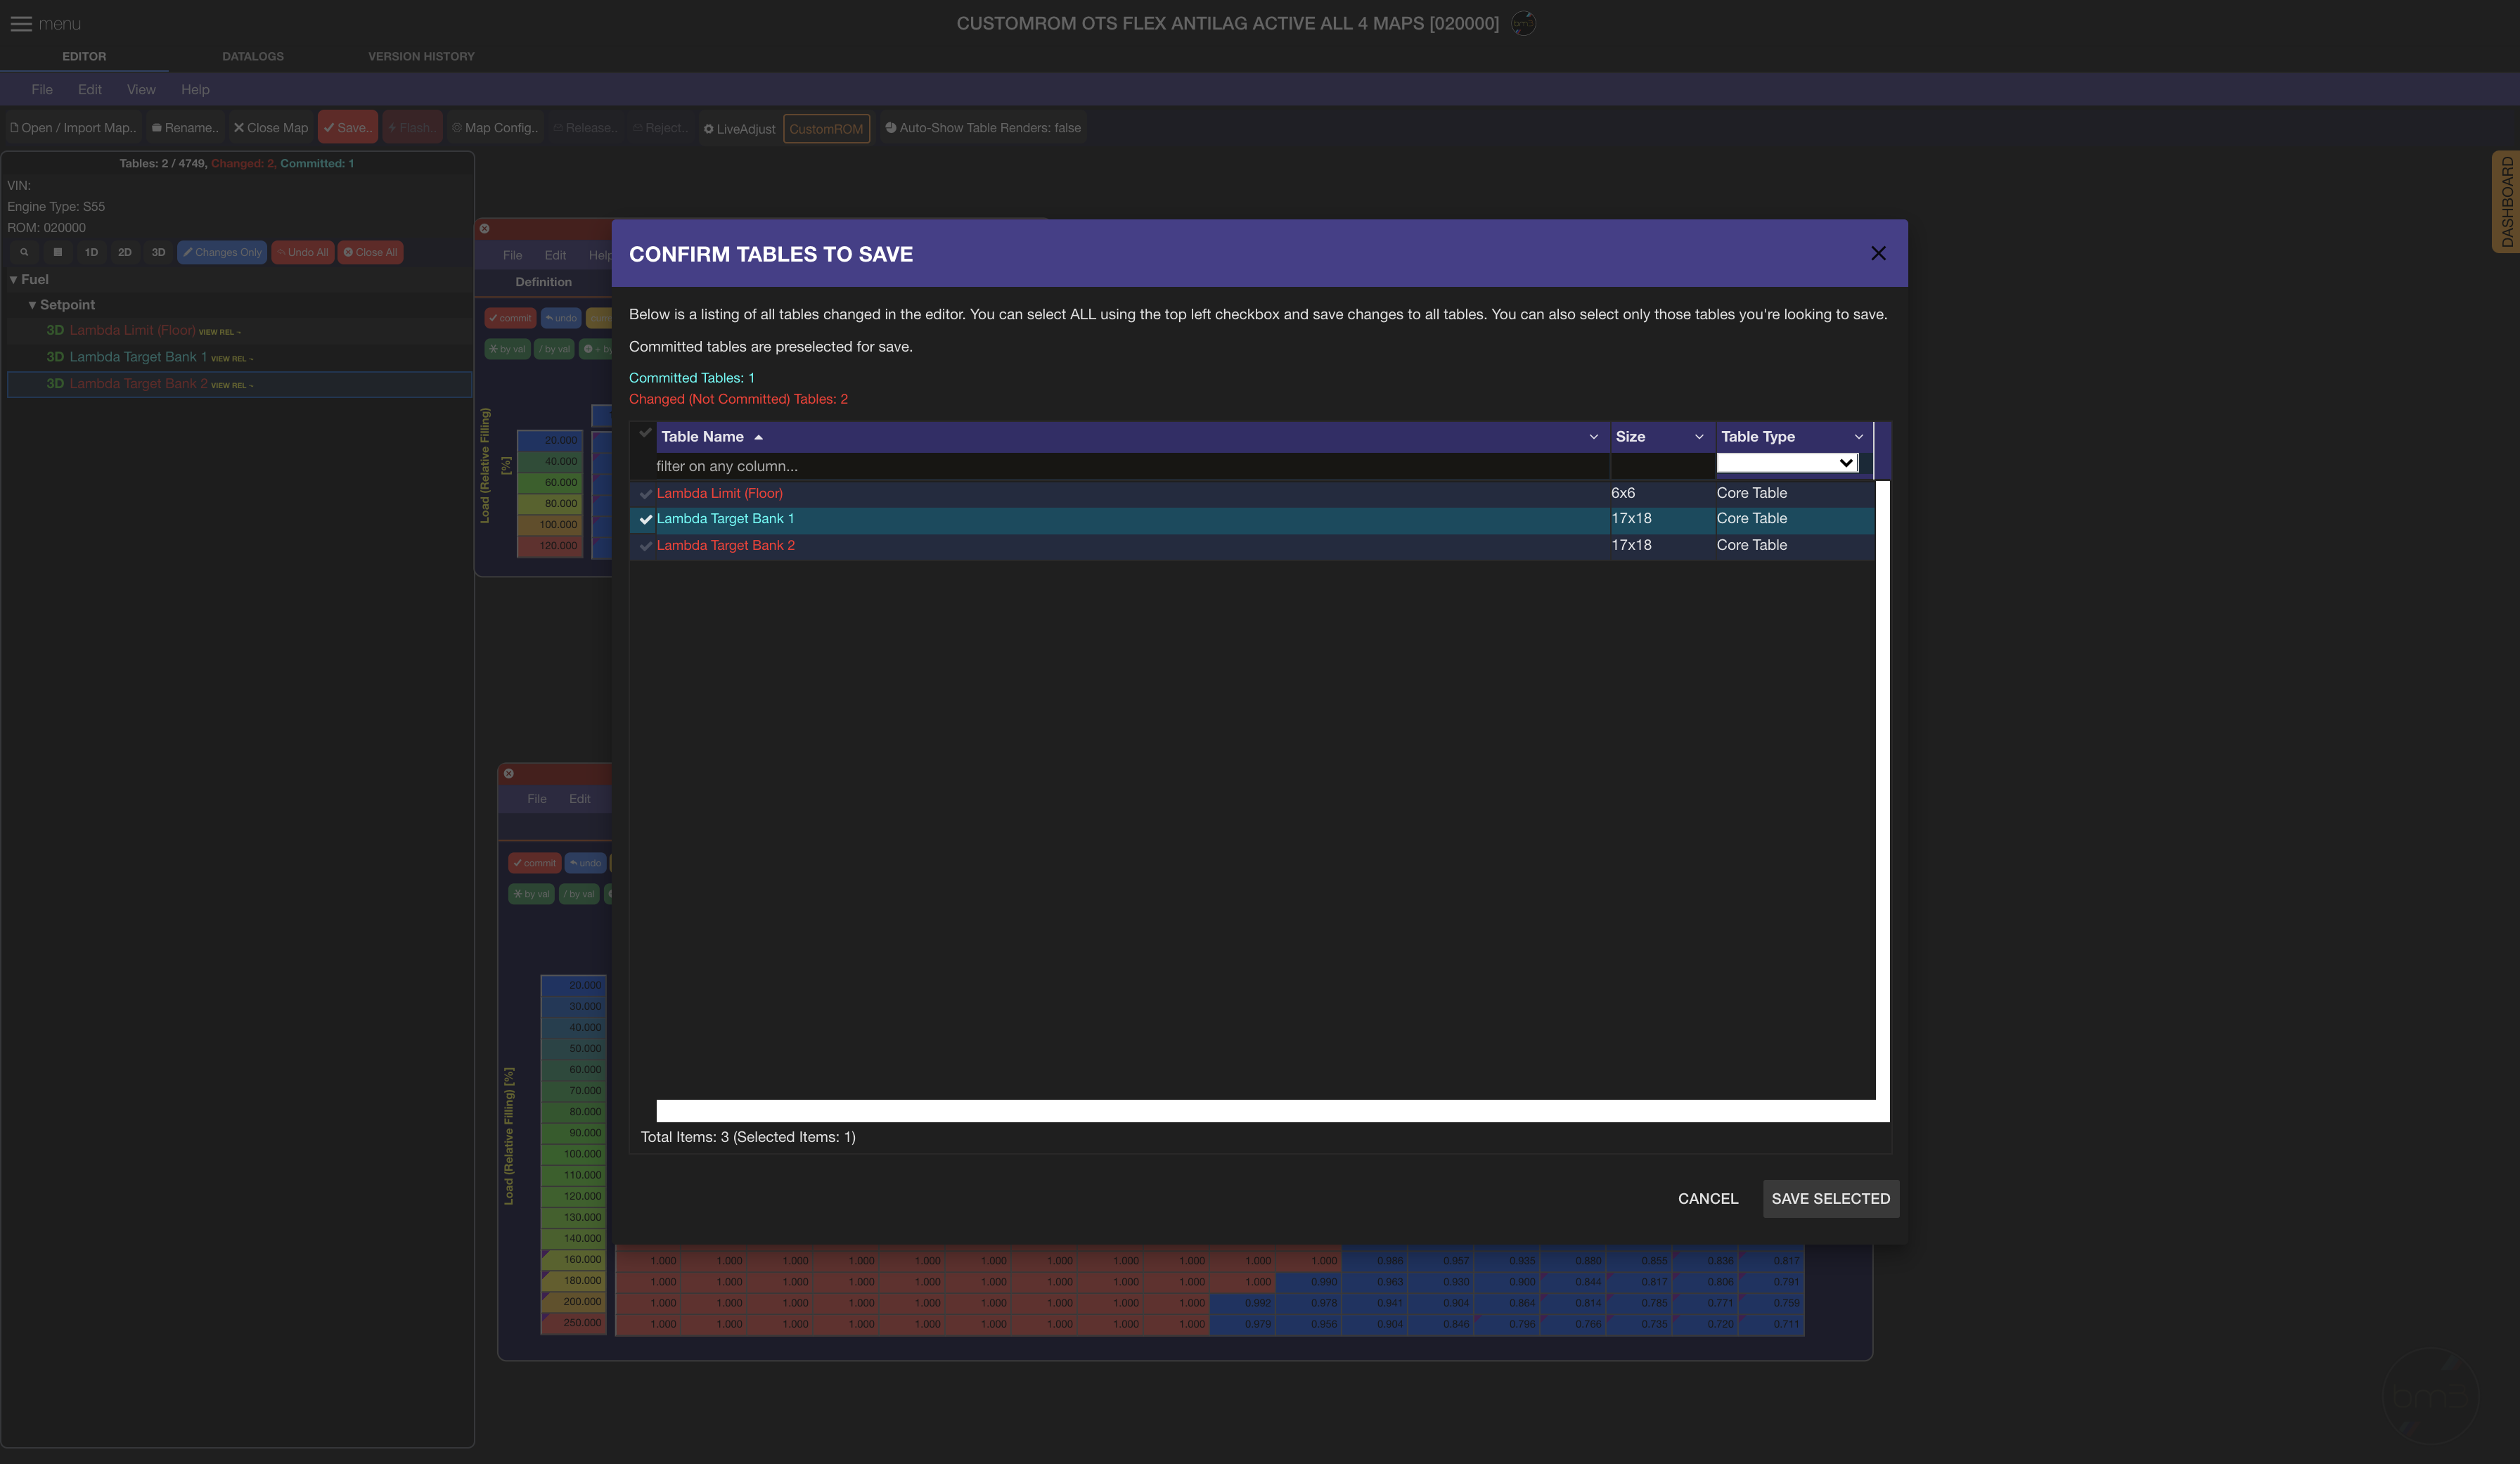
You can see Lambda Target Bank 1 shows preselected for Save. If that is all we wanted to change, we can click the ‘Save Selected’ button at the bottom and only the Lambda Target Bank 1 table will be saved. The other two tables will remain with changes only in the editor and can be subsequently saved, or, they can be ignored and map closed.
Upon clicking ‘Save Selected’ the following screen is presented:
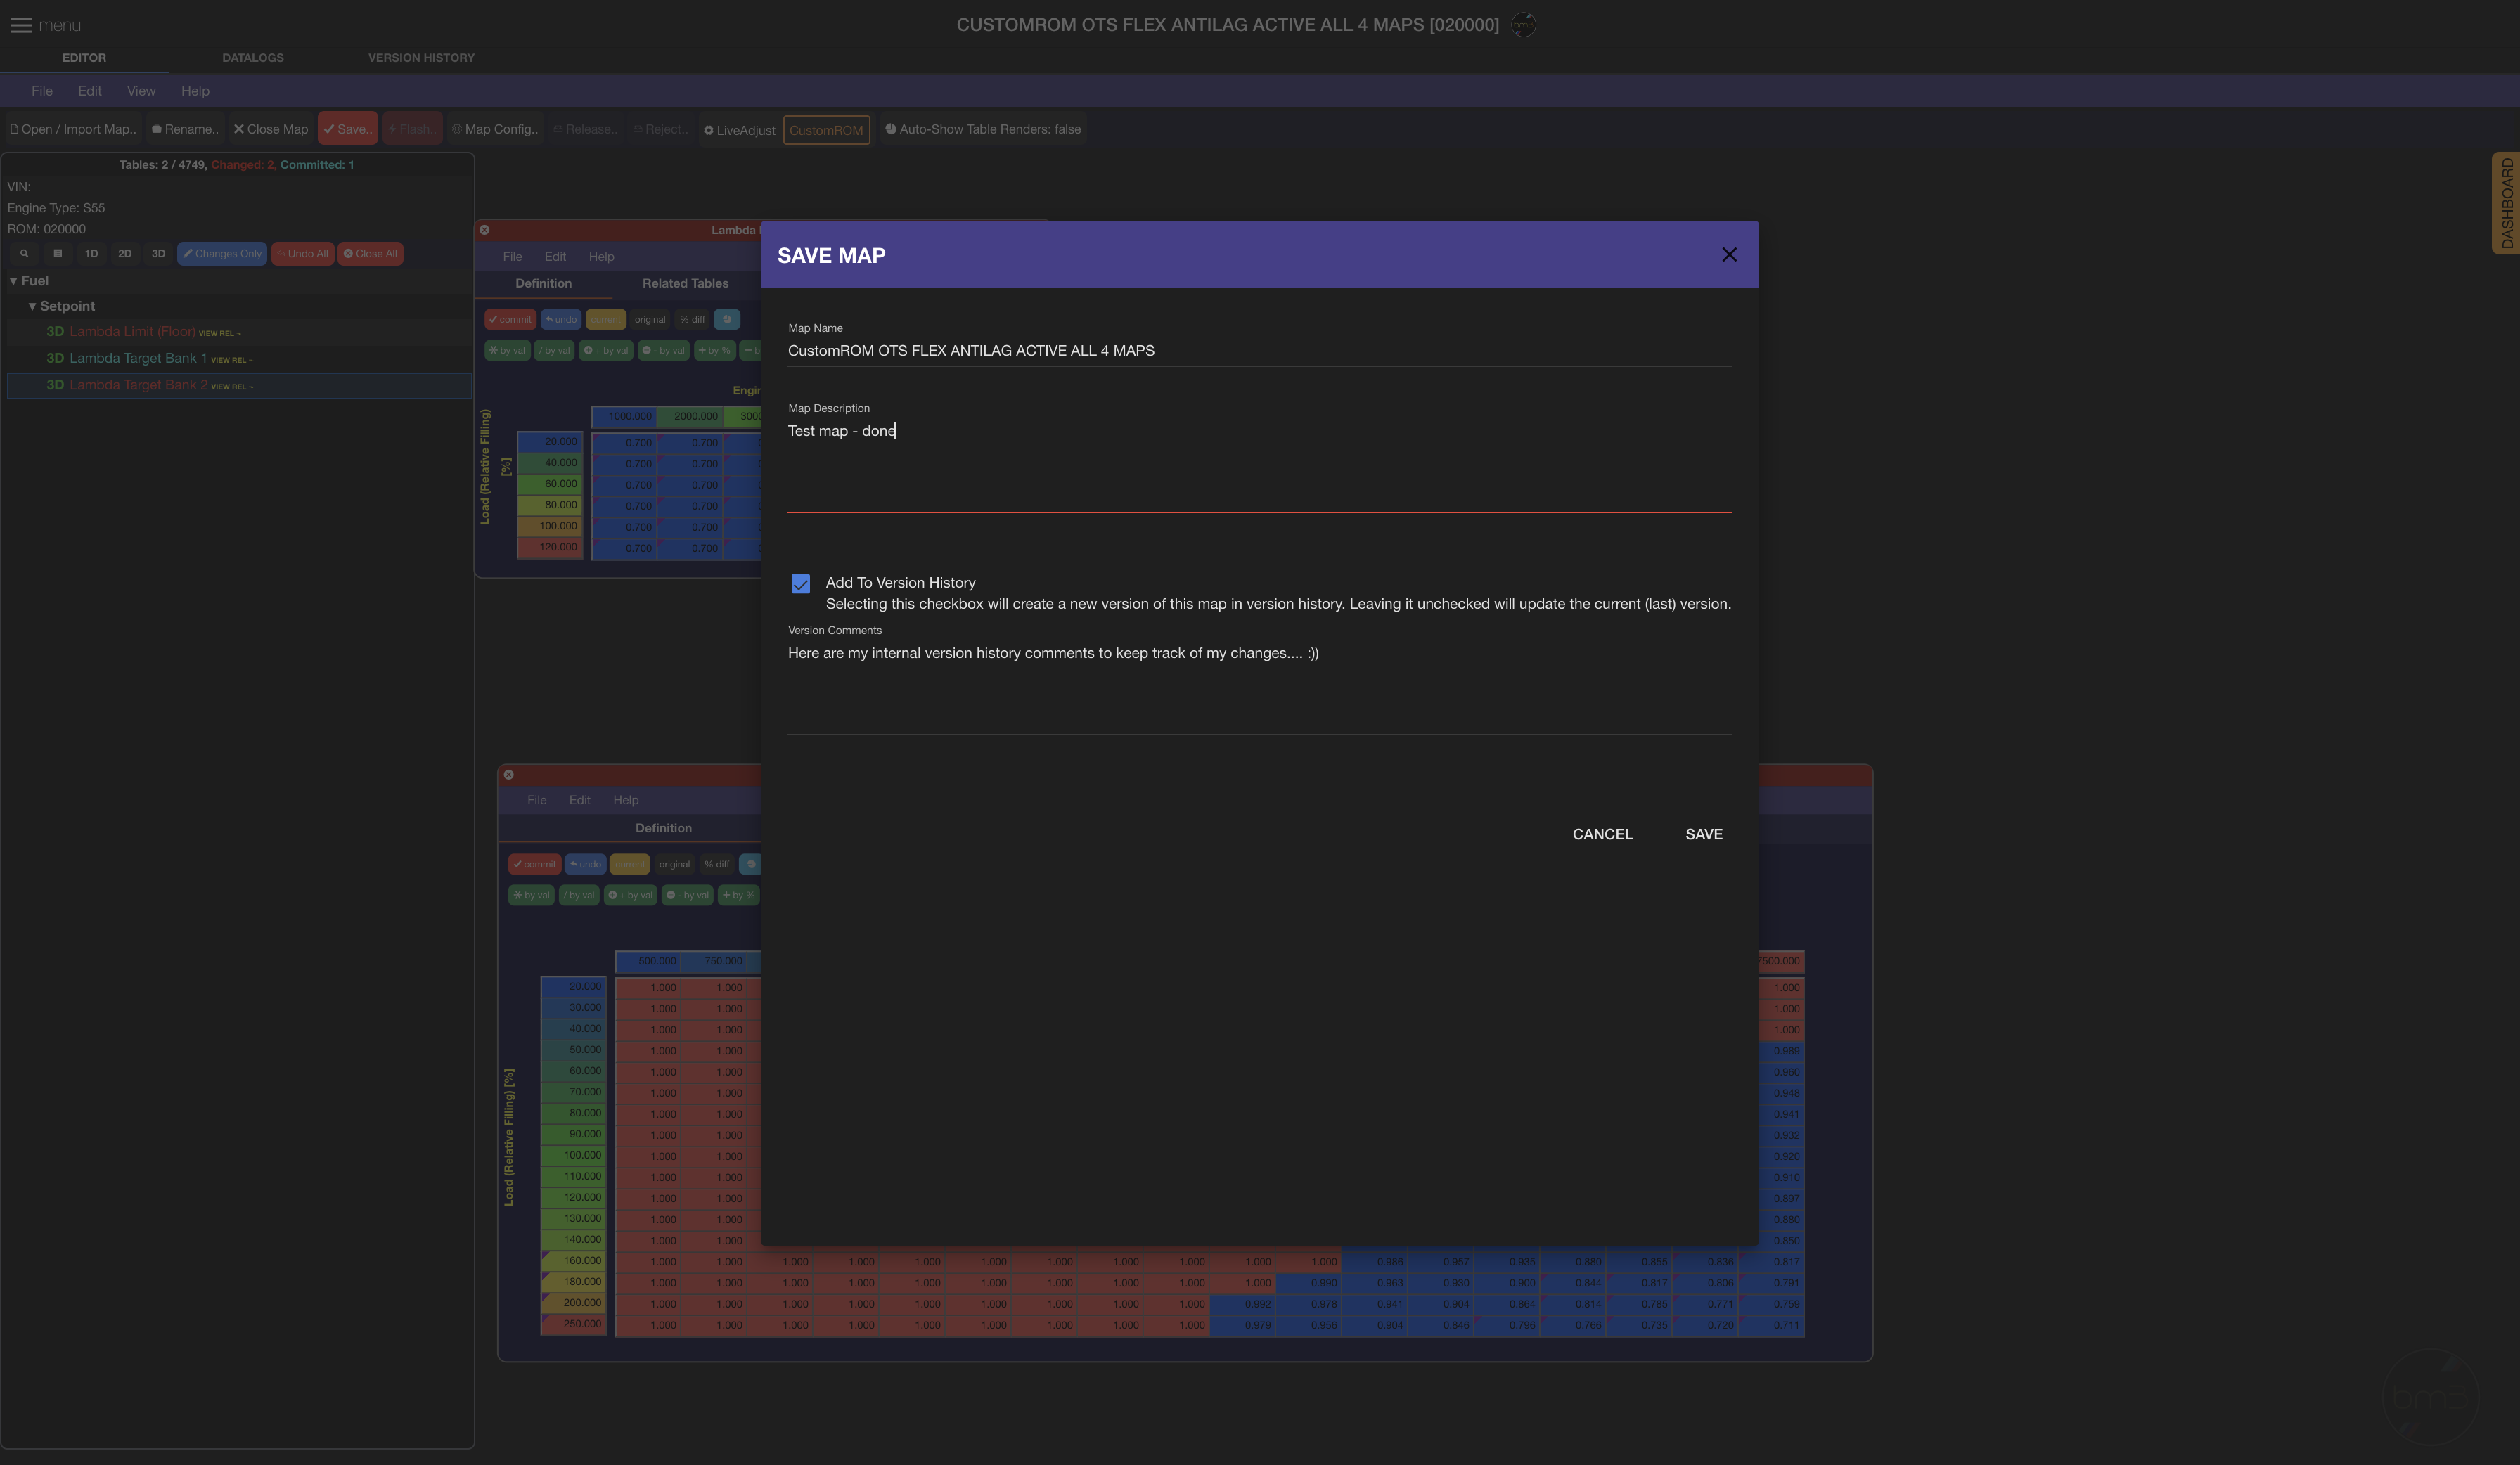
Upon a successful Save, going to the Version History you’ll be able to see the map has been versioned and its changes can be imported back to the map at any time if required:

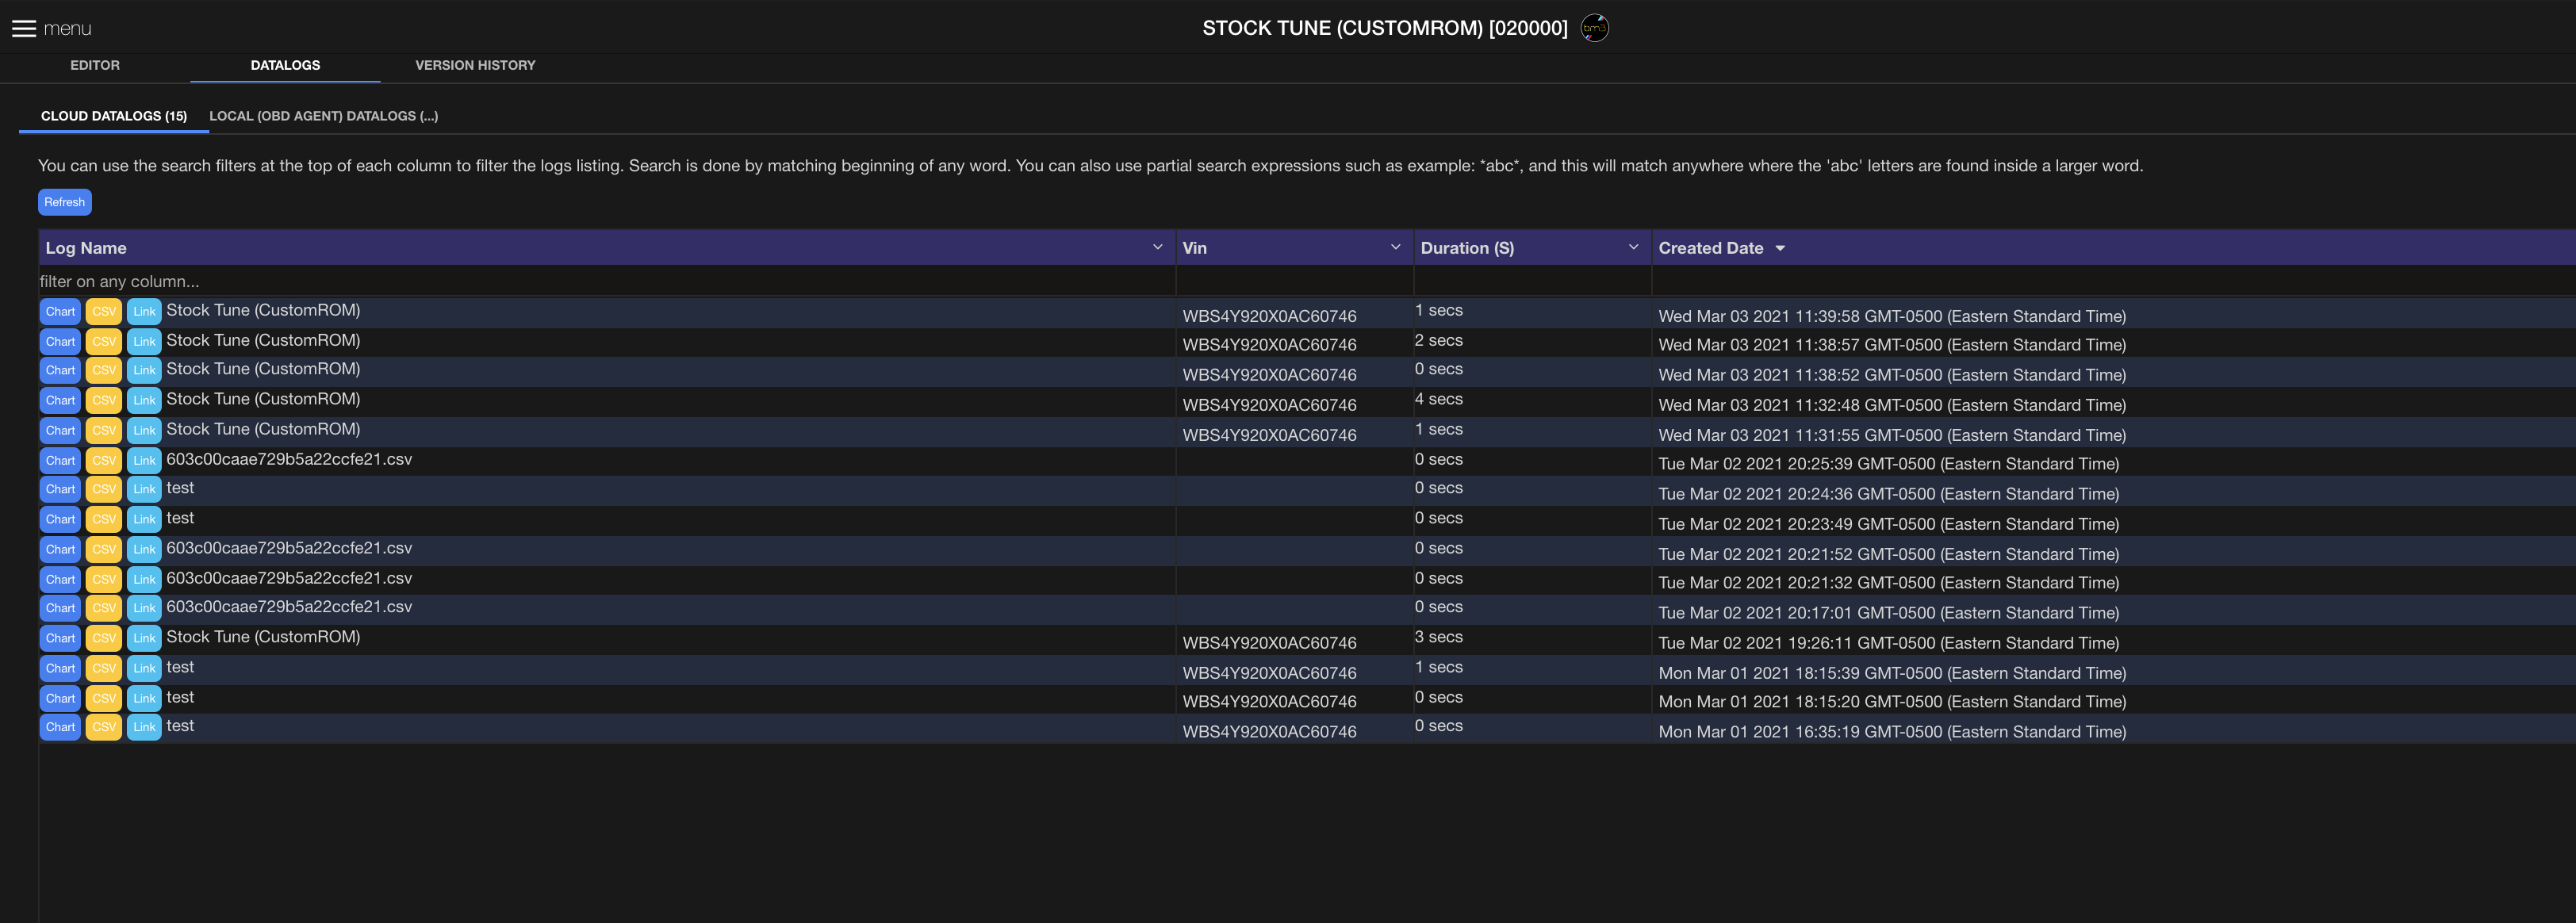
Showing Datalogs Tab View - chart logs, download CSV files for external tool graphing, copy link to send to anyone externally, showing dates in current user’s timezone:
Version History at Map Level - allows importing any version into the currently open map

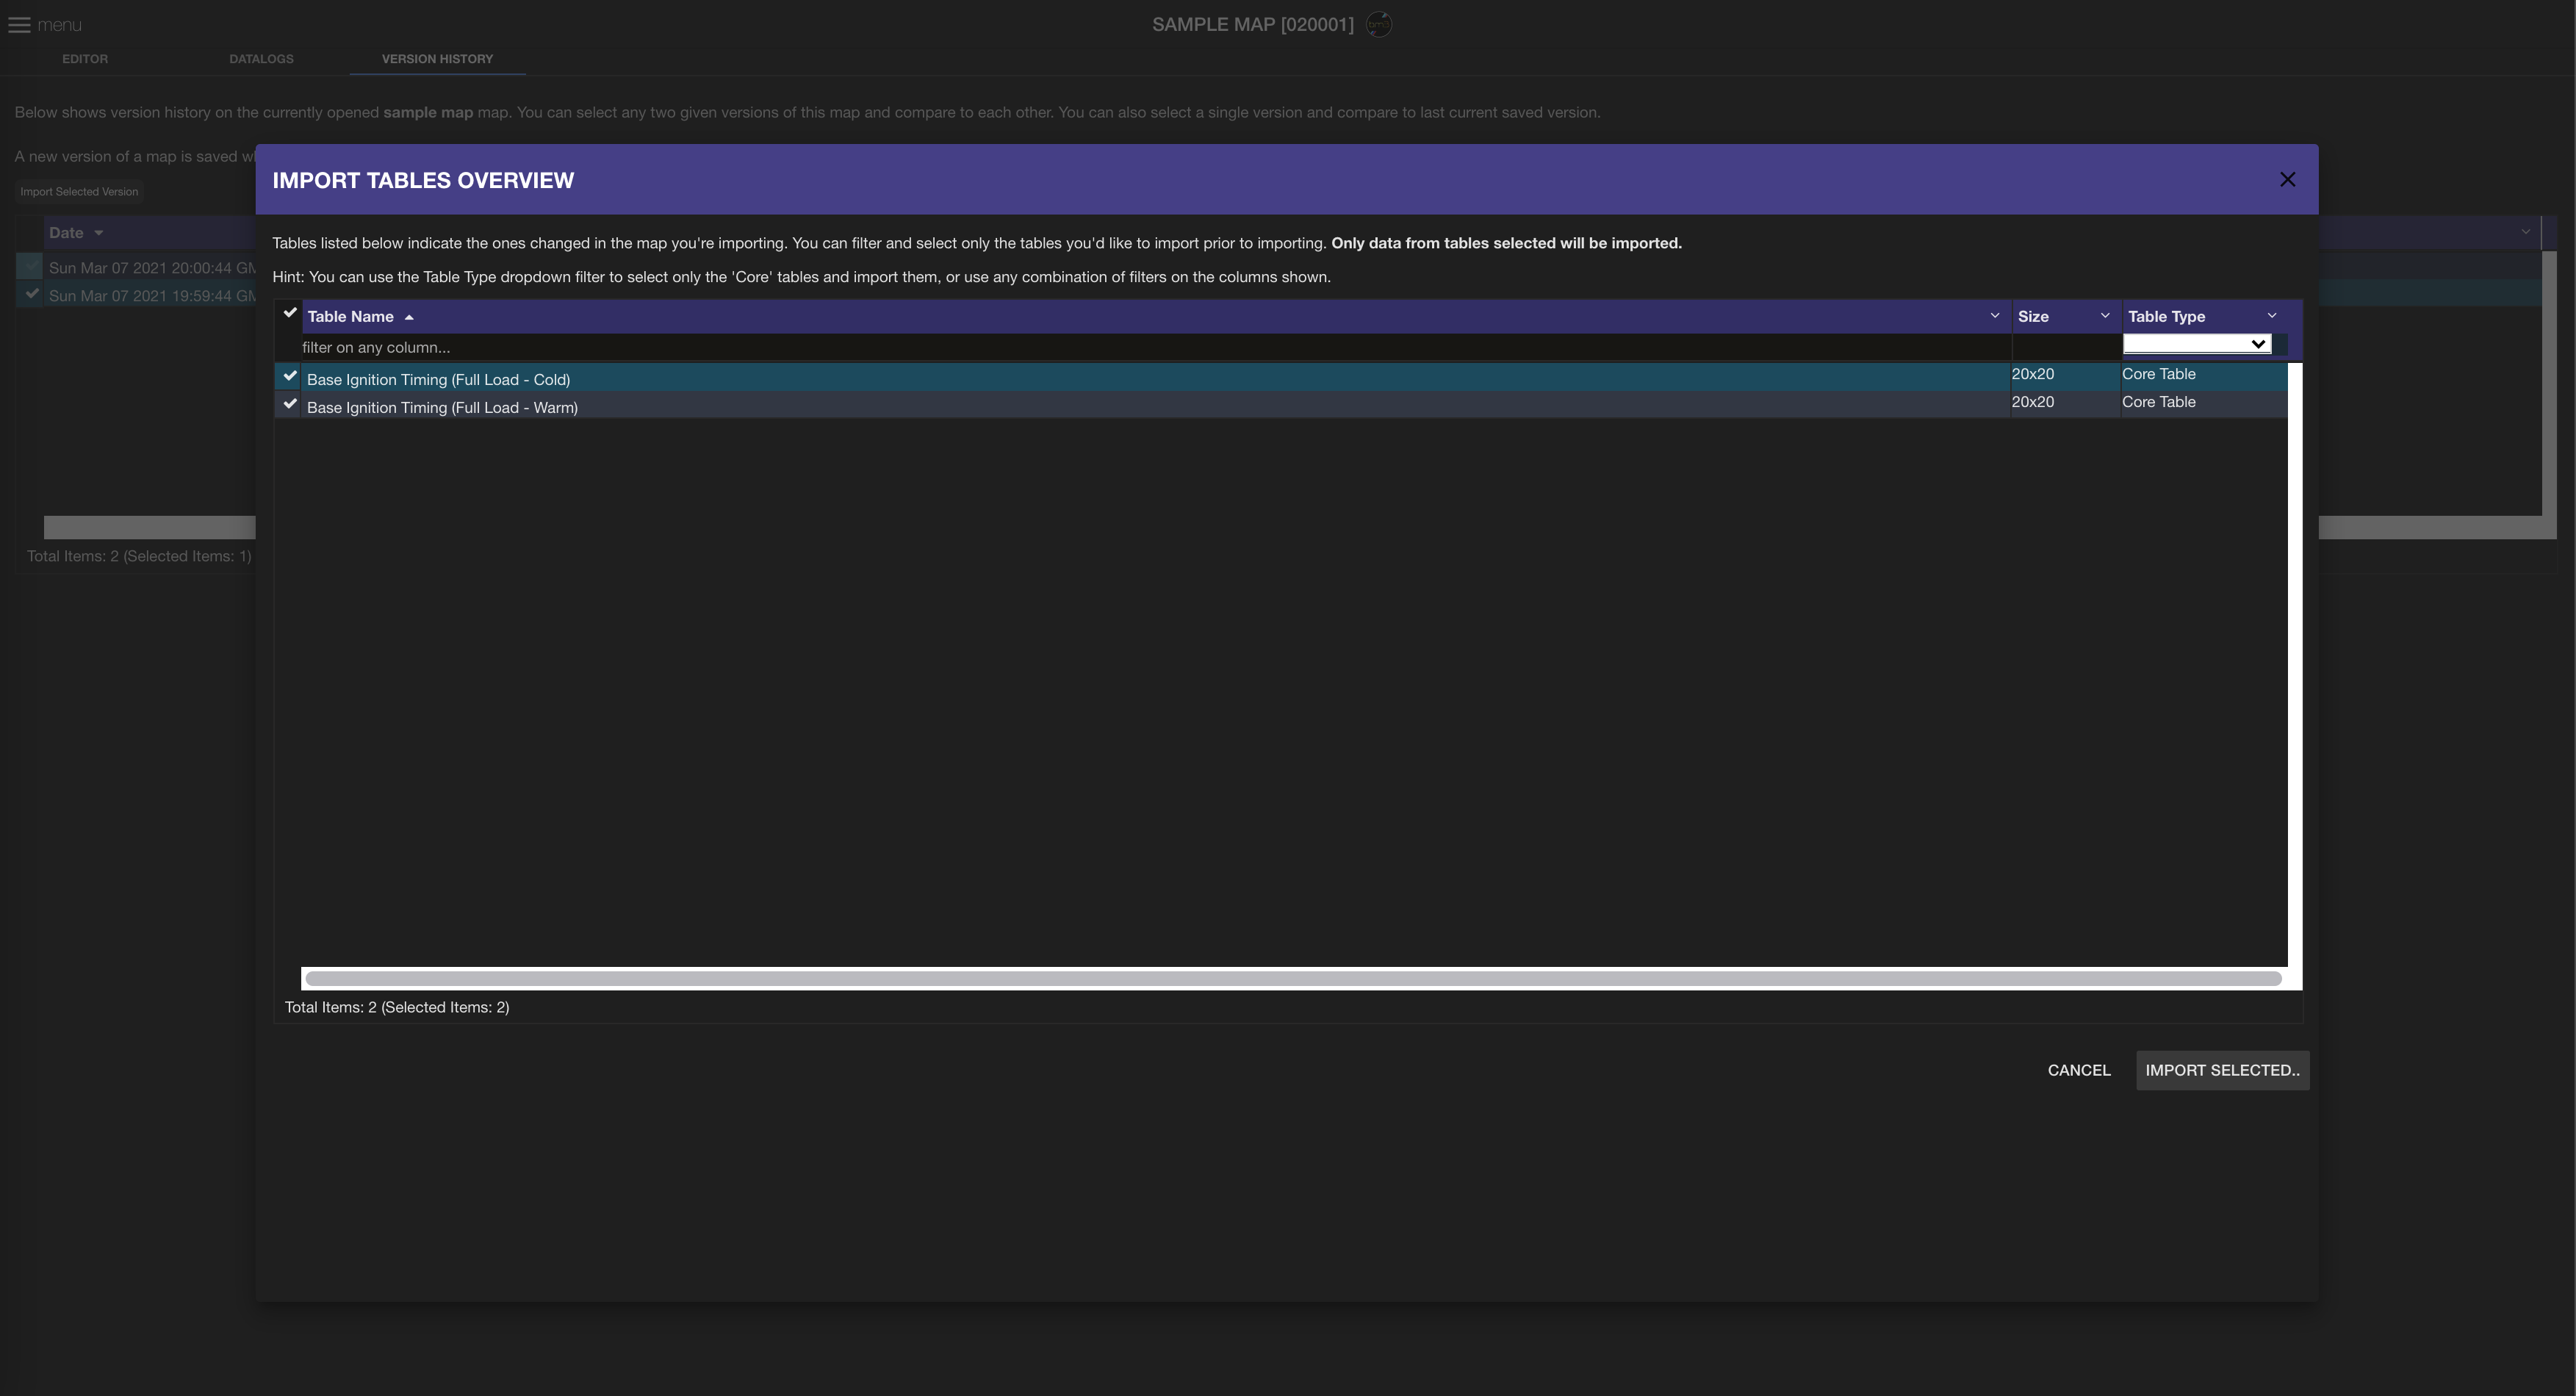
When choosing to import a specific version from Version History the import tables overview screen allows selection of tables to import along with filtering by table name and category.
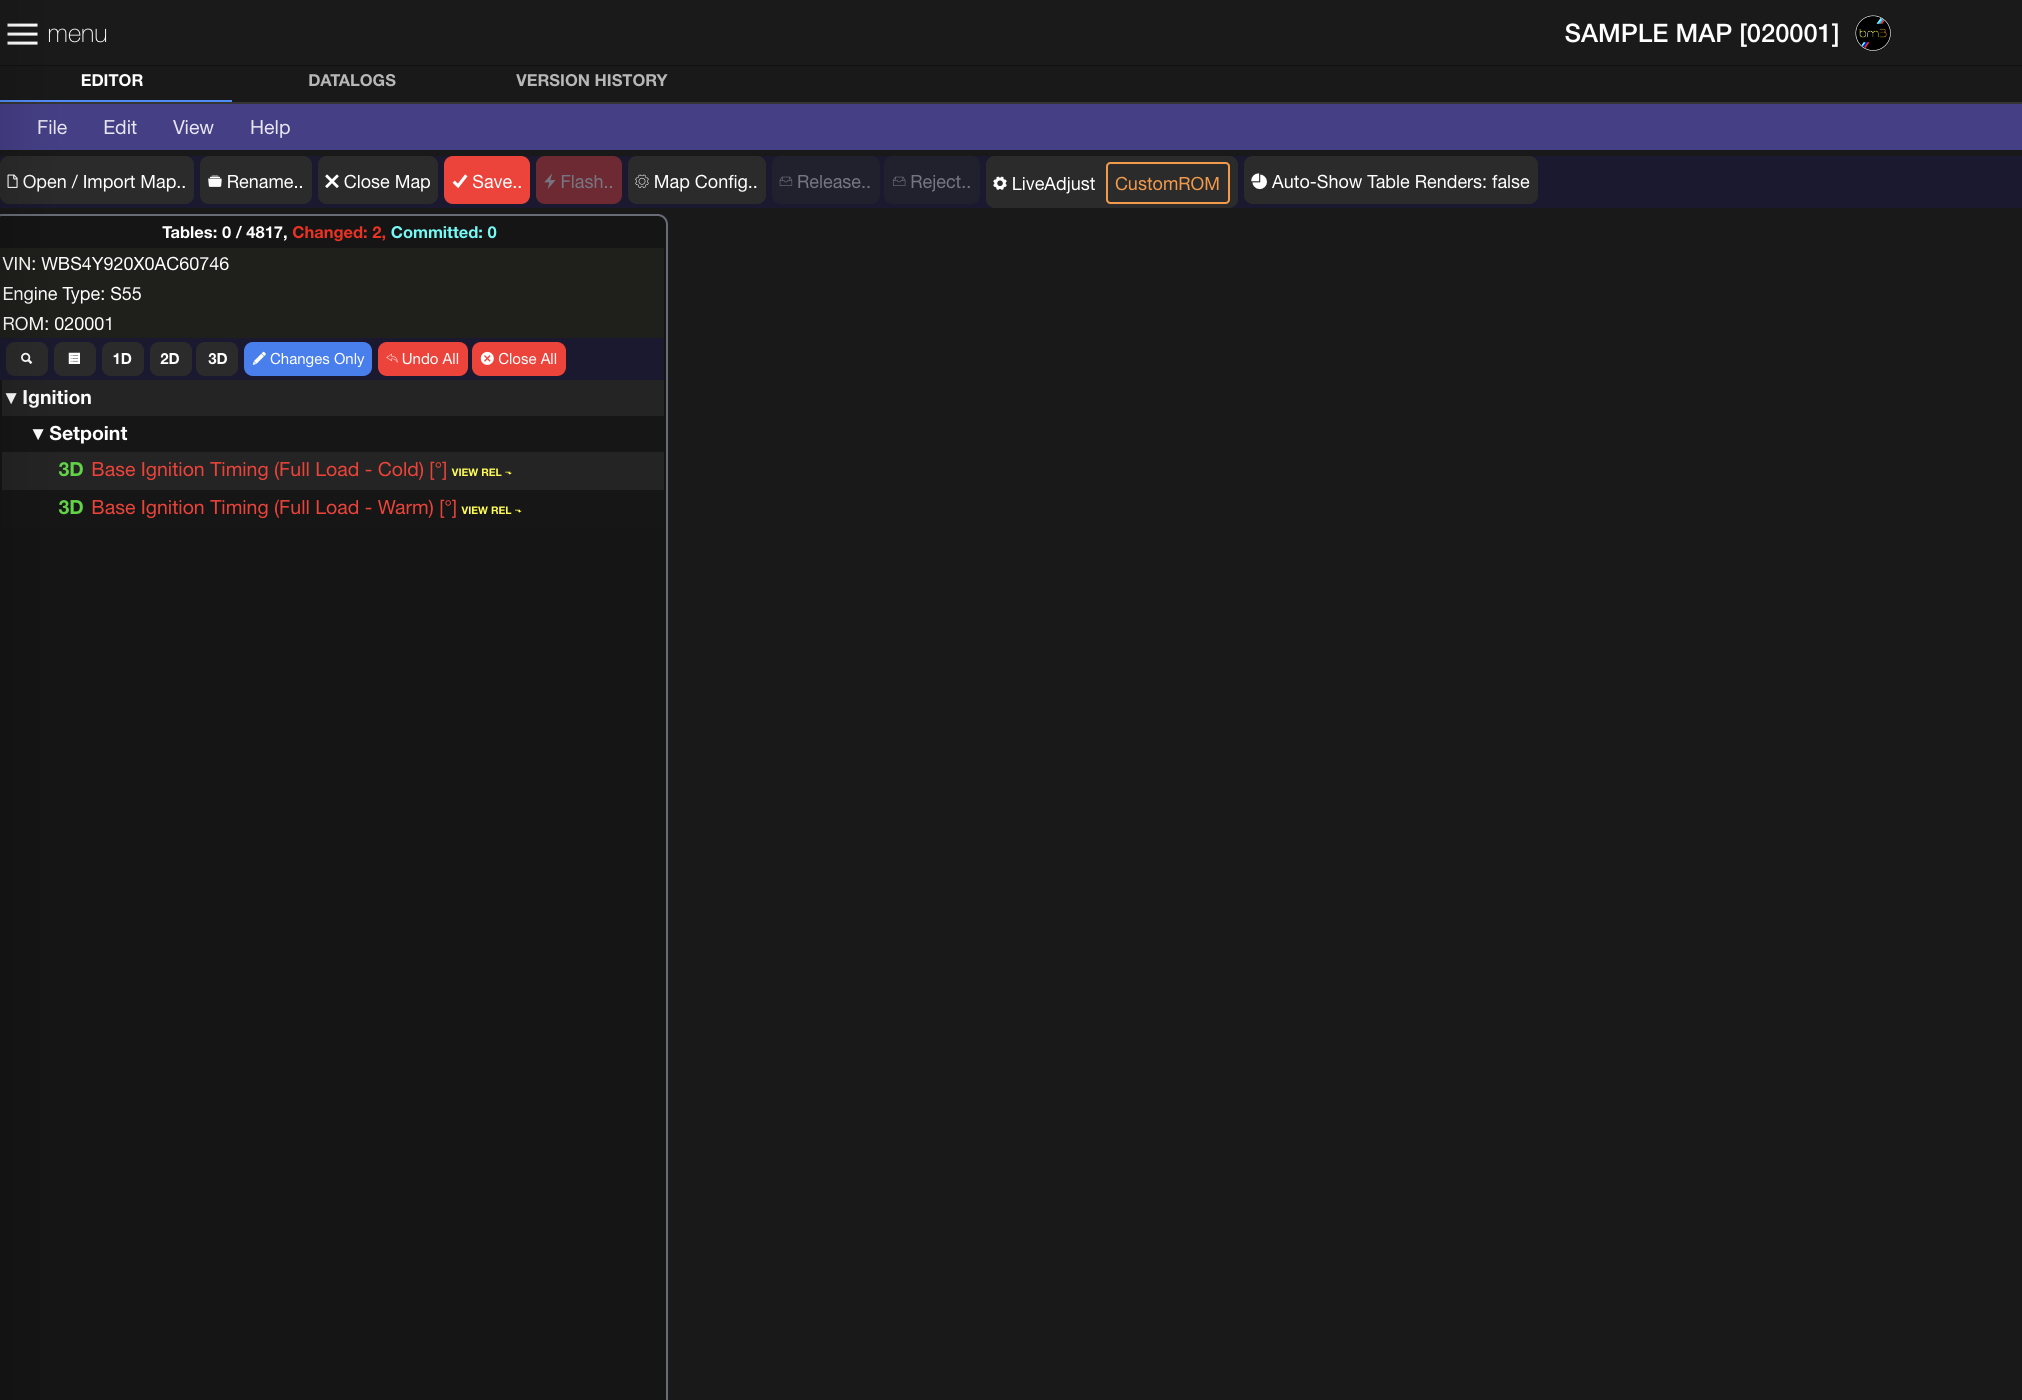
After import, the Table Tree changes to ‘changes only’ mode and shows only the ‘dirty’ tables (those not committed yet). This can be toggled off using the buttons above the Table Tree. Undo All is available to undo all table changes that haven’t yet been committed in the map.
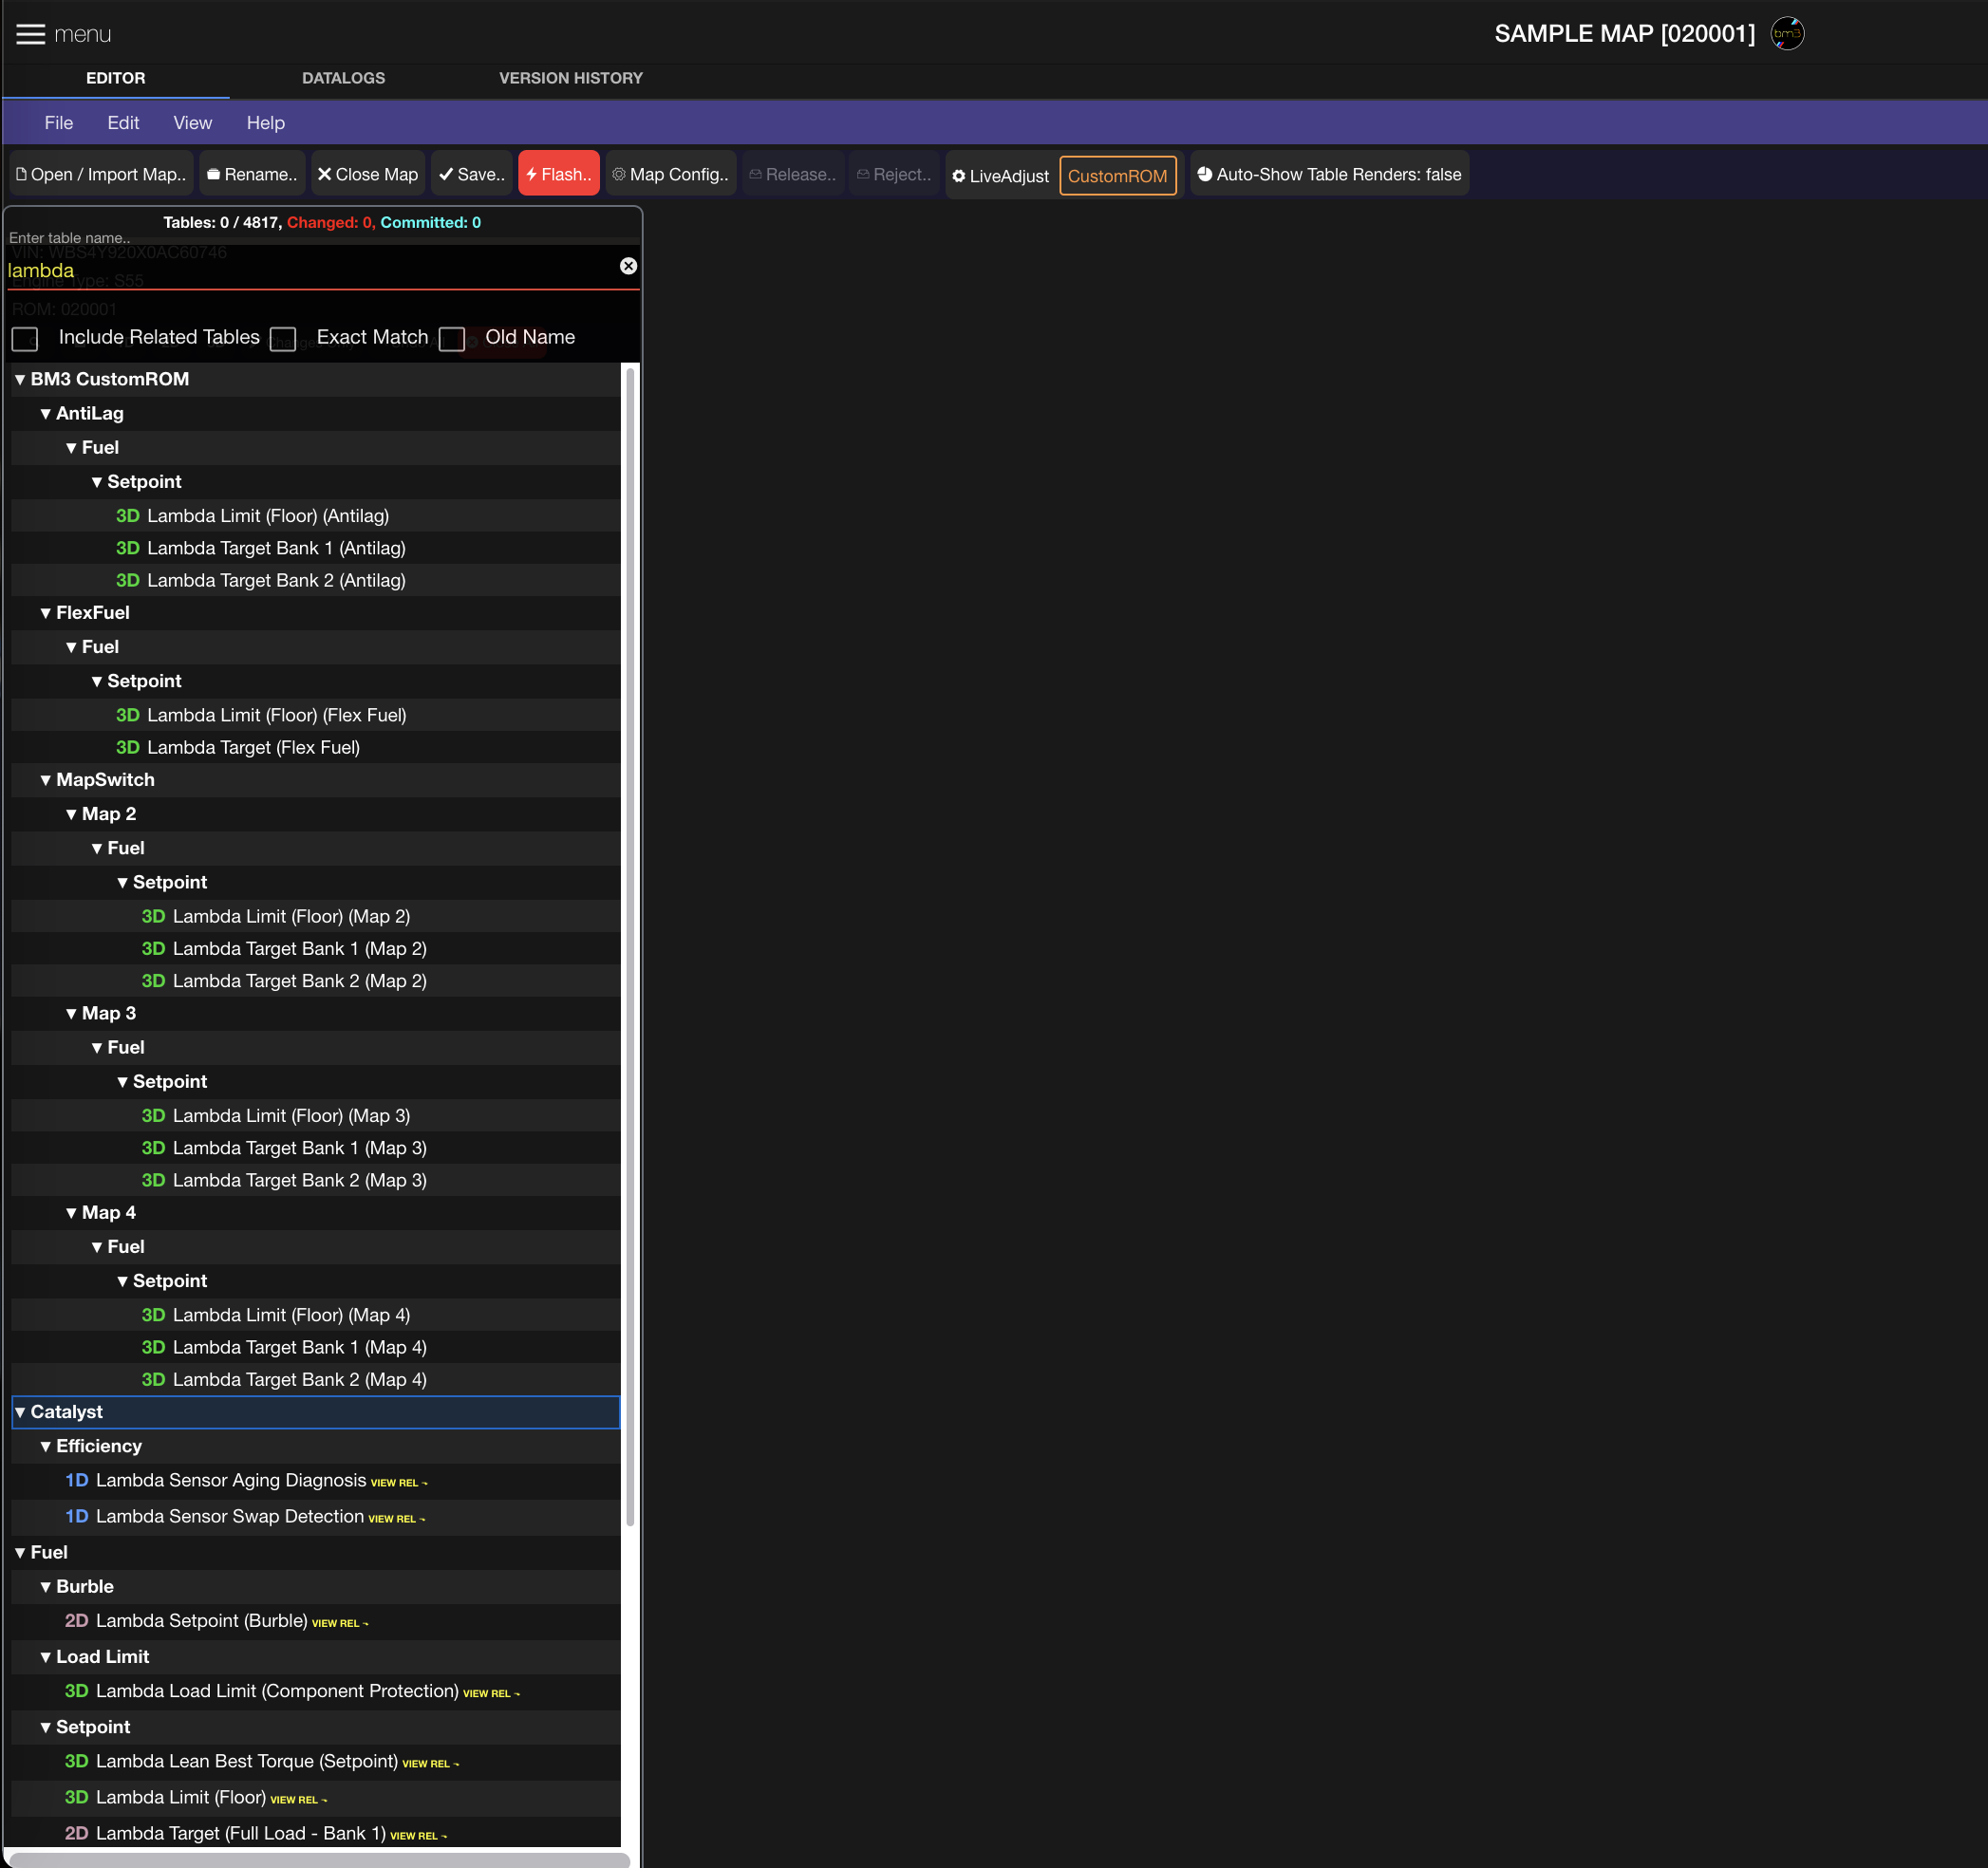
Various keyboard shortcuts are available while in the Table Tree. Pressing the 'f' key for instance while in the tree will display the search dialog at the top and tree will filter as you type the name of the table.
Filtering the Table Tree can be done using the options illustrated with checkboxes to alter default filter behaviour. To exit Filter mode, hit the Esc key or the 'x' button in the filter input on the right side.
Above the Table Tree, you’ll see filters for 1D, 2D, 3D tables. Use these whenever you’d like to filter the tree and only focus on tables of a give structure type (1D for a toggle or switch, 2D for a curve, 3D for a 3-dimensional map). In the screenshot below both 2D and 3D are selected which filters the tree to show only 2D and 3D tables.
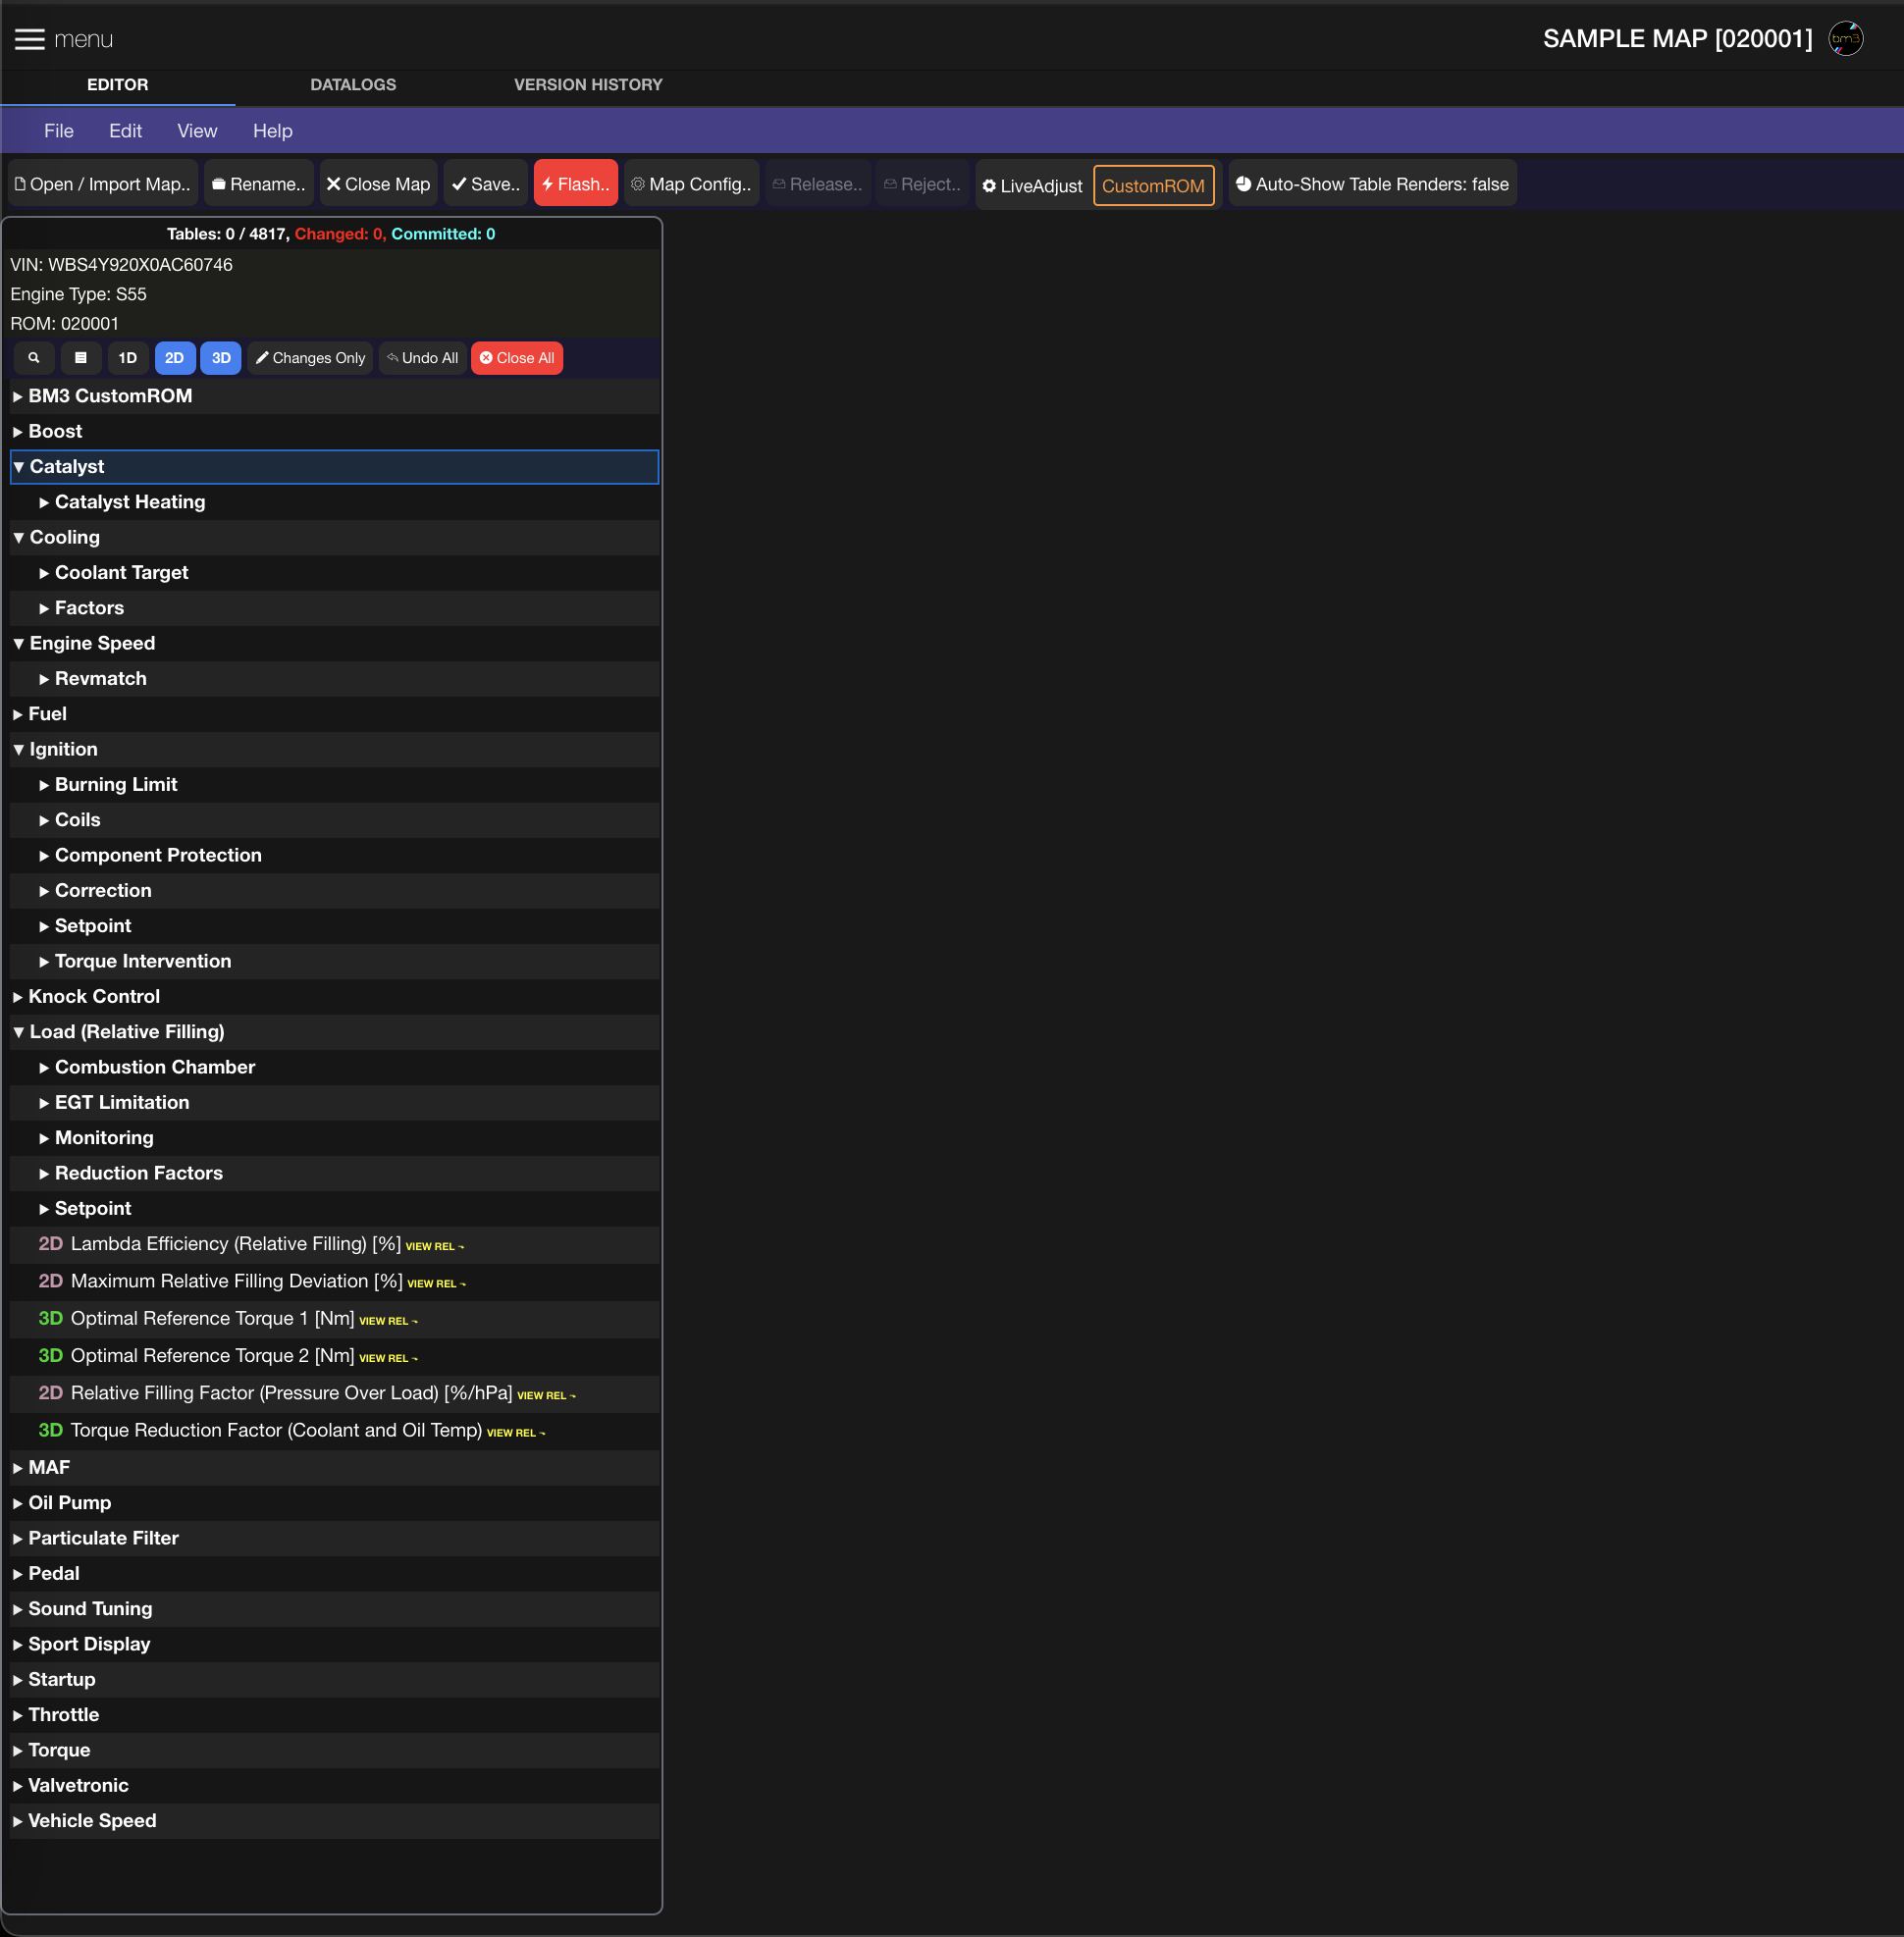
Table Tree shows all Core tables in their respective folders. Related tables show up by clicking on the ‘View Rel’ yellow link, on the right side of the Core table name:
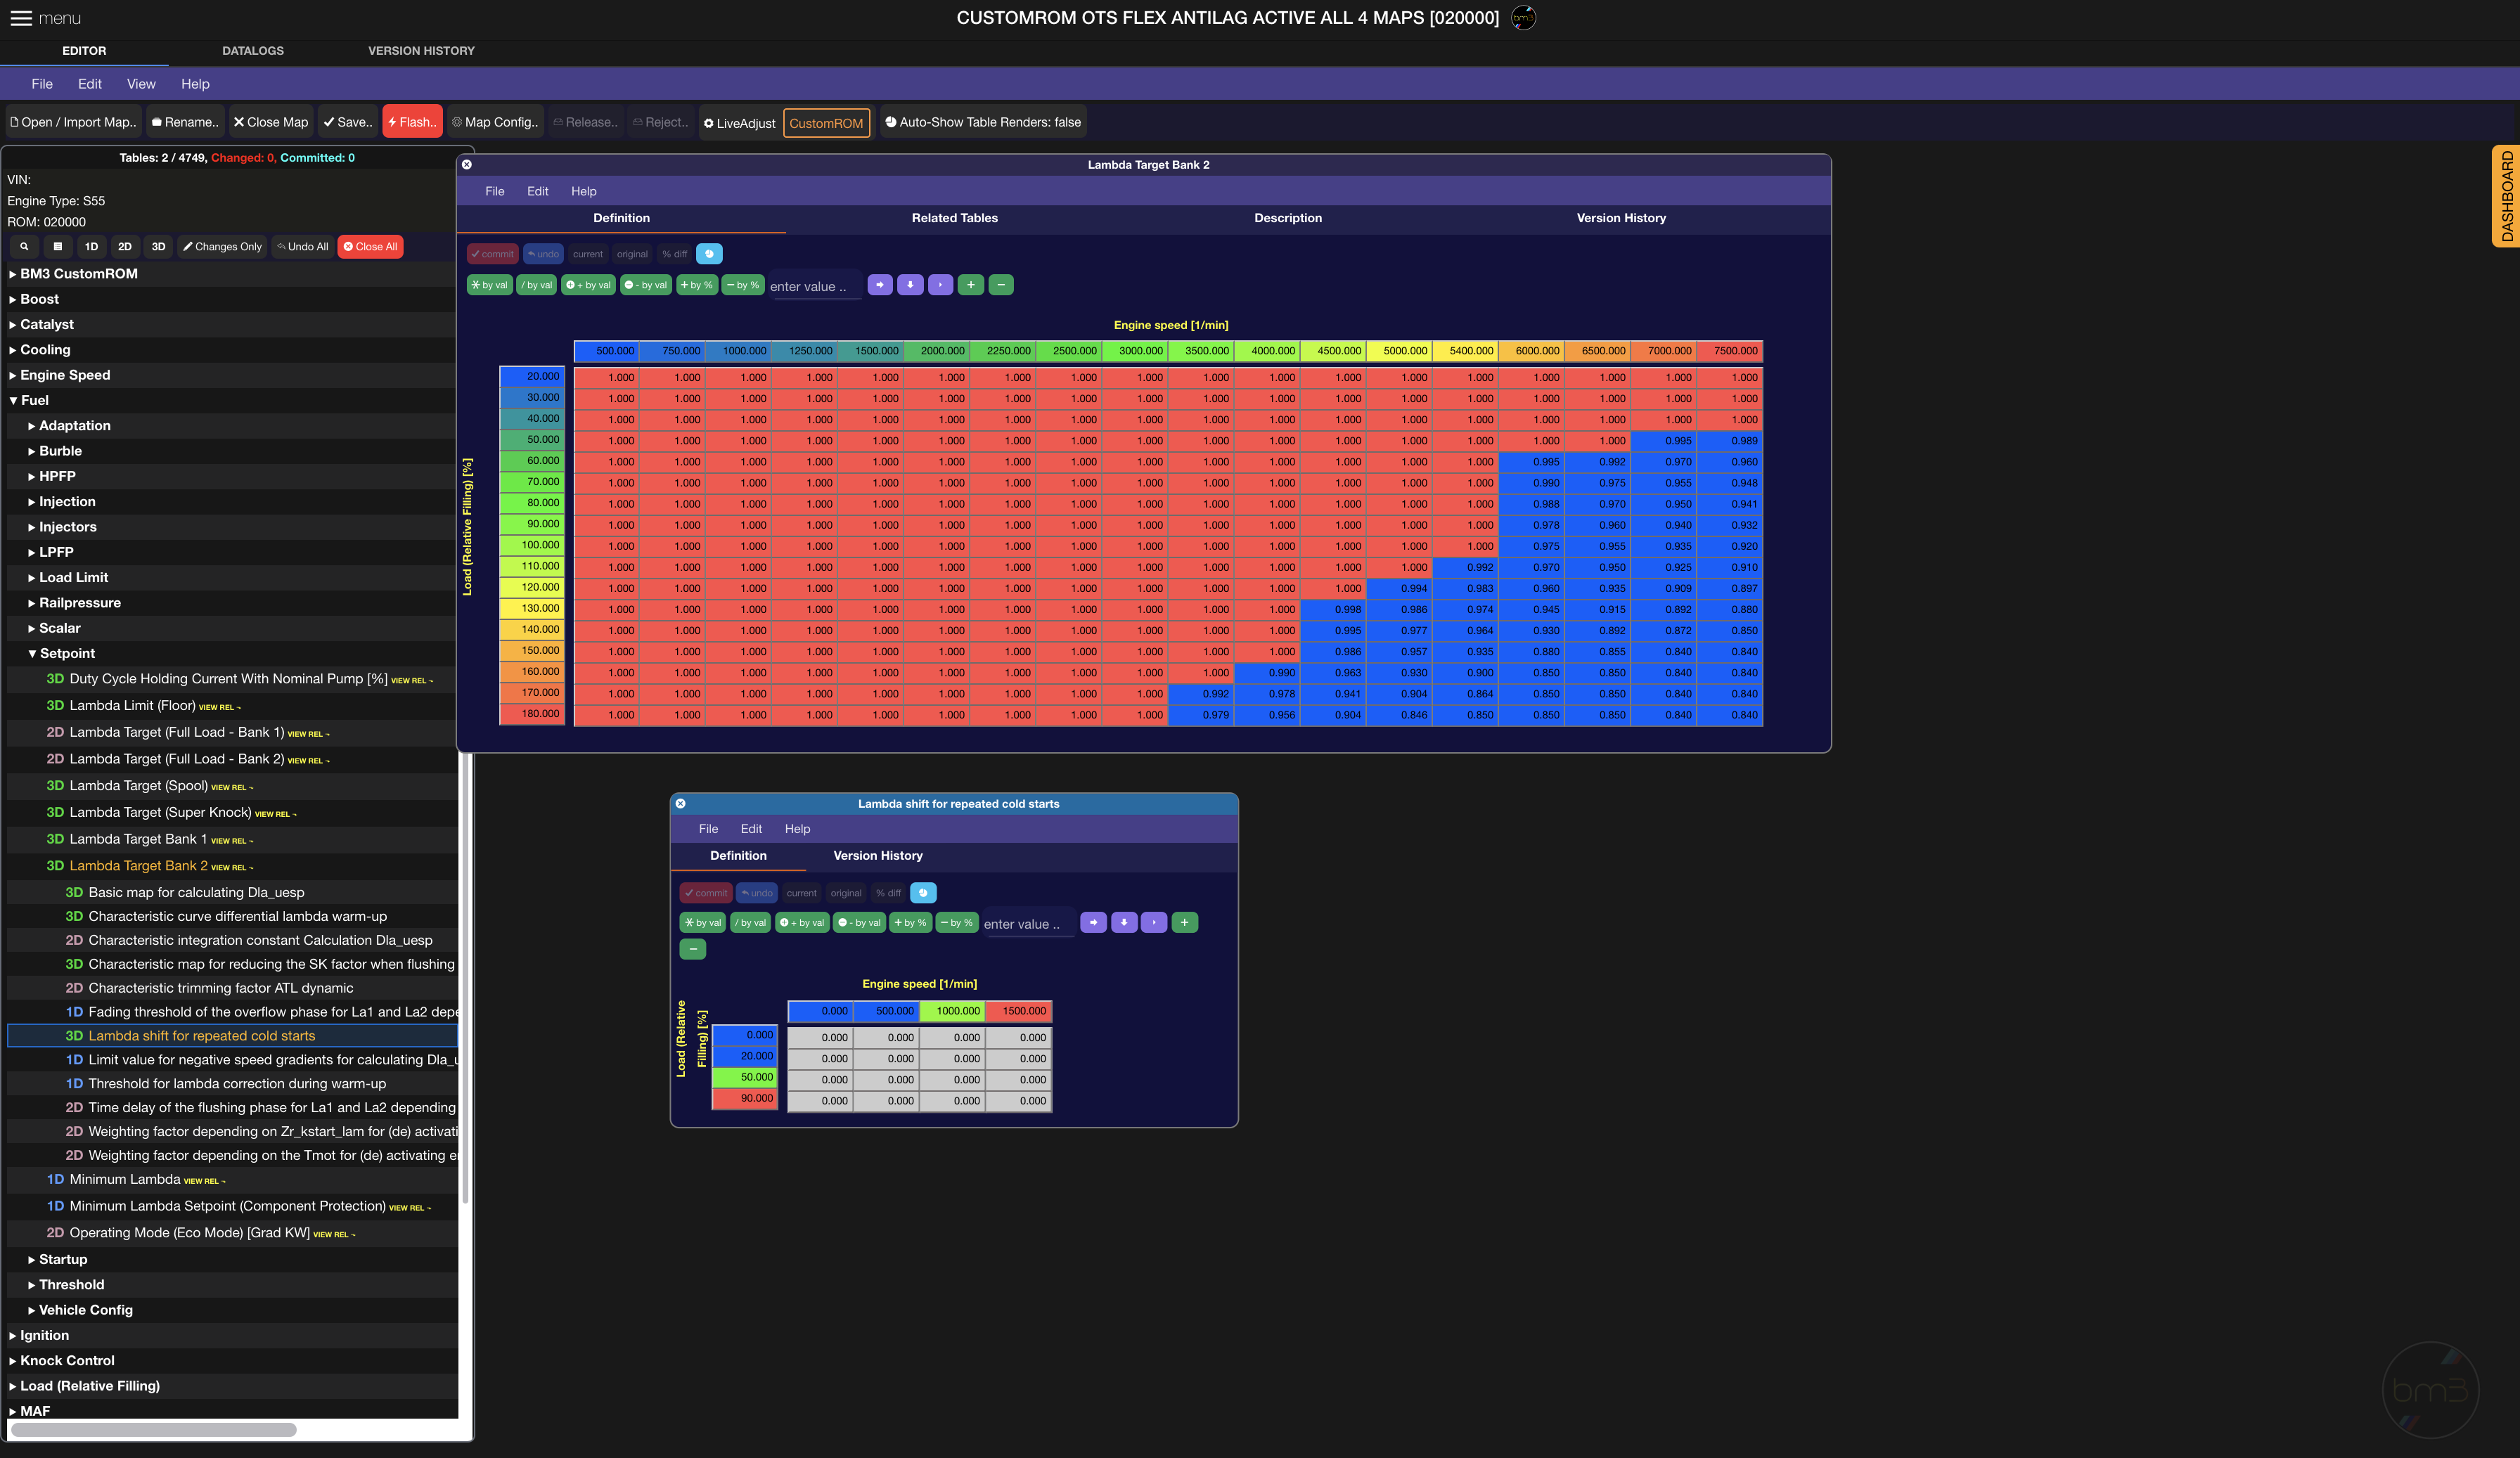
In this case the Lambda Target Bank 2 table is the Core table we opened. When clicking on the ‘View Rel’ there, we can see a set of Related tables show under it, and in this case we clicked on the Lambda Shift For Repeated Cold Starts ‘related’ table. Both Core and Related table chagnes are managed in version history.
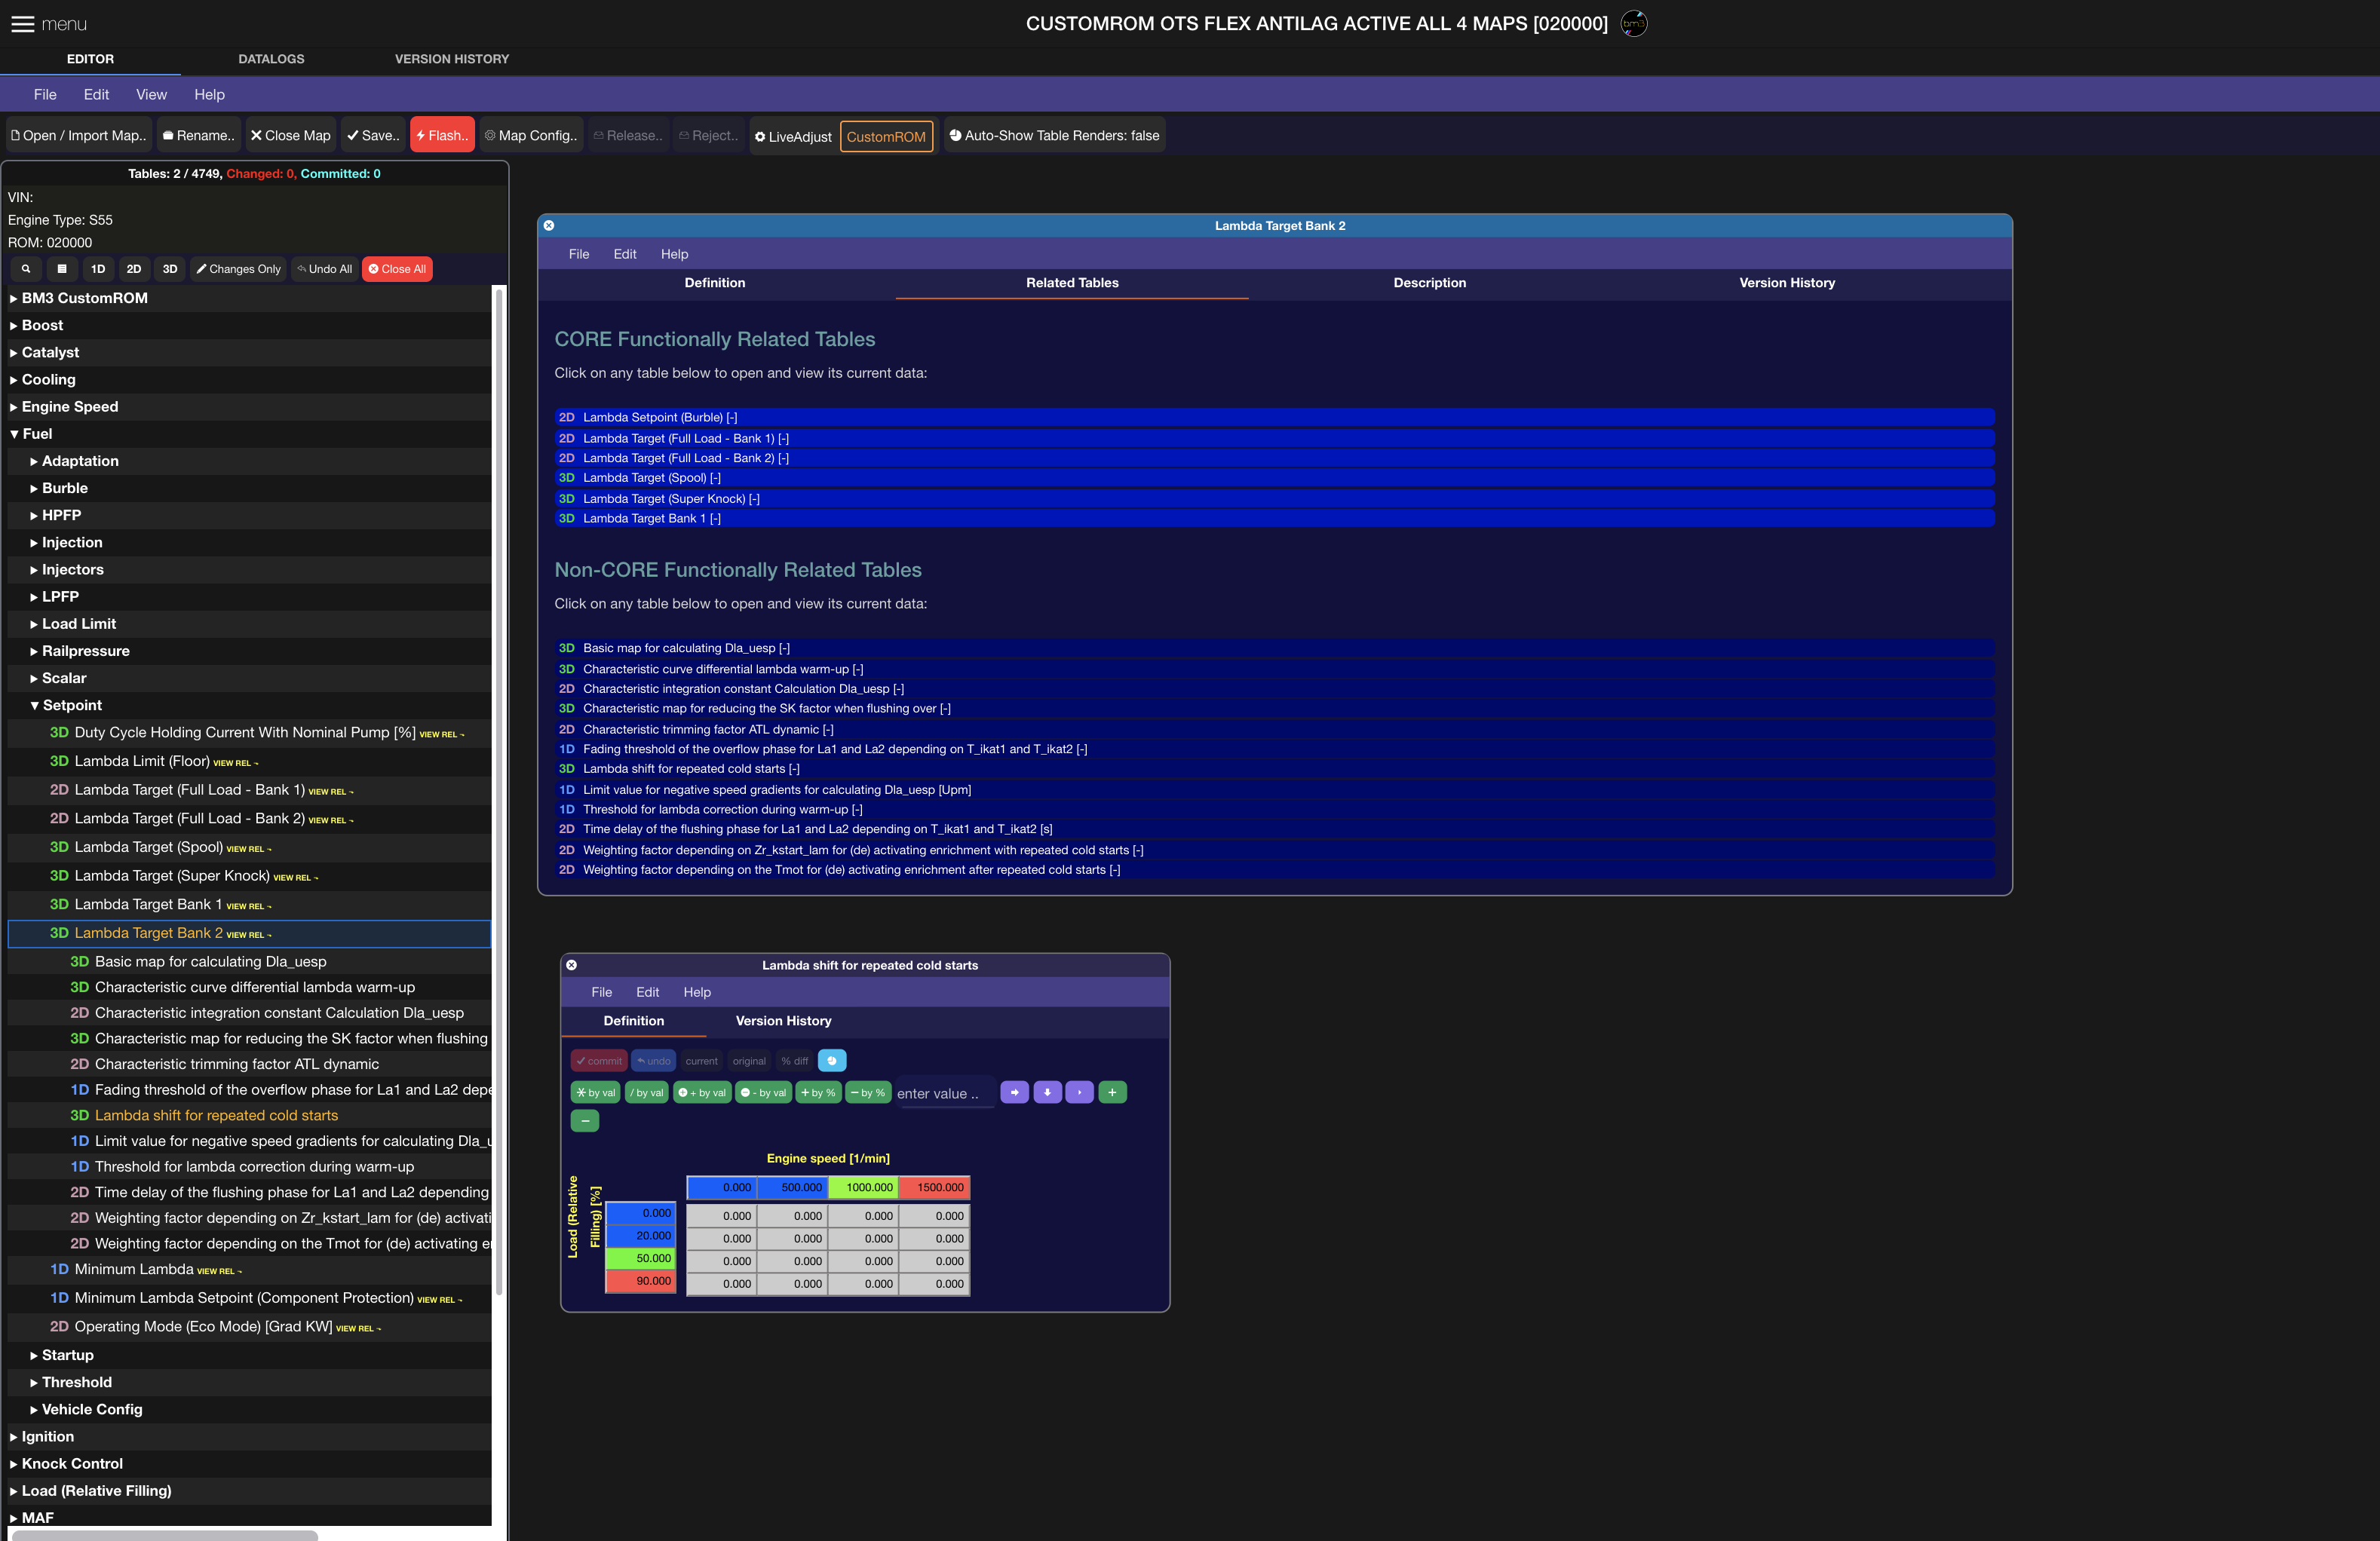
When clicking on the Related Tables tab on the Lambda Target Bank 2 table we can see an interactive view of its Related Tables here as well. Clicking on any table here will open it and make it available for editing:
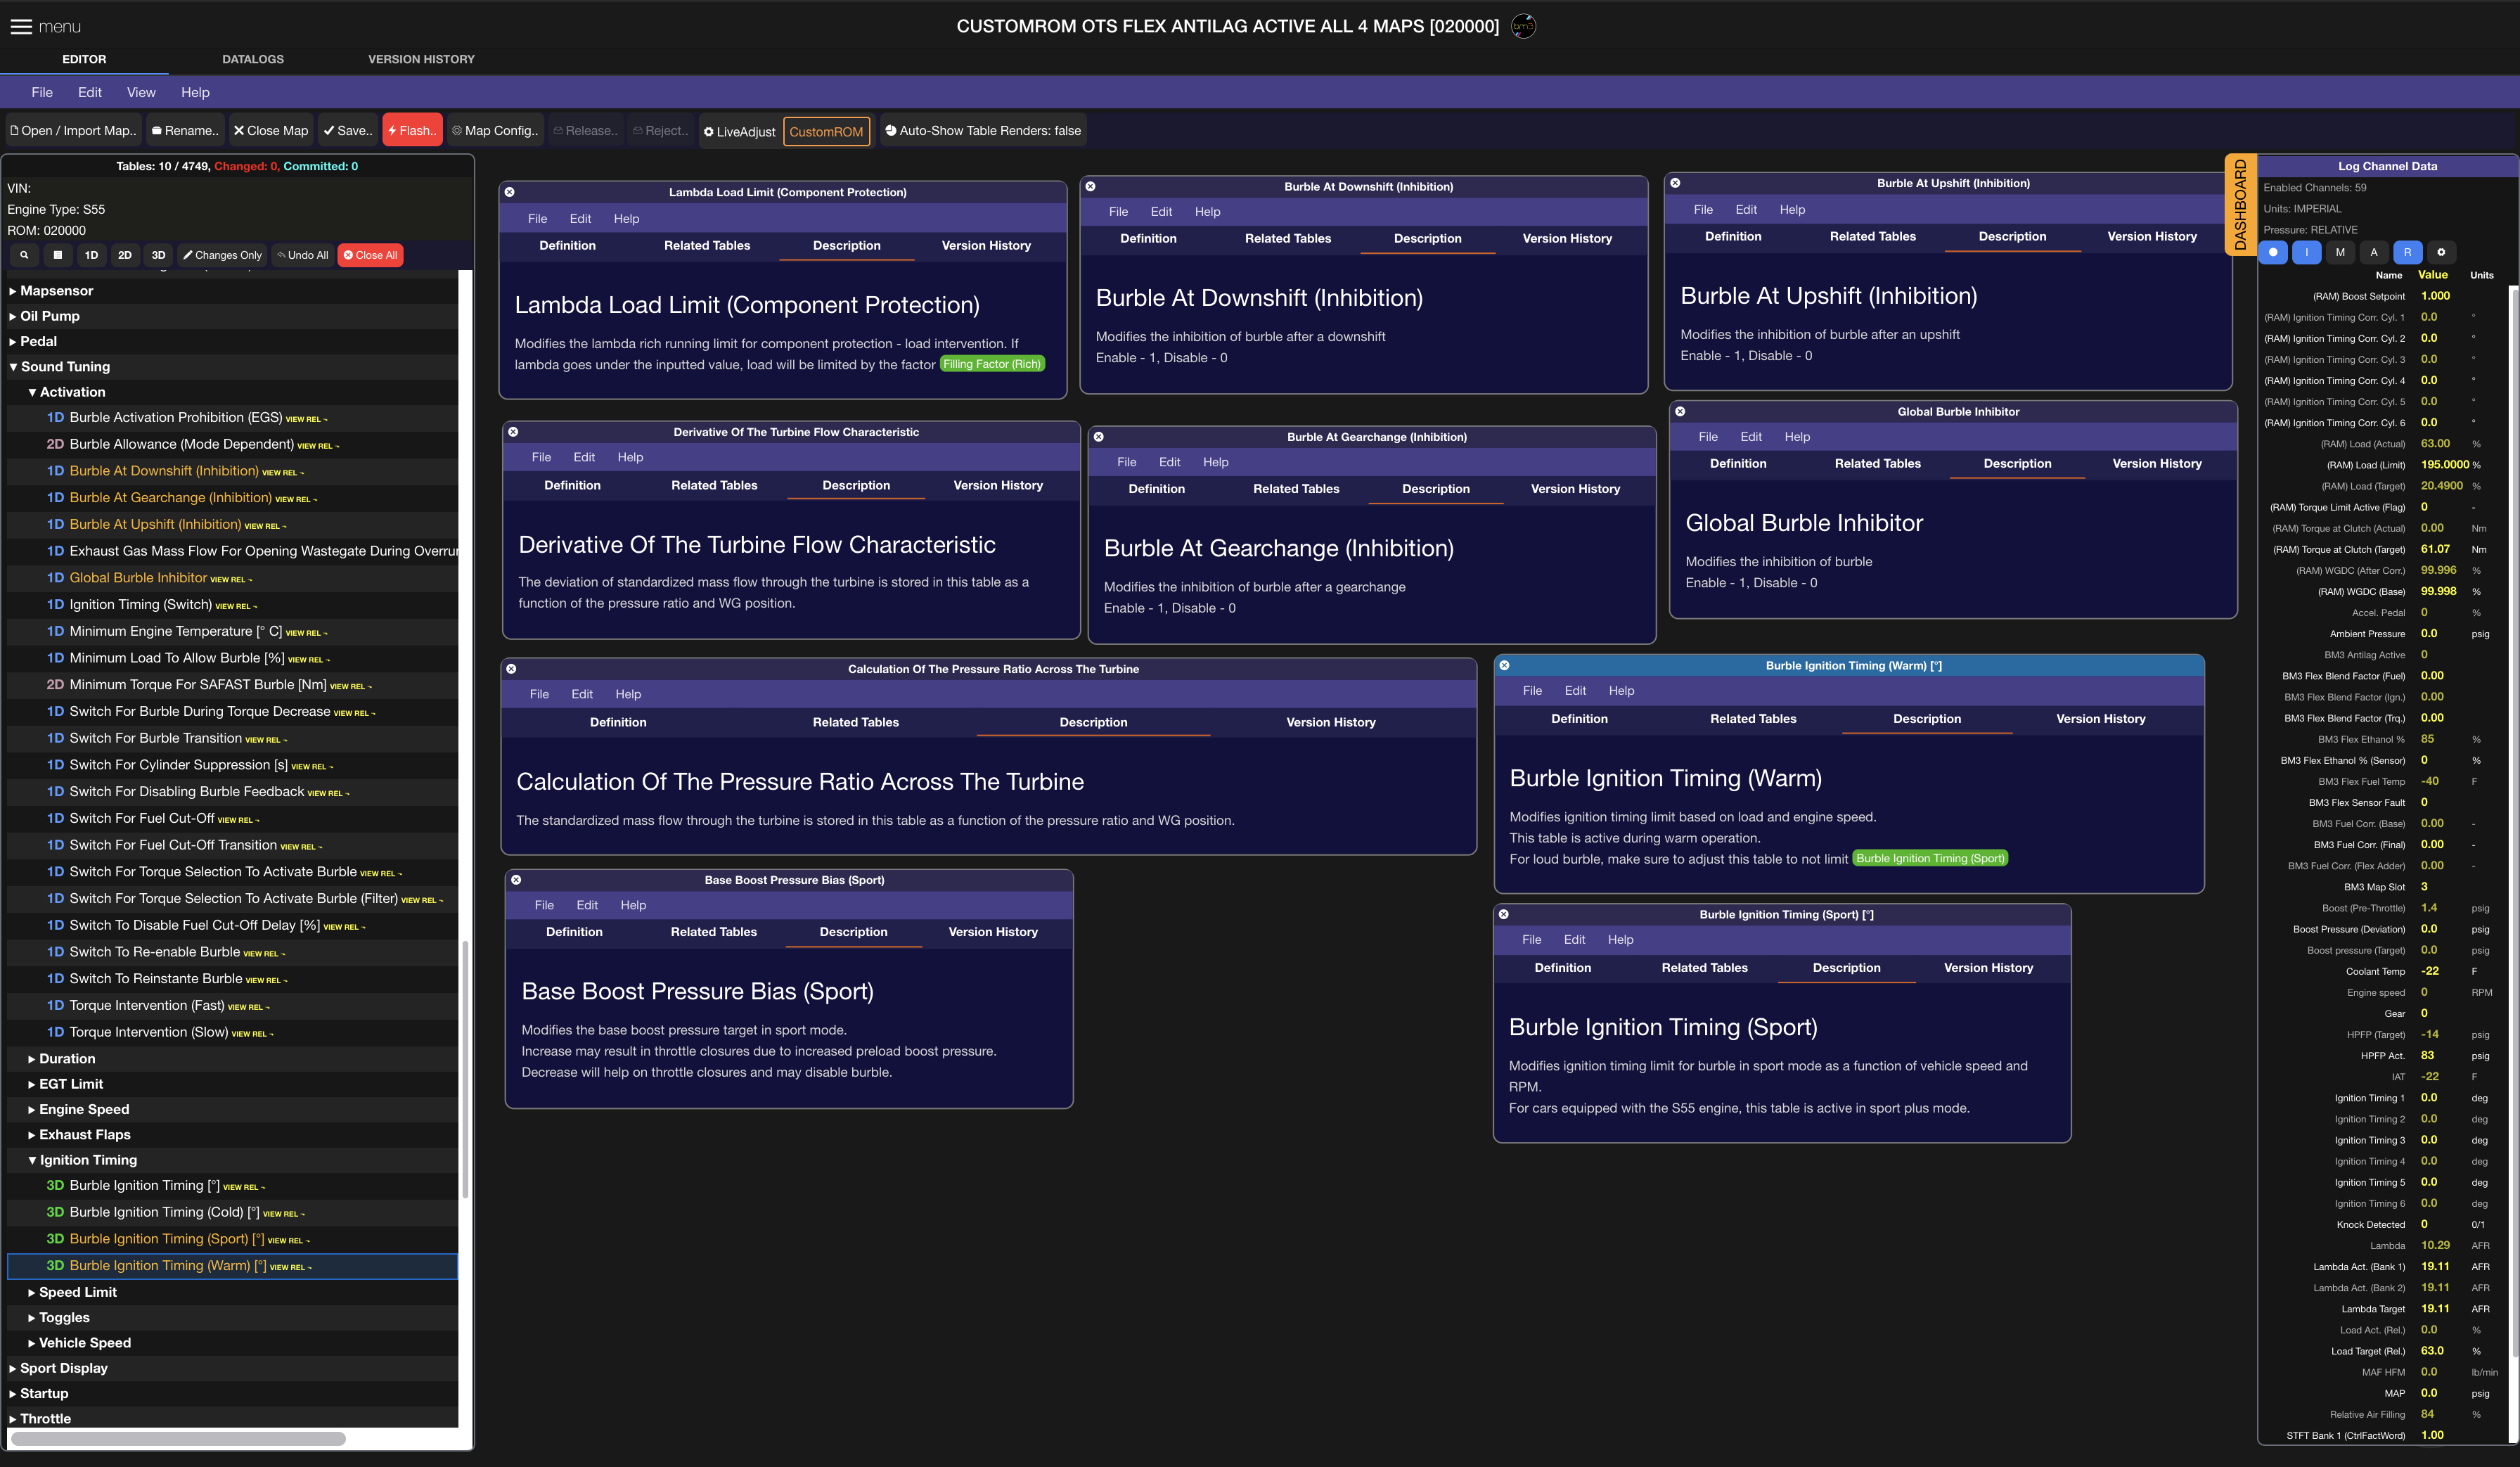
Clicking on the ‘Description’ tab in any Core table will show a brief description on its function. Any tables requiring description to be expanded can be requested through the Help menu in the map editor.
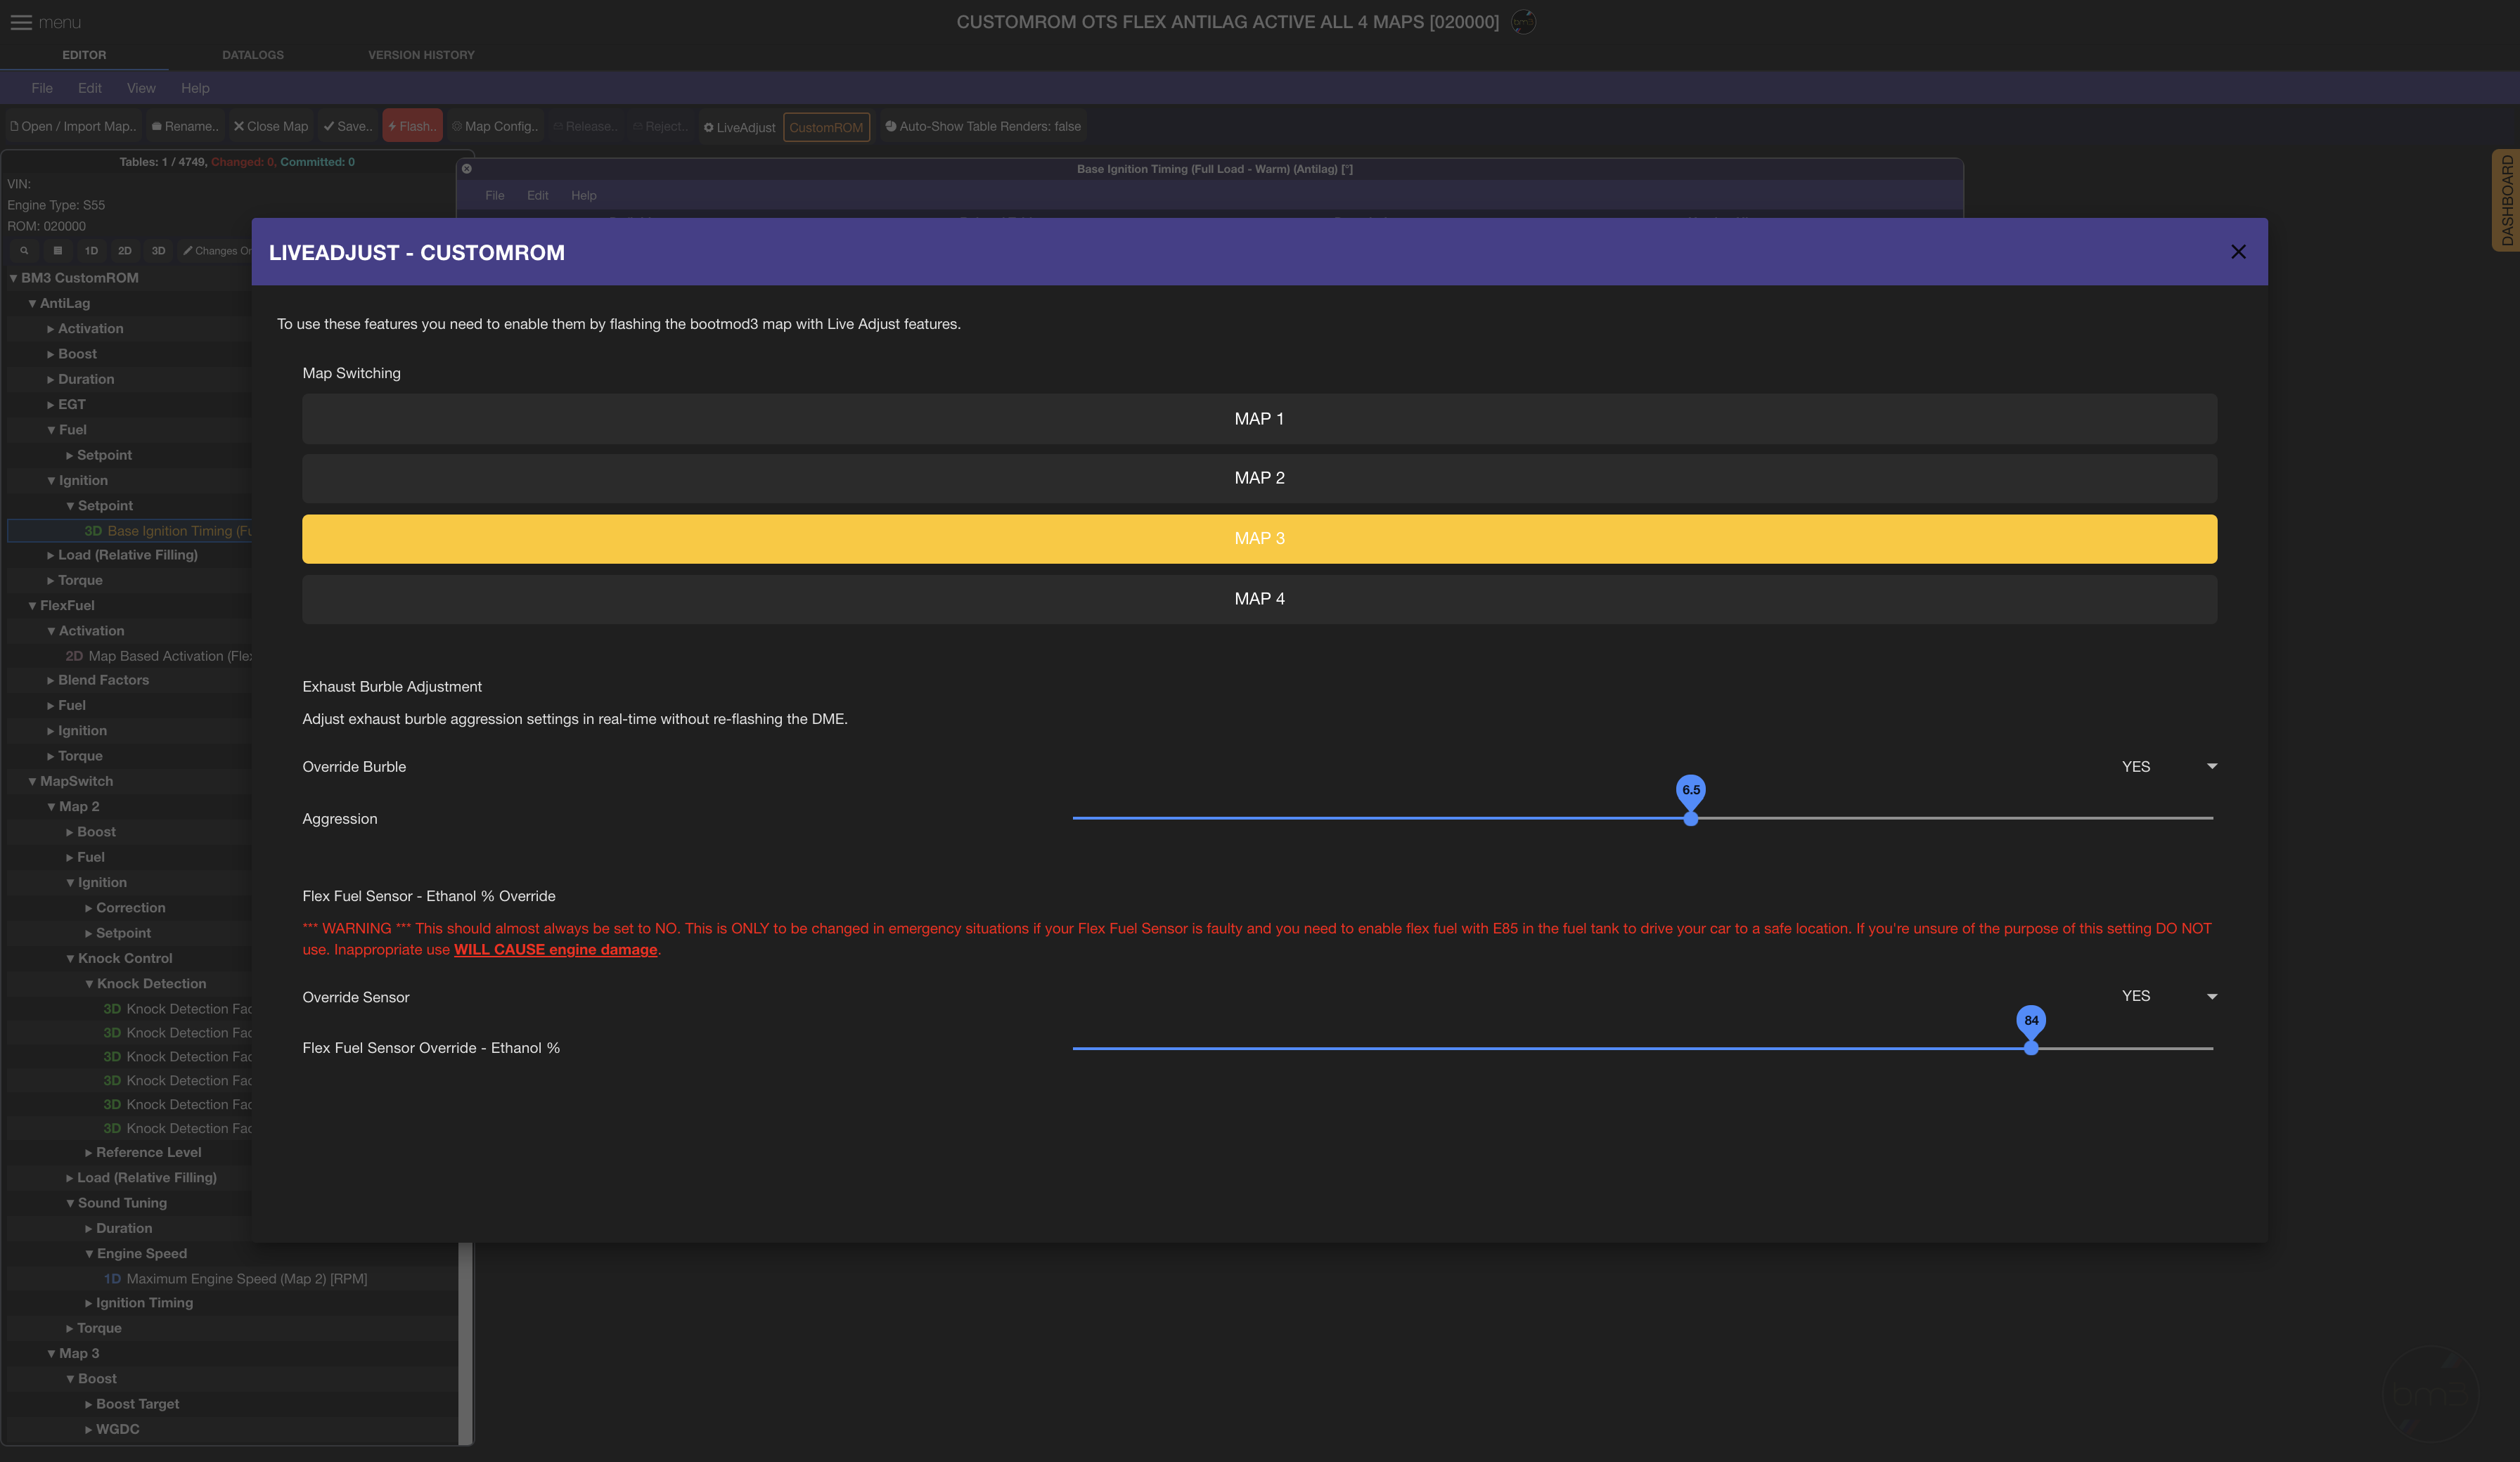
For ‘CustomROM’ enabled cars, with vehicle connected, you can use the LiveAdjust button to bring up the screen inside the editor to test live adjustments and any overrides in the screen:
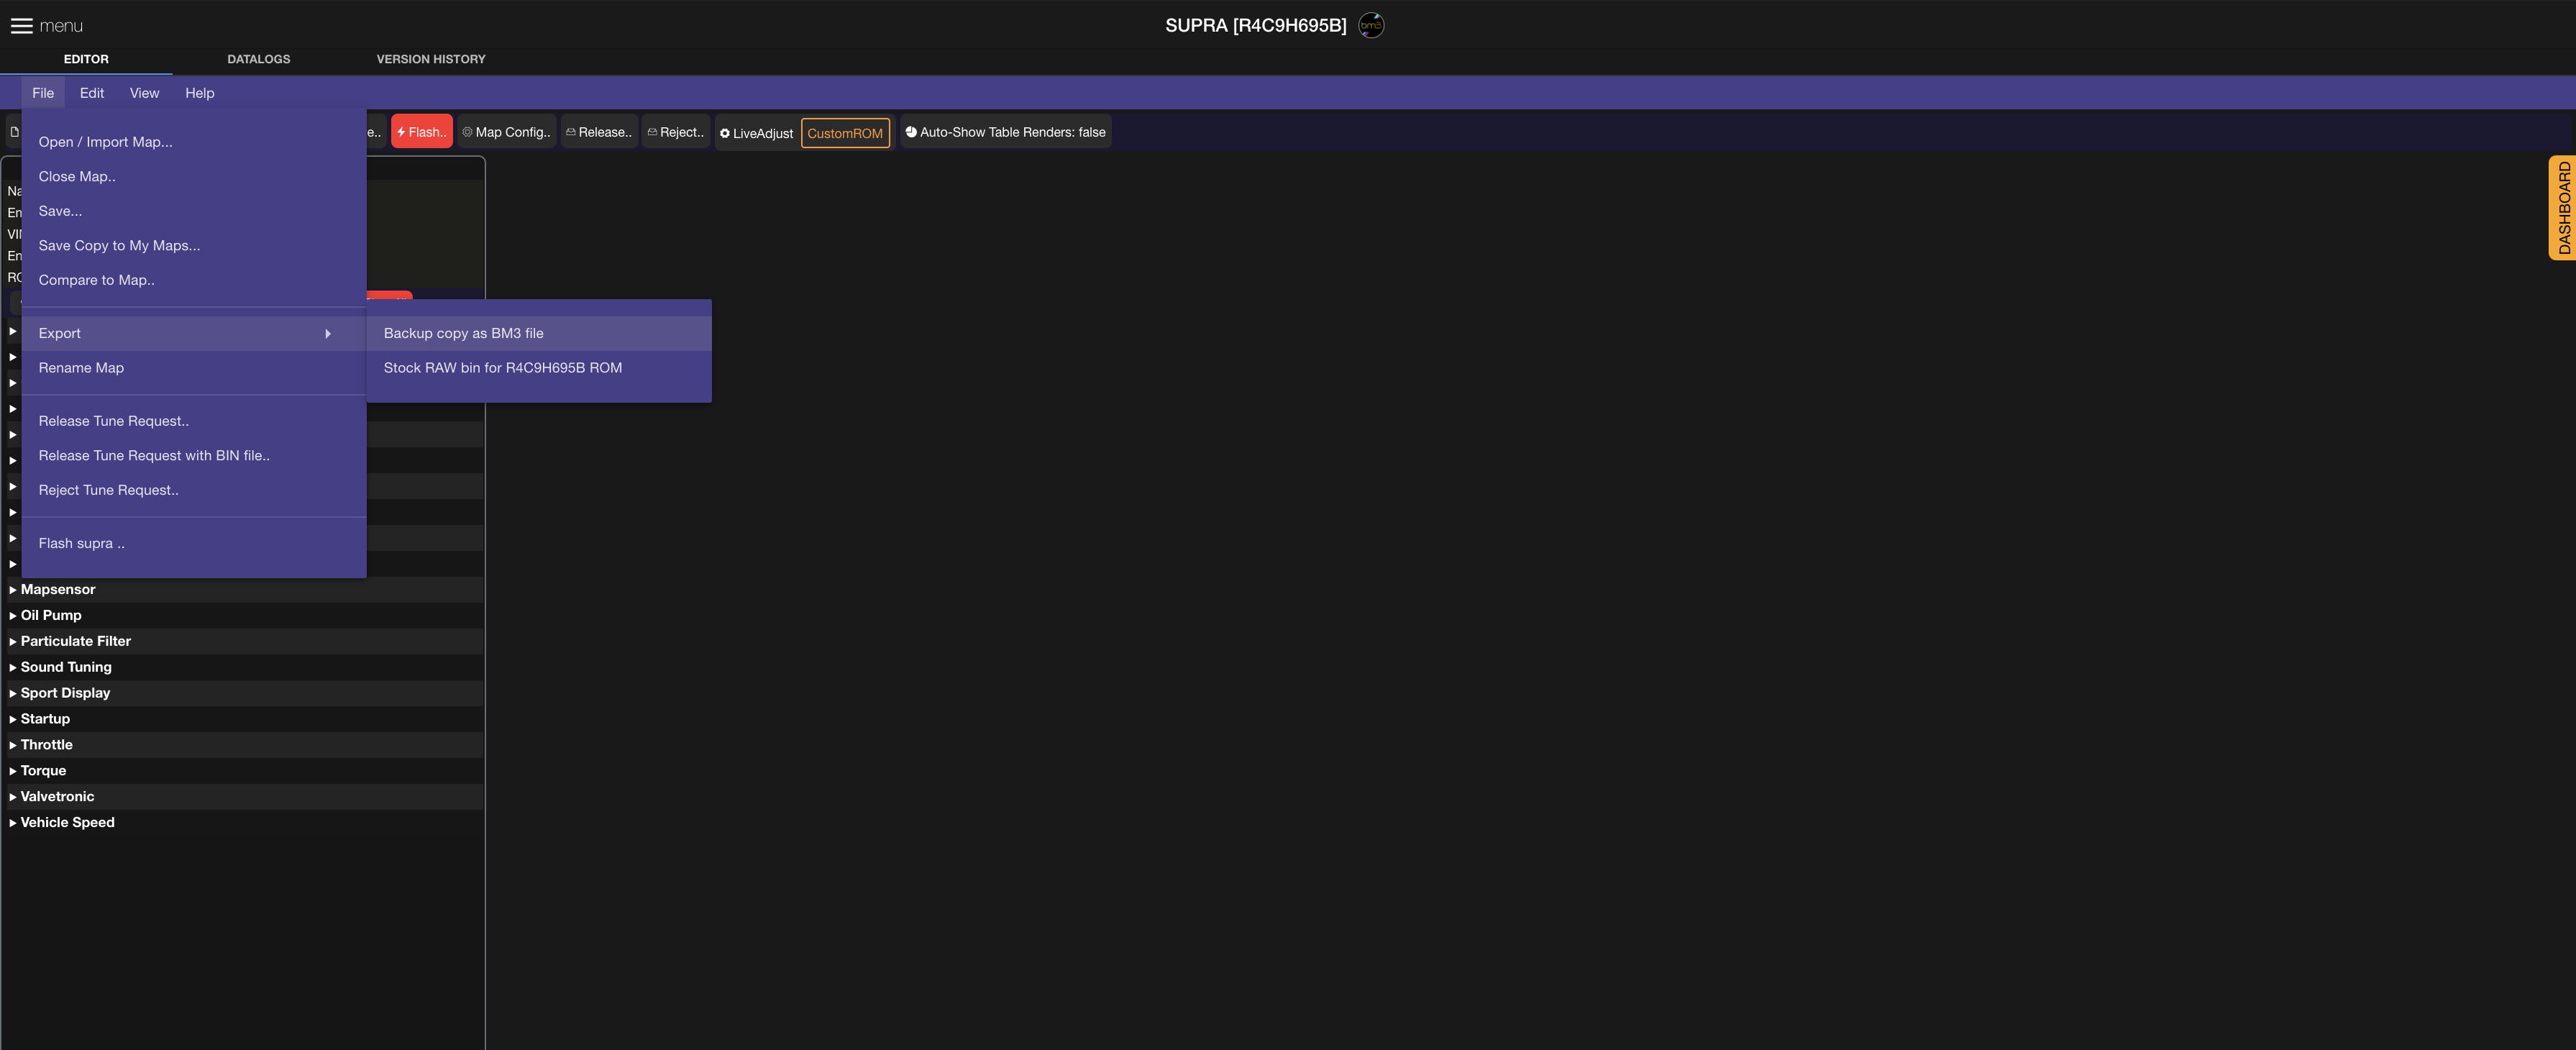
All maps can be exported in encrypted .bm3 format for backup offline. Editor also provides a way to export stock raw virtual read BIN files if required:
Map Configuration is accessible from the Map Editor for any maps and tune requests and can be set up by tuners on behalf of their customers for seamless end to end setup of the map before hand over to the customer for flashing when working remotely:
